
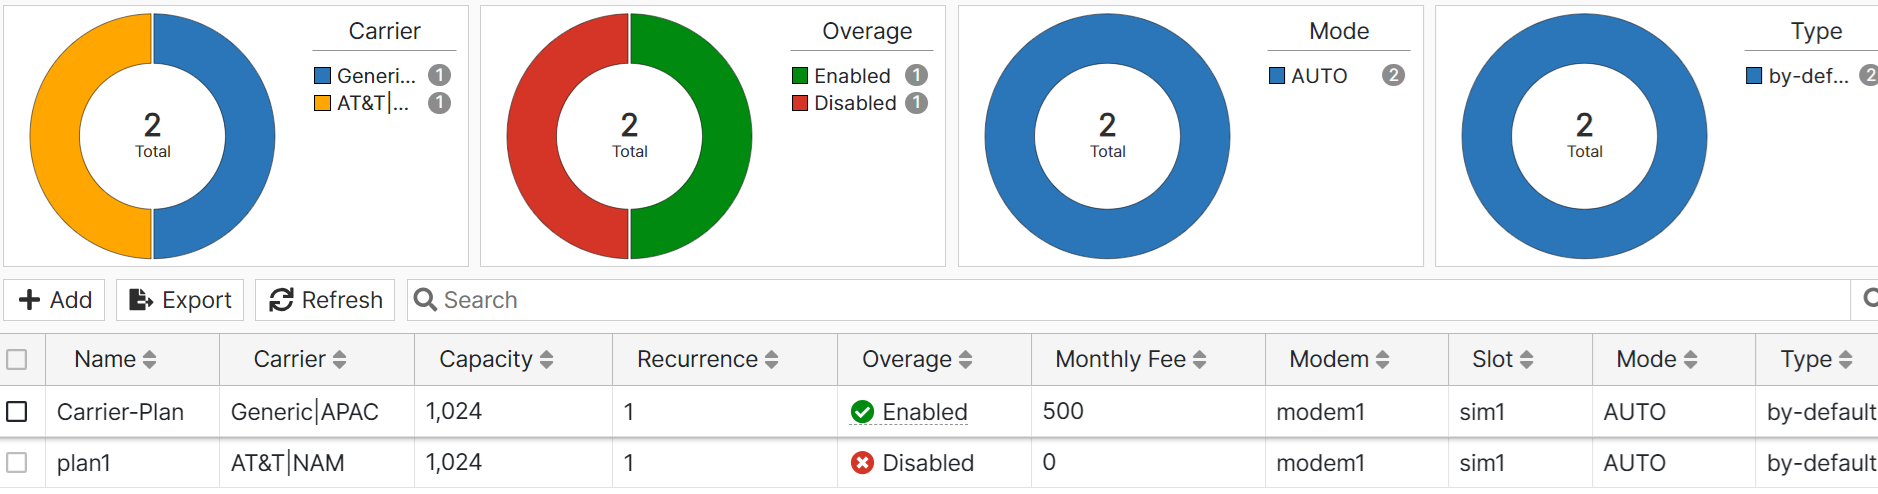
Carrier Plans
A carrier plan refers to a service plan that you have signed up or subscribed from a mobile phone service provider or carrier. It identifies your mobile phone service provider, and contains information such as your allowed data usage and billing cycle. The FortiEdge Cloud lets you create carrier plans to specify your data provider and the limits of your data plan, and apply them to profiles and individual devices. The carrier plan page displays information about each plan's carrier company, data capacity, as well as the plan fee and billing date. You can export this information in a CSV file. You can also see which plans have permission to exceed your allotted data limits.
Pre-requisite
Before creating your carrier plan, you must have the following information ready.
- The name of your carrier or data provider
- Your Access Point Name (APN)
- Your authentication type (None, CHAP, PAP)
- Your plan's billing date
- Your plan's total capacity (in MB)
- If your plan is an individual plan or a pooled plan
- Your plan's overage limits (if any)
- Your plan's security mode (NAT or IP PASS)
-
Navigate to Plans > Carrier and click Add.
-
Configure the following settings
-
Field Name
Description
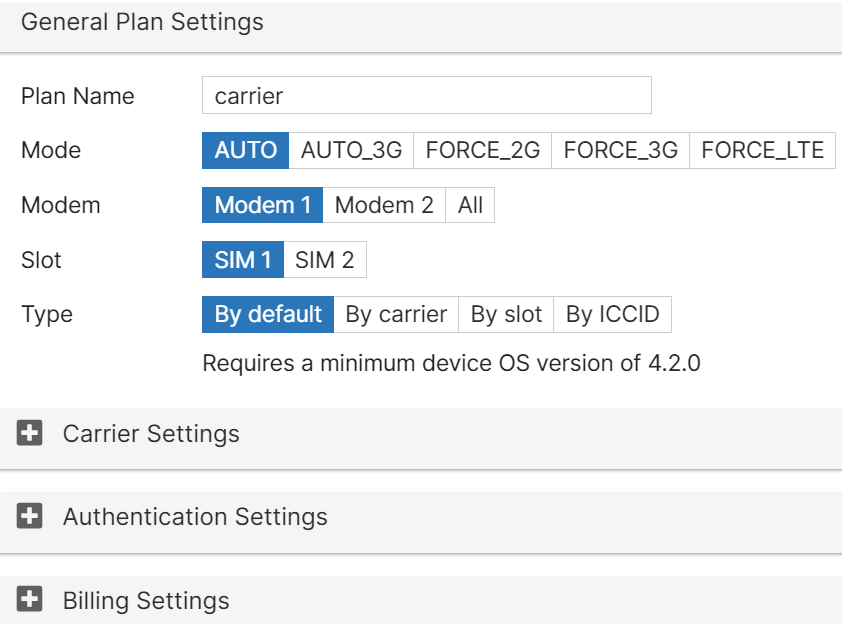
General Plan Settings Plan Name Enter a name for the carrier plan. Mode Select how your modem chooses a wireless network standard.
-
AUTO — Automatically select the wireless network standard.
-
AUTO_3G — Automatically select the wireless network standard with 3G having the highest priority.
-
FORCE_2G — Select the 2G wireless network standard.
-
FORCE_3G — Select the 3G wireless network standard.
-
FORCE_LTE — Select the LTE wireless network standard.
Modem
Select which modems on the device that this plan will be associated with.
Slot
Select which SIM slot you want to apply the plan to.
Type
Select how a plan applies configurations to a SIM.
-
By-default — This plan will apply to any SIM card inserted.
-
By-carrier — This plan will apply to the SIM card with the plan's specified carrier.
-
By-slot — This plan will apply to the SIM inserted the plan's specified slot.
-
By-ICCID— This plan will apply to the SIM card with the provided ICCID.
Note: Assigning a type only applies to devices running OS 4.2.0 and later.
Carrier Settings
Type
Select a carrier setting type.
-
Built-In — Select from a list of commonly used mobile phone service carriers.
-
Customized — Lets you add your own carrier.
To add your own carrier, click + Add and complete the fields. You can view all your customized carriers from the Customized Carrier page (see Managing Customized Carriers).
Region
Select the region where your device is to be deployed.
Carrier
If you selected the Built-In type, select your carrier. If you do not find your carrier, you can select Generic.
Authentication Settings
APN
Enter the Access Point Name of your plan.
Type
Select your plan's authentication type.
-
None — No authentication required.
-
CHAP — Challenge-Handshake Authentication Protocol.
-
If you select Specify Credential, enter the Username and Password for APN access.
-
If you select Use Credential Plan, choose an existing credential plan from the drop-down.
-
-
PAP — Password Authentication Protocol, authenticated with a static user name and password combination.
-
If you select Specify Credential, enter the Username and Password for APN access.
-
If you select Use Credential Plan, choose an existing credential plan from the drop-down.
-
Username
Enter your username.
Note: This field is only enabled if you have CHAP or PAP authentication selected.
Password
Enter your authentication password.
Note: This field is only enabled if you have CHAP or PAP authentication selected.
Billing Settings
Billing Date
Enter the plan's monthly billing date.
Pooled
Enable if your plan is a group plan.
Monthly Fee
Enter how much the plan costs per month.
Overage
Enable if you want to allow your plan to exceed its data usage limit.
Note: Enabling the overage function prevents smart switch from automatically switching to the secondary SIM card after the first card hits its data limit.
Auto Switch
Capacity
Enter your plan's data capacity in MB.
Signal Threshold
Enter a threshold for an allowable RSSI value. If the RSSI value drops below this amount for a specified time period, this can trigger automatic SIM switching.
Signal Period
Enter the allowable length of time in seconds in which an RSSI value can drop below the specified threshold. If the RSSI value is below the threshold for more than this time period, this can trigger automatic SIM switching.
-
After you create a carrier plan, you can view the plan's configurations, modify them as required, delete, or clone them. Select a plan and click Edit, Clone, or Delete for any of these operations. If you clone a plan, specify a unique name for the new plan. You can export you carrier plans in a CSV file.
Notes:
-
Modifying a carrier plan causes the devices associated with it to reboot.
-
You cannot delete carrier plans that are associated with a device or profile. You must first re-assign each device or profile to a new plan before you can delete the old plan.