


Protection from Botnet C&C attacks
This recipe uses a new FortiGuard feature: the Botnet C&C (command and control) database to protect your network from Botnet C&C attacks.
For this recipe, you will create a new DNS Filter Profile called Botnet&Facebook, block access to all known C&C addresses, and block access to the Social Networking FortiGuard category. In addition, you will enhance this with a Static Domain Filter in order to block access to www.facebook.com, and all of its affiliated subdomains.
For this recipe to work, your device must be licensed for the FortiGuard Web Filtering service. If you are using FortiOS 5.4.0 or 5.4.1, DNS filtering is only available when Inspection Mode is Proxy-based.

1. Enabling the DNS Filter Security Feature
Go to System > Feature Select, and enable DNS Filter under Security Features. Select Apply.

2. Creating the DNS Filter Profile and enabling Botnet C&C database
Go to Security Profiles > DNS Filter, and create a new profile called Botnet&Facebook.
Right-click and block the Social Networking category from the FortiGuard category based filter table.
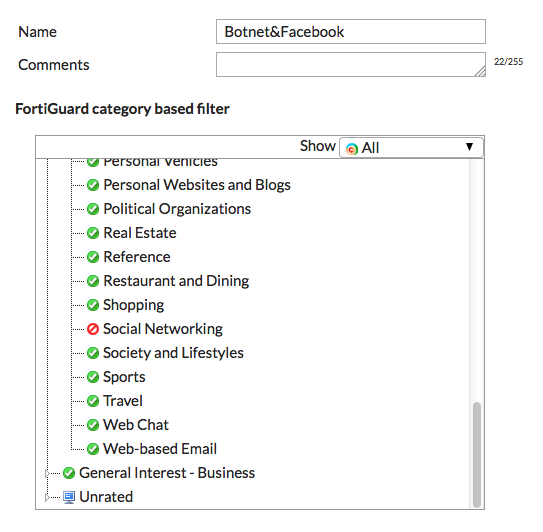
Under Options, enable Block DNS requests to known botnet C&C.

3. Configuring Static Domain Filter in DNS Filter Profile
In the DNS Filter Profile, enable Domain Filter under Static Domain Filter. You will now be able to add domains of your choosing.
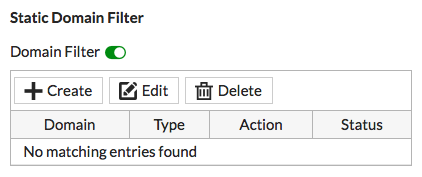
Select Create and enter *.facebook.com.
Set Type to Wildcard, and set Action to Block. Make sure Status is enabled. This will block access to Facebook, and all its other affiliated subdomains.

4. Creating a DNS Filtering firewall policy
Go to Policy & Objects > IPv4 Policy, and create a firewall policy that allows Internet access.
Set Incoming Interface to the internal interface and set Outgoing Interface to the external interface.
Set Source to all and set Destination Address to all.
Set Schedule to always, set Services to ALL, and make sure NAT is enabled.
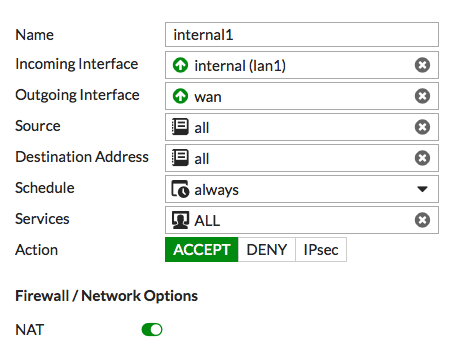
Under Security Profiles, enable DNS Filter and select the Botnet&Facebook DNS Filter profile — this will automatically enable Proxy Options.

5. Results
To confirm that the DNS Filter Profile has been added, go to Policy & Objects > IPv4 Policy. The policy will now have the DNS filter icon in the Security Profiles column.

To confirm that the filter is working correctly, open a browser and attempt to browse to www.facebook.com. The DNS request will be blocked.

To confirm that the known Botnet C&C feature is working correctly, browse to a known Botnet site — the example is nateve.us. Again, the DNS request will be blocked.
Note that the blocked pages may look different on other web browsers.

