


Sandboxing with FortiSandbox and FortiClient
In this recipe, you will set up sandboxing to send suspicious files to a FortiSandbox Appliance for further inspection. The FortiSandbox scans for threats that can get past other detection methods, using Windows virtual machines (VMs) to test suspicious files in isolation from your network.
You will also configure your FortiGate to automatically receive signature updates from FortiSandbox and add the originating URL of any malicious file to a blocked URL list. Finally, you will configure FortiClient to use extended scanning that includes FortiSandbox. This feature is currently only available in FortiClient 5.4 for Windows.
There was a change in the FortiClient security profile from FOS 5.4 to FOS 5.4.1. The VPN, Advanced and Mobile tabs do not appear in FOS versions 5.4.1 and above. Features emphasizing compliance of the endpoint devices have been added. These enhancements facilitate integration with the Cooperative Security Fabric (called “Security Fabric” in FOS 5.6). Read more in the What’s New for Security Profiles 5.4.1.

1. Connecting the FortiSandbox
Connect the FortiSandbox to your FortiGate as shown in the diagram, so that port 1 and port 3 on the FortiSandbox are on different subnets.
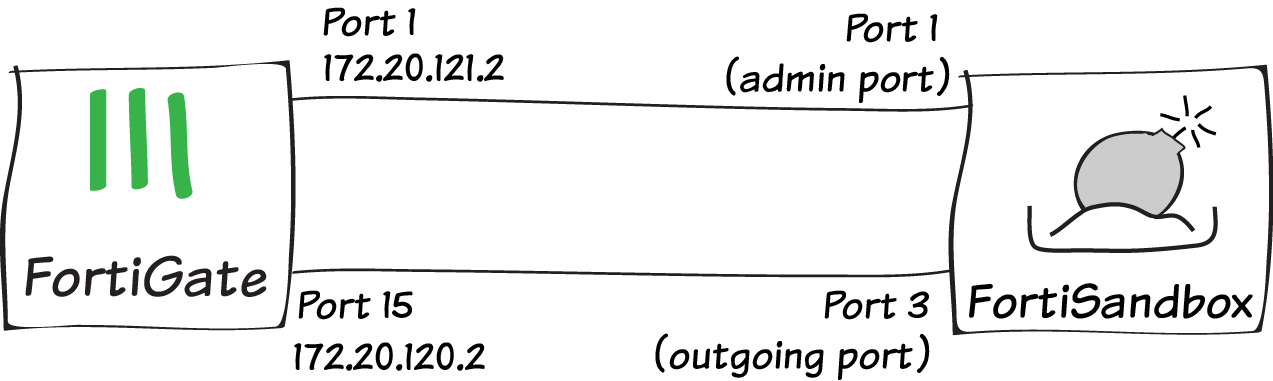
FortiSandbox port 3 is used for outgoing communication triggered by the execution of the files under analysis. It is recommended to connect this port to a dedicated interface on your FortiGate (in the example, port 15), to protect the rest of the network from threats currently being investigated by the FortiSandbox.
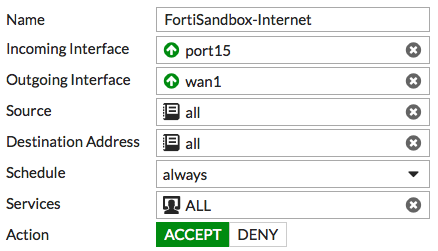
FortiSandbox port 3 must be able to connect to the Internet. On the FortiGate, go to Policy & Objects > IPv4 Policy and create a policy allowing connections from the FortiSandbox to the Internet (using the isolated interface on the FortiGate mentioned above).
On the FortiSandbox, go to System > Network > Static Routing and add static routes for both port 1 and port 3.
The static route for port 3 must have the Destination/IP Mask0.0.0.0/0.0.0.0, while port 1 is assigned the Destination/IP Mask for traffic in the local network.

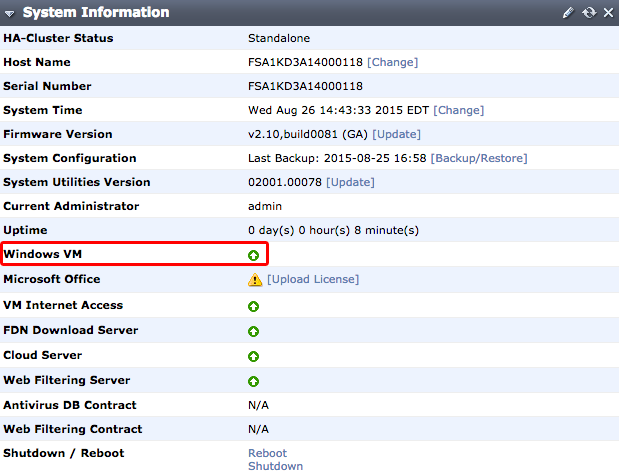
Once the FortiSandbox has access to the Internet through port 3, it will begin to activate its VM licenses.
Before continuing with this recipe, wait until a green arrow shows up beside Windows VM in the FortiSandbox’s System Information widget, found at System > Status. This indicates that the VM activation process is complete.
2. Enabling Sandbox Inspection
On the FortiGate, go to System > External Security Devices. Select Enable Sandbox Inspection and select FortiSandbox Appliance.
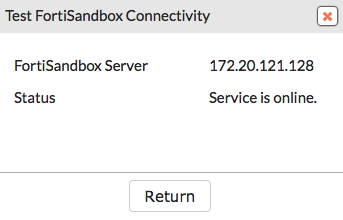
Set the IP Address (in the example, 172.20.121.128) and enter a Notifier Email, where notifications and reports will be sent.

If you select Test Connectivity, the Status shows as Service is not configured because the FortiGate has not been authorized to connect to the FortiSandbox.

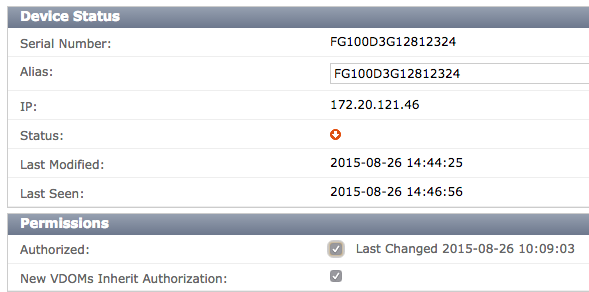
On the FortiSandbox, go to File-based Detection > File Input > Device. Edit the entry for the FortiGate.
Under Permissions, enable Authorized.
On the FortiGate, go to System > External Security Devices and for FortiSandbox select Test Connectivity. The Status now shows that Service is online.
3. Configuring sandboxing in the default AntiVirus profile
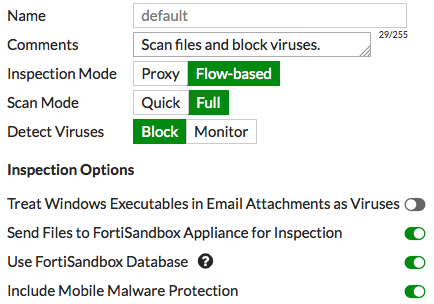
Go to Security Profiles > AntiVirus and edit the default profile.
Under Inspection Options, enable both Send Files to FortiSandbox Appliance for Inspection and Use FortiSandbox Database.
If FortiSandbox discovers a threat, it creates a signature for that file that is added to the FortiGate’s AntiVirus signature database.
4. Configuring sandboxing in the default Web Filter profile
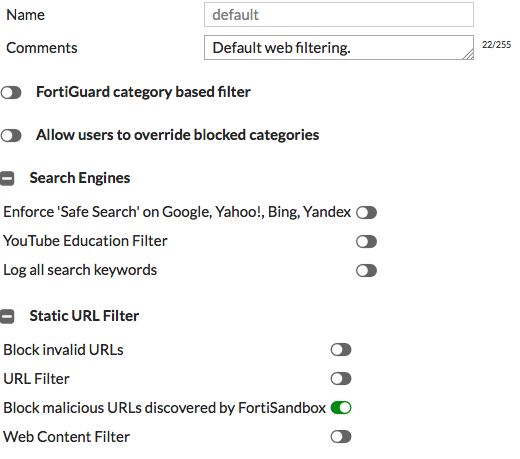
Go to Security Profiles > Web Filter and edit the default profile.
Under Static URL Filter, enable Block malicious URLS discovered by FortiSandbox.
If the FortiSandbox discovers a threat, the URL that threat came from will be added to the list of URLs that will be blocked by the FortiGate.
5. Configuring sandboxing in the default FortiClient profile
Go to Security Profiles > FortiClient Profiles and edit the default profile.
Under AntiVirus, enable Realtime Protection, then enable Scan Downloads, followed by Scan with FortiSandbox. Enter the IP of the FortiSandbox.
Decide if you want to wait for FortiSandbox results before sending files to the PC running FortiClient, or if you want downloaded files to be sent at the same time as they are being scanned by FortiSandbox.
Enable Use FortiSandbox signatures to make sure new virus signatures and blocked URLs from the FortiSandbox are added to FortiClient’s databases.

This profile will be pushed to any device running FortiClient that is registered to your FortiGate. These settings can also be configured from within FortiClient’s AntiVirus settings.
6. Applying AntiVirus and Web Filter scanning to network traffic
Go to Policy & Objects > IPv4 Policy and view the policy list. If a policy has AntiVirus and web filtering scanning applied, the profiles will be listed in the Security Profiles column.

If scanning needs to be added to any security policy (excluding the Implicit Deny policy) select the + button in the Security Profiles column for that policy, then select the default AntiVirus Profile, the default Web Filter Profile, the appropriate Proxy Options, and the deep-inspection profile for SSL Inspection Options (to ensure that encrypted traffic is inspected). Then select OK.

7. Results
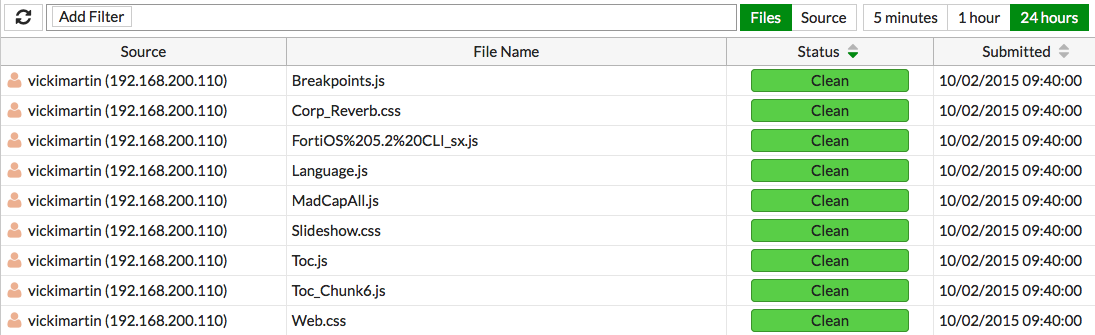
If your FortiGate discovers a suspicious file, it will now be sent to the FortiSandbox. To view information about the files that have been sent on the FortiGate, go to FortiView > FortiSandbox to see a list of file names and current status.
You can also view results on the FortiSandbox by going to System > Status and viewing the Scanning Statistics widget. There may be a delay before results appear on the FortiSandbox.

Open FortiClient using a Windows PC on the internal network. Make sure it is registered to your FortiGate.
Go to AntiVirus > Realtime Protection Enabled and edit the settings. You will see that the Realtime Protection settings match the FortiClient Profile configured on the FortiGate. These settings cannot be changed using FortiClient.

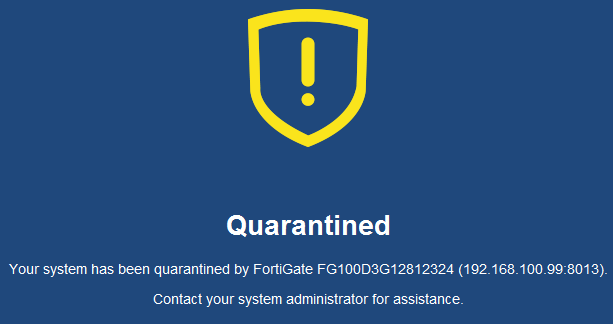
On the FortiGate, go to Monitor > FortiClient Monitor. Select the FortiClient device, then select Quarantine.

The PC is now quarantined by FortiClient and cannot connect to the Internet or other network devices.

A message appears in FortiClient, telling the user to contact the system administrator.
FortiClient cannot be shutdown on the PC. It can also not be uninstalled or unregistered from the FortiGate.
If a FortiClient device attempts to download a file that FortiSandbox discovers is malicious, the FortiSandbox notifies the FortiGate. The administrator can take action to quarantine the device. When a quarantine is in effect, FortiClient cuts off other network traffic from the device directly, preventing it from infecting or scanning the local network. When a device is under quarantine, FortiClient cannot be shutdown or uninstalled. A user is also unable to unregister from the FortiGate that quarantined them, or register to another FortiGate unit. A quarantine can only be lifted by the administrator of the FortiGate where the FortiClient device is registered.
