


Creating security policies
In this recipe, you will create and order multiple security policies in the policy table, to apply the appropriate policy to various types of network traffic.
In the example, three IPv4 policies will be configured:
- Internet: a policy allowing general Internet access to the LAN
- Mobile: a policy allowing Internet access while applying web filtering for mobile devices. In this example, a wireless network has already been configured that is in the same subnet as the wired LAN.
- Admin: a policy allowing the system administrator's PC (named SysAdminPC) to have full access
A fourth policy, the default Implicit Deny policy, will also be used.

1. Configuring the Internet policy
Go to Policy & Objects > IPv4 Policy and edit the policy allowing outgoing traffic. Set Name to Internet.
Set Service to HTTP, HTTPS, and DNS.
Ensure that you have enabled NAT. In order to view the results later, enable Log Allowed Traffic and select All Sessions.

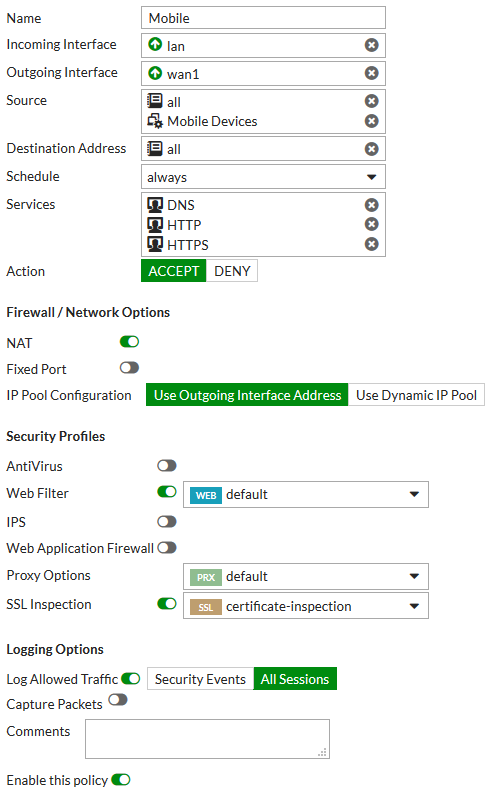
2. Creating the Mobile policy
Go to Policy & Objects > IPv4 Policy and create a new policy. Set Name to Mobile.
Set Incoming Interface to lan, Source Device Type to Mobile Devices (a custom device group that includes tablets and mobile phones), Outgoing Interface to your Internet-facing interface, and Service to HTTP, HTTPS, and DNS. Using a device group will automatically enable device identification on the lan interface.
Enable NAT.
Under Security Profiles, enable Web Filter and set it to use the default profile. Enable SSL Inspection and and set it to certificate-inspection to allow HTTPS traffic to be inspected. Doing this will enable Proxy Options; set that to use the default profile.
Enable Log Allowed Traffic and select All Sessions.
3. Defining SysAdminPC
Go to User & Device > Custom Devices & Groups and create a new device. This will identify the system administrator's PC.
Select an appropriate Alias, then set the MAC Address. Set the appropriate Device Type.

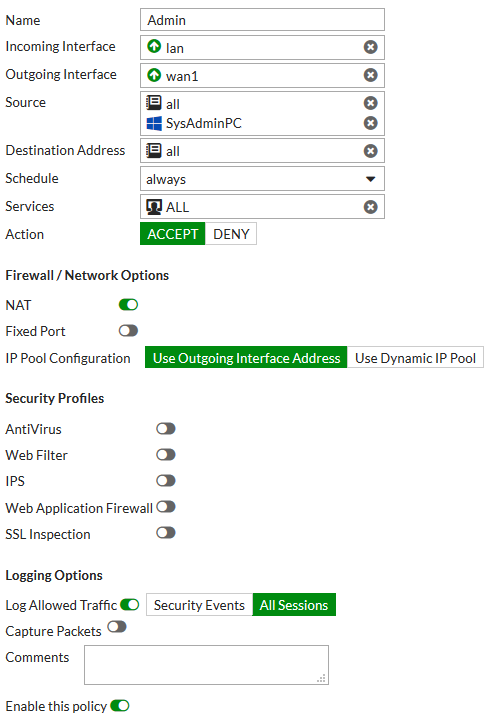
4. Creating the Admin policy
Go to Policy & Objects > IPv4 Policy and create a new policy. Set Name to Admin.
Set Incoming Interface to lan. Select Source and set Address to all and Device to SysAdminPC. Set Outgoing Interface to your Internet-facing interface and Service to ALL.
Enable NAT. Enable Log Allowed Traffic and select All Sessions.
5. Ordering the policy table
Go to Policy & Objects > IPv4 Policy to view the policy table. Select the By Sequence view, which shows the policies in the order that they are used by the FortiGate.
Currently, the policies are arranged in the order they were created.
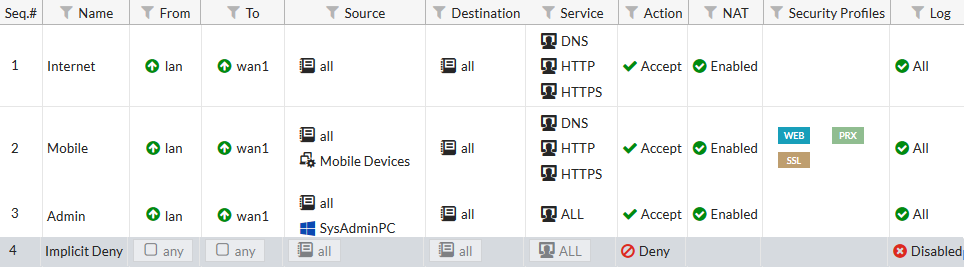
In order to have the correct traffic flowing through each policy, they must be arranged so that the more specific policies are located at the top.
To rearrange the policies, select the column on the far left (in the example, Seq.#) and drag the policy to the desired position, as shown on the right.

6. Results
Browse the Internet using the system administrator's PC, a different PC, and a mobile device.
Go to FortiView > Policies and select the now view. You can see traffic flowing through all three security policies.

Right-click on the Admin policy and select Drill Down to Details.
View the Sources tab to confirm that this policy is being used exclusively by SysAdminPC.

(Optional) Attempt to make an SSL connection to a web server with all three devices. Only the system administrator's PC will be able to connect.
