


SSL VPN using web and tunnel mode
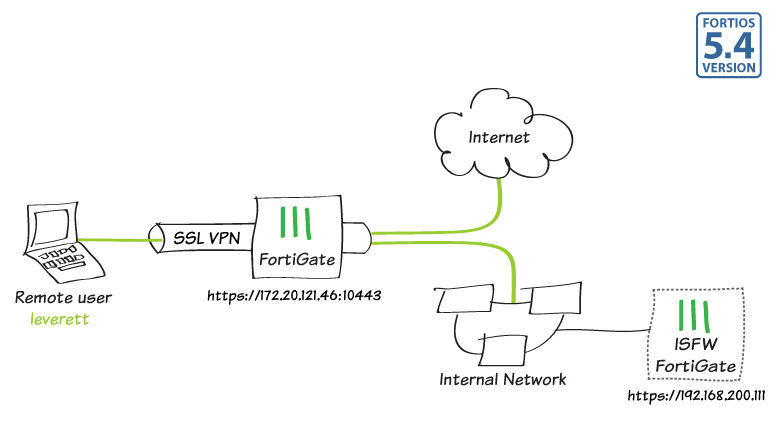
In this example, you will allow remote users to access the corporate network using an SSL VPN, connecting either by web mode using a web browser or tunnel mode using FortiClient. This allows users to access network resources, such as the Internal Segmentation Firewall (ISFW) used in this example.
For users connecting via tunnel mode, traffic to the Internet will also flow through the FortiGate, to apply security scanning to this traffic.
During the connecting phase, the FortiGate will also verify that the remote user's antivirus software is installed and up-to-date.
1. Creating a user and a user group
Go to User & Device User Definition. Create a local user account for a SSL VPN user.


Go to User & Device > User Groups. Create a user group for SSL VPN users and add the new user account.

2. Creating an SSL VPN portal for remote users
Go to VPN > SSL-VPN Portals. Edit the full-access portal. The full-access portal allows the use of tunnel mode and/or web mode.
Make sure Enable Split Tunneling is not selected, so that all Internet traffic will go through the FortiGate. If you do select Enable Split Tunneling, traffic not intended for the corporate network will not flow through the FortiGate or be subject to the corporate security profiles. You will also have to set your corporate network's address as the Routing Address.
Set Source IP Pools to use the default IP range SSLVPN_TUNNEL-ADDR1.

Under Predefined Bookmarks, select create new to add a new bookmark. Bookmarks are used as links to internal network resources.
In the example, a bookmark is added to connect to a FortiGate being used as an ISFW, which can be accessed at https://192.168.200.111.

3. Configuring the SSL VPN tunnel
Go to VPN > SSL-VPN Settings and set Listen on Interface(s) to wan1.
To avoid port conflicts, set Listen on Port to 10443. Set Restrict Access to Allow access from any host.
In the example, the Fortinet_Factory certificate is used as the Server Certificate. It is, however, recommended that you purchase a certificate for your domain and upload it for use with an SSL VPN.
Under Tunnel Mode Client Settings, set IP Ranges to use the default IP range SSLVPN_TUNNEL-ADDR1.

Under Authentication/Portal Mapping, add the SSL VPN user group and map it to the full-access portal.
If necessary, map a portal for All Other Users/Groups.

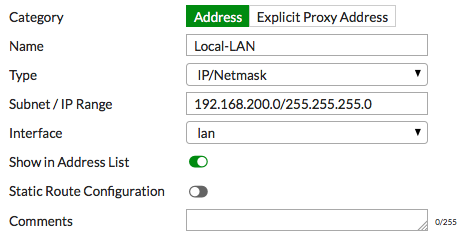
4. Adding an address for the local network
Go to Policy & Objects > Addresses.
Add the address for the local network. Set Type to IP/Netmark, Subnet/IP Range to the local subnet, and Interface to an internal port.
5. Adding security policies for access to the internal network and Internet
Go to Policy & Objects > IPv4 Policy. Add a security policy allowing access to the internal network through the VPN tunnel interface. Set a policy name that will identify what this policy is used for (in the example, SSL-VPN-internal)
Set Incoming Interface to ssl.root and Outgoing Interface to the local network interface. Select Source and set Address to all and Source User to the SSL-VPN user group. Set Destination Address to the local network address, Service to ALL, and enable NAT.
Configure any remaining firewall and security options as desired.

Add a second security policy allowing SSL VPN access to the Internet.
For this policy, Incoming Interface is set to ssl.root, Outgoing Interface is set to wan1, and Destination is set to all.

6. Setting the FortiGate unit to verify users have current AntiVirus software
Go to the Dashboard. In the CLI Console widget, enter the following commands to enable the host to check for compliant AntiVirus software on the remote user's computer:
                config vpn ssl web portal
  edit full-access
    set host-check av
  end
7. Results
The steps for connecting to the SSL VPN different depending on whether you are using a web browser or FortiClient.
Web browsers:
Using a supported Internet browser, connect to the SSL VPN web portal using the remote gateway configured in the SSL VPN settings (in the example, 172.20.121.46:10443)
Use the SSL VPN user's credentials to authenticate.

The web portal appears.

In this example, selecting the ISFW Bookmark allows you to connect to the ISFW FortiGate.

To connect to the Internet, select Quick Connection. Select HTTP/HTTPS, then enter the URL and select Launch.

The website will launch.

You can also use the Quick Connection for other allowed types of traffic, such as SSH.

An SSH connection will open in your browser, connecting to the requested Host.
Java is required for an SSH connection.

On the FortiGate, go to Monitor > SSL-VPN Monitor. The user is connected to the VPN.

FortiClient:
If you have not done so already, download FortiClient from www.forticlient.com.
Open the FortiClient Console and go to Remote Access. Add a new connection.
Set VPN Type to SSL VPN, set Remote Gateway to the IP of the listening FortiGate interface (in the example, 172.20.121.46). Select Customize Port and set it to 10443.
Select Add.

Connect to the VPN using the SSL VPN user's credentials.

You are able to connect to the VPN tunnel.

On the FortiGate, go to Monitor > SSL-VPN Monitor. The user is connected to the VPN.

