


Adding FortiManager to a Security Fabric
In this recipe, you will add a FortiManager to a network that is already configured as a Cooperative Security Fabric (CSF). This will simplify network administration because you can manage all of the FortiGates in the fabric from the FortiManager.

|
|
This recipe is part of the Cooperative Security Fabric collection. It can also be used as a standalone recipe. |
In this example, the FortiManager is added to an existing security fabric. The FortiManager, as well as a FortiAnalyzer, both connect to the same port on the upstream FortiGate, called External, to provide services to the entire network.
To add a FortiManager to a security fabric:
- Connect the External FortiGate and the FortiManager:
In this example, the External FortiGate’s port 16 will connect to port 2 on the FortiManager.
- On the External FortiGate, go to Network > Interfaces and edit port 16. Set an IP/Network Mask for the interface (in the example, 192.168.55.2).
- Configure Administrative Access to allow FMG-Access and FortiTelemetry.

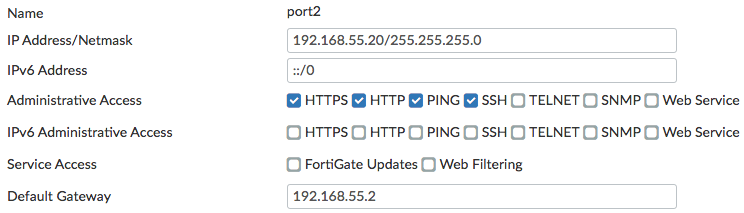
- On the FortiManager, go to System Settings > Network, select All Interfaces, and edit port2.
- Set IP Address/Netmask to an internal IP (in the example, 192.168.55.20/255.255.255.0).

- Connect the External FortiGate and the FortiManager.
- On the FortiManager, go to System Settings > Network. Port 2 is now shown as the management interface. Add a Default Gateway, using the IP address of the External FortiGate's port 16.

If you previously configured a FortiAnalyzer using the recipe Adding a FortiAnalyzer to a security fabric, you may be able to skip the next two steps in this recipe, provided that the FortiAnalyzer and FortiManager both connect to the same port on the External FortiGate.
- Configure OSPF routing to the FortiManager:
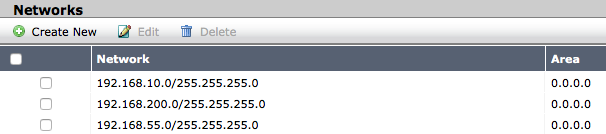
- On the External FortiGate, go to Network > OSPF and create a new Network. Set IP/Netmask to 192.168.55.0/255.255.255.0 (the subnet that includes FortiManager’s port 1) and Area to 0.0.0.0.
- Allow internal FortiGates to access the FortiManager:
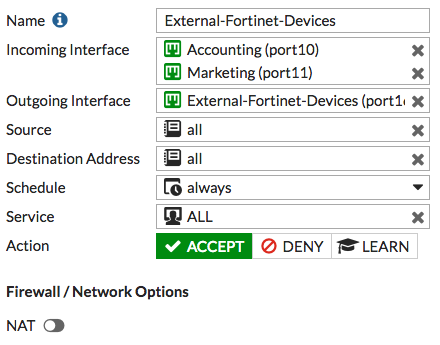
- On the External FortiGate, go to System > Feature Select. Under Additional Features, select Multiple Interface Policies.

- Go to Policy & Objects > IPv4 Policy and create a policy allowing the internal FortiGates (Accounting and Marketing) to access the FortiManager.
- Do not enable NAT.
- On the External FortiGate, go to System > Feature Select. Under Additional Features, select Multiple Interface Policies.
- Configure central management:
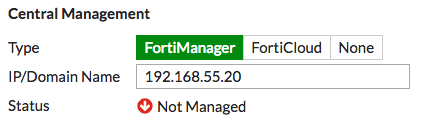
- On the External FortiGate, go to System > Settings. Under Central Management, select FortiManager and enter the IP/Domain Name.
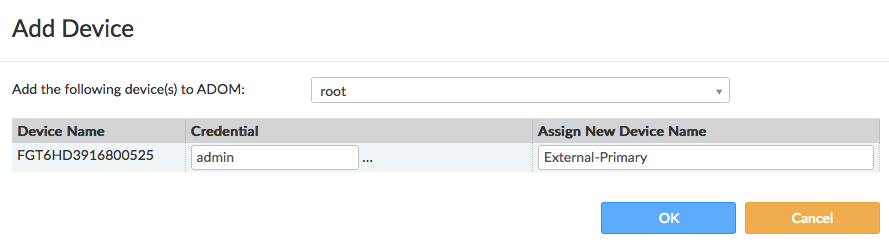
- On the FortiManager, go to Device Manager > Unregistered Devices. Select the External FortiGate, then select + Add.

- Add the device to the root ADOM.
- The External FortiGate is now on the Managed FortiGates list.

- Connect to the External FortiGate. A warning message appears, stating that the FortiGate is now managed by a FortiManager.
- Select Login Read-Only.

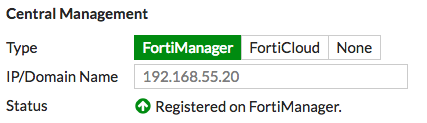
- Go to System > Settings. The Central Management Status is now Registered on FortiManager.
- On the ISFW FortiGates, make sure that the interface connected to the External FortiGate allows FMG-Access. You can then repeat the above steps to configure central management for these FortiGates.

- On the External FortiGate, go to System > Settings. Under Central Management, select FortiManager and enter the IP/Domain Name.
All three FortiGates are shown in the FortiManager’s Managed FortiGates list.
