


IPsec tunnel templates
You can provision IPsec tunnels to FortiGate branch devices using an IPsec template. You can save an IPsec VPN configuration, apply it to one or more FortiGates, or reuse the same configuration over and over again. You can specifically name IPsec tunnel interfaces using supported meta fields, and the tunnel interfaces may later on be mapped to normalized interfaces, or used in policies and also in SD-WAN widgets.
The following example assumes that site HQ IPsec VPN has been configured and is up and running. We will establish the configurations of Branch-A and Branch-B sites to the HQ site by using an IPsec template.

This section describes the following:
- Creating new meta fields
- Assigning values to meta field variables
- Creating IPsec VPN template
- Assigning IPsec VPN template to devices
- Installing IPsec VPN configuration and firewall policies to devices
- Verifying IPsec VPN tunnel status
- Verifying IPsec template configuration status
Creating new meta fields
To create a new meta field:
- Go to System Settings > Advanced > Meta Fields.
- Click Create New from the toolbar. The Create New Meta Fields pane appears.
- Select the Object type from the drop-down list, for example, Device VDOM.
- Enter a value in the Name field to name the meta field. The value entered here (
branch_local_network) becomes the variable name and is indicated in the Variable field with the value$(branch_local_network)at the bottom. - Select the appropriate Length from the drop-down list.
- Select the Importance as Required to make the meta field mandatory.
- Select the Status as Enabled to enable the meta field.
- Click OK. The meta field is created.

Similarly, create another meta field remote_site_id.

Assigning values to meta field variables
Once meta fields are created, you need to assign values to the meta field variables for each device. You will assign values to the meta field variables branch_local_network and remote_site_id for both the sites Branch-A and Branch-B.
To assign a value to a meta field variable for a device:
- Go to Device Manager > Device & Groups > Managed Devices.
- Select device Branch-A and click Edit. The Edit Device pane appears.
- Scroll down to the Meta Fields section and add values for both the branch_local_network and remote_site_id fields.
- Click OK.

Similarly, edit device Branch-B to add values to the meta field variables.

Creating IPsec VPN template
To create an IPsec VPN template:
- Go to Device Manager > Provisioning Templates > IPsec Tunnel Templates.
- Click Create New from the toolbar. The Create New IPsec Tunnel Template dialog appears.
- Enter a Name for the template.
- Click OK. The new template is created.
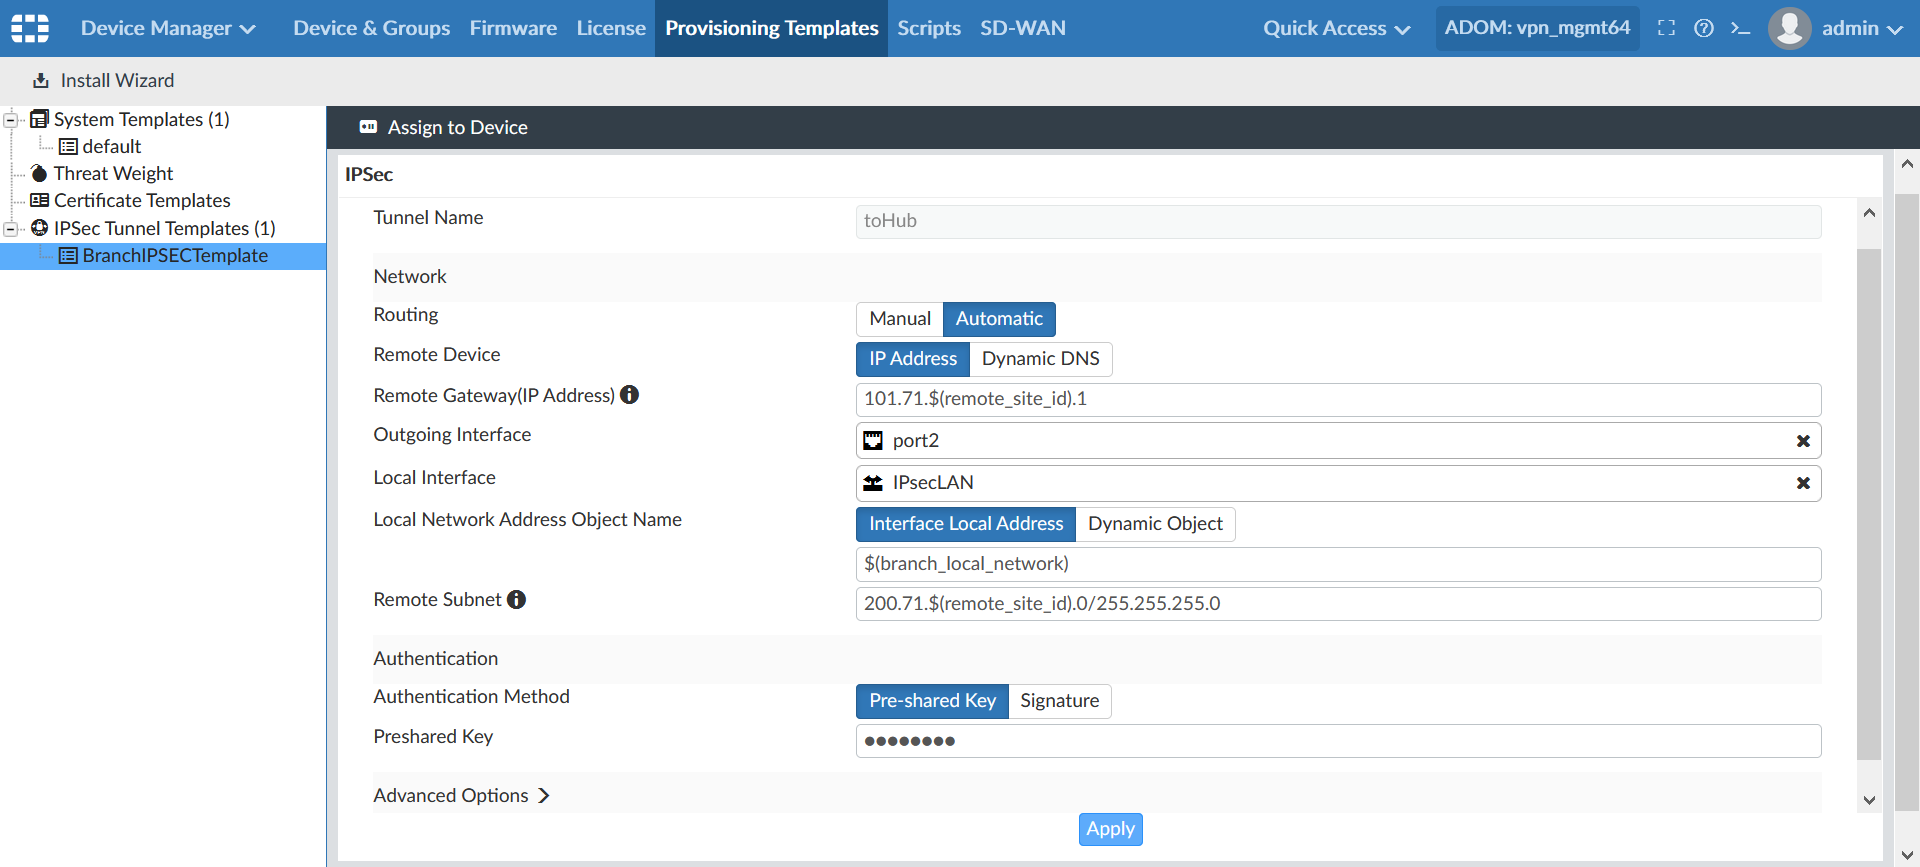
- Click on the template name from the tree menu at the left. The IPsec settings for the template appear on screen:
Setting
Value/Description
Tunnel Name
Name of the IPsec tunnel.
Routing
Automatic: Static routes to remote subnet will be created.
Remote Device
IP Address
Remote Gateway (IP Address)
This field accepts meta field variables and you will use the remote_site_id meta field variable here, for example,
101.71.$(remote_site_id).1, where the meta field variable value will be substituted at runtime.Outgoing Interface
port2Local Interface
We need to create and select a normalized interface with per-device mapping as different devices use different local interfaces. In this case, it is IPsecLAN.
Local Network Address Object Name
Select Interface Local Address, and enter the meta field variable
$(branch_local_network), where the meta field variable value will be substituted at runtime.Remote Subnet
Enter
200.71.$(remote_site_id).0/255.255.255.0, where the meta field variable value will be substituted at runtime.Authentication Method
Pre-shared Key: Alphanumeric key used for device authentication.
- Click Apply at the bottom to save the settings. The IPsec template is created and is ready to be assigned to devices.
Assigning IPsec VPN template to devices
The created IPsec template needs to be assigned to the Branch-A and Branch-B devices.
To assign an IPsec VPN template to a device:
- Go to Device Manager > Provisioning Templates > IPsec Tunnel Templates.
- Click on the template name from the tree menu at the left. The IPsec settings for the template appear on screen.
- Click Assign to Device from the toolbar. The Assign to Device dialog appears.
- Select the devices Branch-A and Branch-B from the list of devices in the Available Entries section, and move them to the Selected Entries section.

- Click OK. The IPsec template is assigned to the selected devices.

Installing IPsec VPN configuration and firewall policies to devices
Once the IPsec template is assigned to devices, it still does not automatically push the settings to the devices. This is indicated by the Caution icon before the template name in the IPsec Template column. You need to install the IPsec VPN configuration and firewall policies to those devices for the IPsec template to push through all the settings.
To install IPsec VPN configuration and firewall policies to a device:
- Go to Policy & Objects > Policy Packages > Firewall Policy.
- Click Create New from the toolbar. The Create New Firewall Policy pane appears.
- Create two firewall policies for traffic between the normalized interface and HQ site.

- Click Install > Install Wizard from the toolbar. The Install Wizard dialog appears.
- Continue with the policy installation on both Branch-A and Branch-B devices.
- Click Finish. The firewall policies are installed and the IPsec VPN configurations are pushed to the devices.
Verifying IPsec VPN tunnel status
To verify IPsec VPN tunnel status:
- Go to VPN Manager > Monitor.
- Check the tunnel status from the Status column. The tunnels may be Down.
- Select the tunnels with a Down status and click Bring Tunnel Up from the toolbar.
- Click OK to confirm in the Bring Tunnel Up dialog.
- Click Refresh from the toolbar to verify that the tunnels have an updated Up status.

Verifying IPsec template configuration status
To verify IPsec template configuration status:
- Go to Device Manager > Device & Groups > Managed Devices.
- Click Column Settings from the toolbar and select IPsec Template. The IPsec Template column appears in the table.
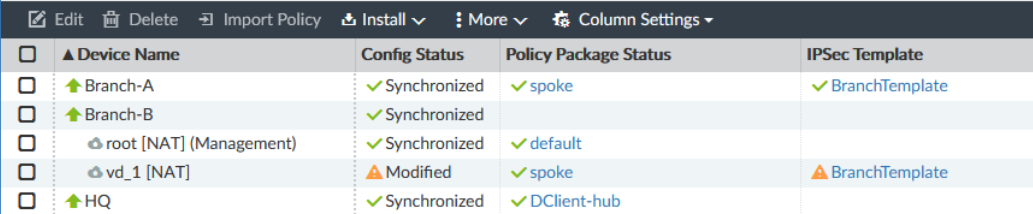
A device with a synchronized template status would be indicated by a green tick mark icon before the template name in the IPsec Template column, while a device with a modified status would be indicated by a yellow triangle caution icon.