


Adding a FortiAP model device
When creating a profile, you can add a model FortiAP device to a FortiGate. When the access point comes online, it is managed by FortiGate and receives the configuration.
Requirements:
Connect the FortiAP LAN port to the target FortiGate port.
To add a model FortiAP to a FortiGate:
- Go to Configuration > Profile.
The list of profiles is displayed.
- Create a new profile, or select a profile to update.
- Display the FortiSwitch/AP settings.
- Click the Network tab.
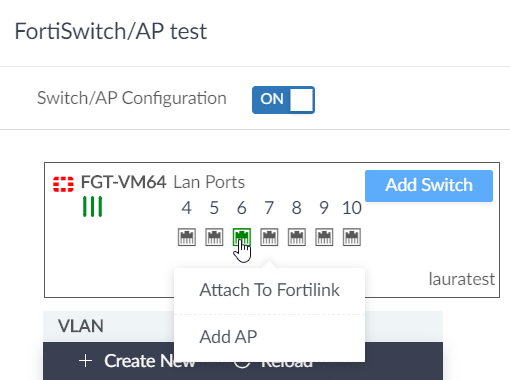
- Expand the LAN section, and toggle Switch/AP Configuration to ON.
The Switch/AP button is displayed.
- Click Switch/AP.
The FortiSwitch/AP <Name> dialog box is displayed.
- Select a FortiGate port, and click Add AP.
The +Add AP <Name> dialog box is displayed.
- From the Platform dropdown, select a FortiAP model you want to manage .

- Click OK.
The AP model is added to the profile.

To install a profile on the target device:
- Enable DHCP on the port so the connected AP will receive the IP address from the DHCP server.
- Go to Configuration > Device.
The device list is displayed.
- Select a device to update.
The Device / <Name> dialog box is displayed.
- Click the Network tab.
- Expand the LAN section, and select a port to update.
The LAN<port> dialog box is displayed.
- Configure the DHCP settings, and click OK

- Click OK again.
- Go to Configuration > Device.
- In the Device pane, click Install Configuration.

The configuration is synchronized with FortiGate. Wait 10-15 minutes for the device to come online.
- To verify the connection in FortiGate, go to WiFi & Switch Controller > Manager FortiAPs.
Check the Status column to verify the device is Online.
Check the FortiAP Profile column to ensure the correct profile was deployed.

- To verify the connection in FortiManager, go to AP Manager > Device & Groups.
Check the Access Point column to verify the device is online.
Check the AP Profile column to verify the correct profile was deployed.
To add an SSID profile to a ports AP profile:
- In the SSID table, create a new profile or select a profile to update.
The +SSID dialog box is displayed.
- Configure the SSID settings, and click OK.
Option
Description
Name Enter a name for the SSID profile. SSID Type the wireless service set identifier (SSID), or network name, for this wireless interface. Users who want to use the wireless network must configure their computers with this network name. Security Mode Select a security mode:
- Open
- WPA2_PERSONAL
- WPA3_SAE
- WPA3_SAE_TRANSITION
Pre-shared Key Enter the pre-shared key for the SSID.
This option is only available when the security mode includes WPA2 _PERSONAL and WPA3_SAE_TRANSITION.
SAE Password
Enter the password for the SSID.
This option is only available when the security mode includes WPA3_SAE and WPA3_SAE_TRANSITION.
Client Limit The maximum number of clients that can simultaneously connect to the AP (0 - 4294967295, default = 0, meaning no limitation). Broadcast SSID Enable/disable broadcasting the SSID (default = enable).
Broadcasting enables clients to connect to the wireless network without first knowing the SSID. For better security, do not broadcast the SSID.
Block Intra-SSID Traffic Enable/disable blocking communication between clients of the same AP (default = disable). Quarantine Host Enable/disable station quarantine (default = enable).
Allow Overlap between Device Toggle on to allow overlap between devices. Toggle off to disable this feature. IP Auto Assign Available when Allow Overlap Between Devices is disabled.
Toggle on to automatically assign IP addresses.
Toggle off to disable this feature.
IP Pool Available when IP Auto Assign is enabled.
Specify a pool of IP addresses to be used for SD-WAN Orchestrator to automatically assign.
Subnet Mask Length Available when IP Auto Assign is enabled.
Specify the length of the subnet mask.
DHCP Mode Specify whether to use DHCP for automatic IP assignment. Select one of the following options:
- None - DHCP is not used.
- Server - Enable DHCP server.
- Relay - Enable DHCP relay agent.
DHCP Choose the DHCP server. DHCP Pool Size Enter the DHCP pool size. Access Types Select the types of access to allow on the interface.
To configure an AP profile:
- In the AP profile table, click Edit.

The AP<Name> dialog box is displayed.
- Configure the settings and click OK.
Option Description AllowAccess Choose from:
- HTTPS
- SSH
- SNMP
Login Password Change Choose from:
- LEAVE_UNCHANGED
- SET
- SET_EMPTY
Mode Choose from:
- DISABLED
- AP
- MONITOR
Wids Profile Choose from:
- default
- default-wids-apscan-enabled
Radio Resource Provision Select to enable radio resource provisioning.
This feature measures utilization and interference on the available channels and selects the clearest channel at each access point.
Band Select the wireless protocol from the dropdown list. The available bands depend on the selected platform.
In two radio devices, both radios cannot use the same band.
Short Guard-interval Select to enable the short guard interval. Auto TX Power Control Enable automatic adjustment of transmit power. TX Power (%) If Auto TX Power Control is disabled, enter the TX power in the form of the percentage of the total available power.
If Auto TX Power Control is enabled, enter the TX Power Low (dBm) and TX Power High (dBm) power levels.
SSIDs Auto Assign Disable to manually assign the SSIDs that APs using this profile will carry, or let them be selected automatically. Monitor Channel Utilization Enable/disable monitoring channel utilization. - To verify the profile was updated, go to Configuration > Device.
Check the Config Status column to verify the profile is Modified.

- Click Install Configuration to synchronize the profile on the device.