


Creating Virtual Private Cloud (VPC)
Amazon VPC lets you provision a logically isolated section of the Amazon Web Services (AWS) Cloud where you can launch AWS resources in a virtual network that you define. You have complete control over your virtual networking environment, including selection of your own IP address range, creation of subnets, and configuration of route tables and network gateways.
This topic introduces the steps to create a VPC. You can refer to AWS documentation for more information: https://docs.aws.amazon.com/vpc/latest/userguide/VPC_Scenario1.html
To create a VPC:
- Log in to AWS. Select VPC from the services list.
- On the VPC dashboard, click Launch VPC Wizard.

- Select the VPC with a Single Public Subnet option.

- Configure the VPC related information as shown below.
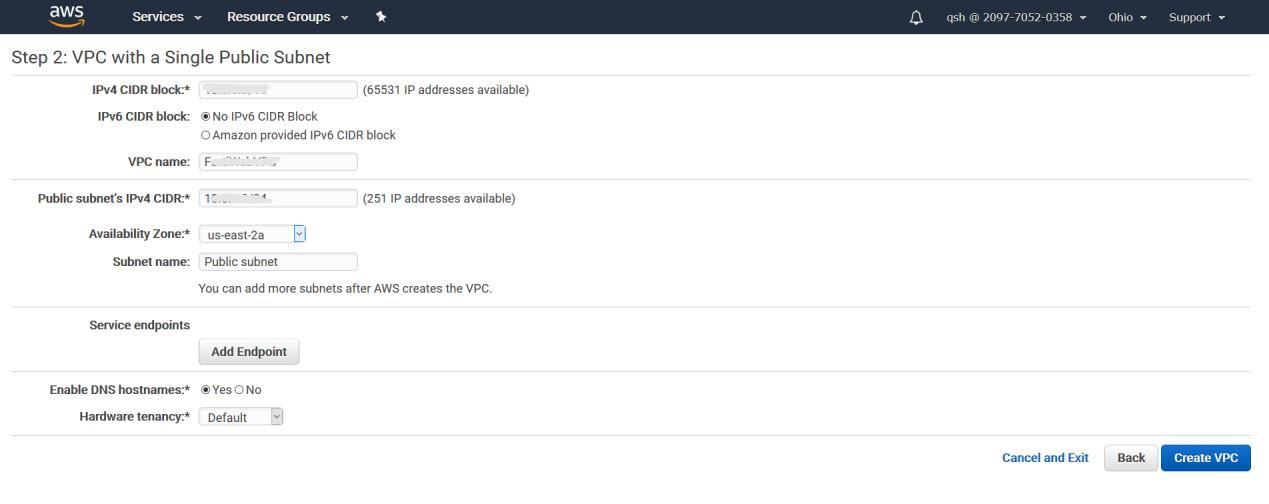
- VPC name: Enter a name for the VPC. You will use the name to reference the VPC in other parts of the configuration.
-
Public Subnet's IPv4 CIDR: Displays the default IPv4 address range for the public subnet. If you want to specify a different CIDR block for the subnet, delete the default CIDR block and enter a new one here. The allowed block size is between a /16 netmask and /28 netmask.
For details, see "VPC and Subnet Sizing" in the Amazon VPC Documentation:
http://docs.aws.amazon.com/AmazonVPC/latest/UserGuide/VPC_Subnets.html#VPC_Sizing -
Availability Zone: Displays the Availability Zone for the public subnet. Select between:
- No preference so that the VPC will select the optimal Availability Zone for the VPC.
- A specific Availability Zone.
http://docs.aws.amazon.com/AWSEC2/latest/UserGuide/using-regions-availability-zones.html
-
Service endpoints: Optionally, click Add Endpoint to configure a connection directly to an AWS service without a gateway, NAT device, VPN connection, or AWS Direct Connect connection. You can add endpoints to multiple AWS services. Because traffic between the VPC and AWS services does not leave the AWS network when you use endpoints, endpoints allow the VPC to communicate with AWS services without imposing resource costs on your network.
If you click Add Endpoint, you must also configure the Service, Subnet, and Policy for the endpoint.You do not have to add endpoints when hosting FortiWeb Manager-VM on AWS to protect your web-based applicatio environment.
For more information about adding an endpoint, see "VPC Endpoints" in the Amazon VPC Documentation:
http://docs.aws.amazon.com/AmazonVPC/latest/UserGuide/vpc-endpoints.html -
Enable DNS hostnames: This guide provides instructions to connect to the FortiWeb Manager-VM instance assuming that this setting is enabled. Optionally, select Yes so that instances that are launched into the VPC receive a DNS hostname. For details, see "Using DNS with Your VPC" in the Amazon VPC Documentation:
http://docs.aws.amazon.com/AmazonVPC/latest/UserGuide/vpc-dns.html
Enable this setting so that you can easily connect to the instance using the public DNS address. -
Hardware tenancy: Configure this option to select whether instances launched in the VPC run on shared or dedicated hardware. Select one of the following options:
- Default—The instance runs on shared hardware.
- Dedicated—The instances runs on single-tenant hardware.
- Host—The instance runs on a dedicated host, which is an isolated server with configurations that you can control.
http://docs.aws.amazon.com/AWSEC2/latest/UserGuide/dedicated-instance.html - Once you have verified the network setting, click Create VPC and you will see the screen below.

When the VPC setup has been completed, go to Amazon VPC console, from the navigation bar, select Instances and click View Instances. You can review subnet and routing information for the VPC.