Deploying FortiWeb Manager-VM on Azure
Deploying FortiWeb Manager-VM
Deploying FortiWeb Manager-VM
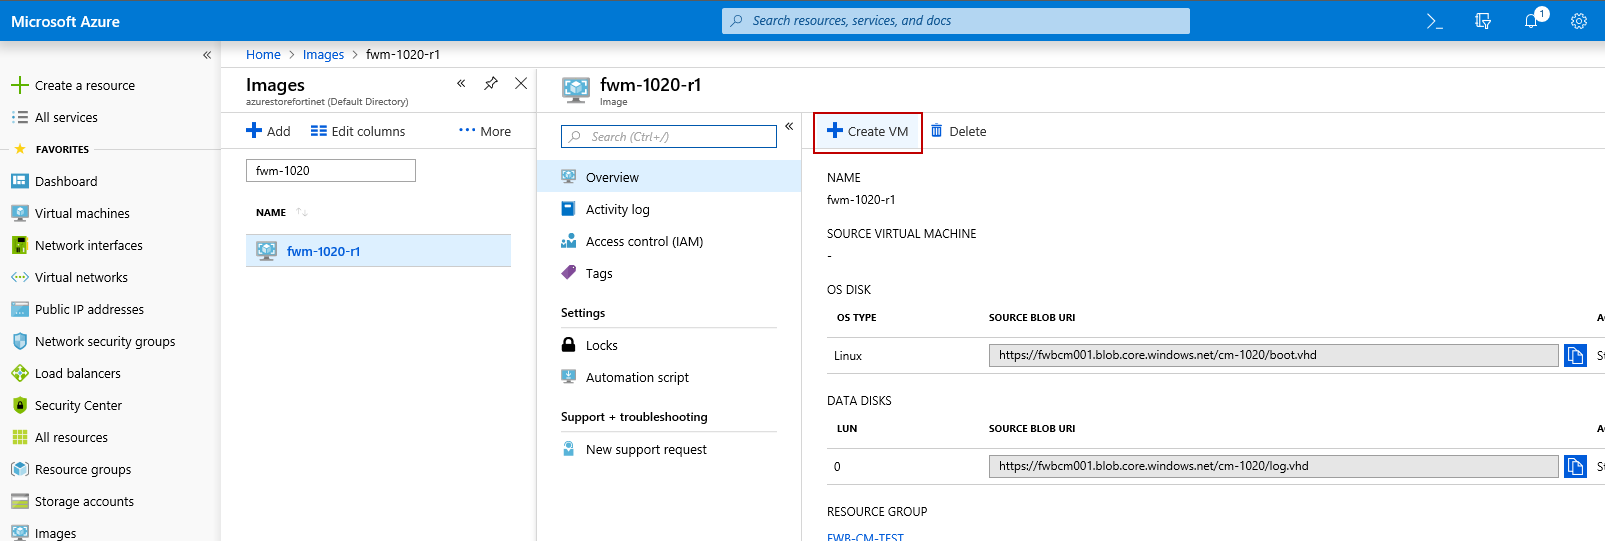
- In Images service, search for the image you just created. Click the image name to open the image details pane.

- Click Create VM.
-
Configure the Basics settings.
Subscription: It is automatically selected as the one to which this image belongs. You can't change it.
Resource group: It is automatically selected as the one to which this image belongs. You can select other resource groups to deploy the VM in.
Instance details: For the size option, FortiWeb Manager requires at least 2 vCPUs and 8GB vRAM.
Administration Account: Set the username and password to connect with FortiWeb Manager-VM instance (the
password option), and the SSH public key to SSH into FortiWeb Manager-VM instance without entering
credentials. Take note of the username and password, you will need them in the following steps.
Refer to the following articles on how to generate SSH public key and private key:
a. PUTTYGEN ON LINUX - SSH KEY GENERATOR
b. PUTTYGEN - KEY GENERATOR FOR PUTTY ON WINDOWS
Inbound port rules: Choose None. In the Networking settings, you can select the security group you have created.

- Click the Networking tab to configure the network settings.
A network interface (NIC) is the interconnection between a VM and a virtual network (VNet). It enables the VM to communicate with internet, Azure, and on-premises resources. When creating a virtual machine using the Azure portal, the portal creates one network interface with default settings for you.
In this tab, you need to tell Azure to allocate the network interface from which virtual network and subnet. In other words, you need to specify the network location for this VM.
Virtual network and Subnet: Choose the virtual network and subnet to deploy the FortiWeb Manager-VM in. It's recommended to deploy FortiWeb Manager-VM in the same virtual network with its managed FortiWeb-VMs, or at least the virtual network which can connect to the one where the FortiWeb-VMs are deployed.
Public IP: After you completed the Basics settings, Azure automatically assign a public IP name for this VM and fill it in the drop-down list of the Public IP option. Select this IP address. Its name is "(new) <VM name>".
Network Security group: Select Basic.
Public inbound ports: Select Advanced, then choose the security group you have created. In the security group, we have allowed traffic to port 22, 80, 443, and 8989.

- For the Disks, Management, Guest config, and Tags tabs, you can configure the settings according to your own needs.
- Click Review + create button at the bottom to create the VM. It may take some time for the VM to change from creating status to running status.

- Click All services, and then enter virtual machines in the search box. Click virtual machines in the search results.
- Enter the name of the VM you just created to search for this VM. In the Status column, check if it is Running. If yes, click its name to open the details pane.

-
Click Networking. Take note of the Network Interface name and the public IP address. You will use them in the following steps.

Deploying FortiWeb Manager-VM
- In Images service, search for the image you just created. Click the image name to open the image details pane.
- Click Create VM.
-
Configure the Basics settings.
Subscription: It is automatically selected as the one to which this image belongs. You can't change it.
Resource group: It is automatically selected as the one to which this image belongs. You can select other resource groups to deploy the VM in.
Instance details: For the size option, FortiWeb Manager requires at least 2 vCPUs and 8GB vRAM.
Administration Account: Set the username and password to connect with FortiWeb Manager-VM instance (the
password option), and the SSH public key to SSH into FortiWeb Manager-VM instance without entering
credentials. Take note of the username and password, you will need them in the following steps.
Refer to the following articles on how to generate SSH public key and private key:
a. PUTTYGEN ON LINUX - SSH KEY GENERATOR
b. PUTTYGEN - KEY GENERATOR FOR PUTTY ON WINDOWS
Inbound port rules: Choose None. In the Networking settings, you can select the security group you have created.
- Click the Networking tab to configure the network settings.
A network interface (NIC) is the interconnection between a VM and a virtual network (VNet). It enables the VM to communicate with internet, Azure, and on-premises resources. When creating a virtual machine using the Azure portal, the portal creates one network interface with default settings for you.
In this tab, you need to tell Azure to allocate the network interface from which virtual network and subnet. In other words, you need to specify the network location for this VM.
Virtual network and Subnet: Choose the virtual network and subnet to deploy the FortiWeb Manager-VM in. It's recommended to deploy FortiWeb Manager-VM in the same virtual network with its managed FortiWeb-VMs, or at least the virtual network which can connect to the one where the FortiWeb-VMs are deployed.
Public IP: After you completed the Basics settings, Azure automatically assign a public IP name for this VM and fill it in the drop-down list of the Public IP option. Select this IP address. Its name is "(new) <VM name>".
Network Security group: Select Basic.
Public inbound ports: Select Advanced, then choose the security group you have created. In the security group, we have allowed traffic to port 22, 80, 443, and 8989.
- For the Disks, Management, Guest config, and Tags tabs, you can configure the settings according to your own needs.
- Click Review + create button at the bottom to create the VM. It may take some time for the VM to change from creating status to running status.
- Click All services, and then enter virtual machines in the search box. Click virtual machines in the search results.
- Enter the name of the VM you just created to search for this VM. In the Status column, check if it is Running. If yes, click its name to open the details pane.
-
Click Networking. Take note of the Network Interface name and the public IP address. You will use them in the following steps.


