Configuring a Security Assertion Markup Language (SAML) server pool
You can use one or more SAML servers in a site publish rule to handle client authentication for web browser single sign-on (SSO).
SAML is an open standard for exchanging authentication and authorization data between parties, and is often used for exchanging such data between an identity provider and a service provider.
You configure single sign-on with SAML server pool, you need to perform the following steps:
- Configure one or more SAML servers.
- Add SAML servers to a SAML server group.
- Reference the SAML server group in a site publish rule.
- Configure the SAML Login Page replacement message to customize the IDP names shown on the SAML login page.
Step 1: Configure a SAML server
- Go to User > Remote Server and select the SAML Server tab.
To access this part of the web UI, your administrator's account access profile must have Read and Write permission to items in the Auth Users category. For details, see Permissions. - Click Create New and complete the following settings:
Name Enter a name for the SAML server that can be referenced by other parts of the configuration. The maximum length is 63 characters. Entity ID Enter the URL for the SAML server. The communications protocol must be HTTPS. Service Path Enter a path for the SAML server at the URL you specified in Entity ID. Signing Enforcement
Enable to enforce signing verification to digitally sign the SAML message, and then the Identity Provider will verify the signature to confirm its integrity.
Assertion Consumer Service Binding Type Select the binding that the server will use to transport the SAML authentication request to the IDP. Path Enter a partial URL that the IDP will use to confirm with the service provider that a user has been authenticated. Single Logout Service Binding Type Select the binding that the server will use when the service provider initiates a single logout request:
POST—SAML protocol messages are transported via the user's browser in an XHTML document using base64-encoding.REDIRECT—SAML protocol messages will be carried in the URL of an HTTPGETrequest. Because the length of URLs is limited, this option is best for shorter messages.
Path Enter a partial URL that the IDP will use to confirm with the service provider that a user has been logged out. Identity Provider Metadata Metadata Click Choose File to upload an IDP (Identity Provider) metadata file for the SAML server. If the file is valid, the Entity ID below will populate.
The metadata file is provided by the Identity Provider such as AD FS, TestShib and OneLogin. It defines the EntityID, Endpoints (Single Sign On Service Endpoint, Single Logout Service Endpoint), etc. FortiWeb parses the information in the metadata file and redirects the user's authentication request to the identity provider accordingly. After the user's identity is authenticated, the identity provider responds to FortiWeb with a SAML authentication assertion.
Note: When you configure SAML Single Sign-on with the Identify Provider, make sure the user information (UPN or Email) is mapped to EPPN (urn:oid:1.3.6.1.4.1.5923.1.1.1.6), because FortiWeb uses the value of the EPPN attribute to identify users uniquely.
The following is an example of the OneLogin SAML Test Connector configurations: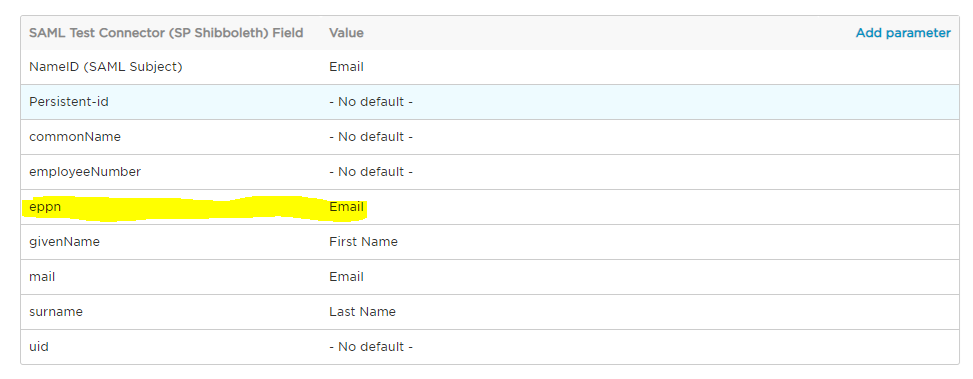
Entity ID The Entity ID will populate if the IDP metadata file for the SAML server that you uploaded in Metadata is valid. - Click OK.
- Click Create New to add domain names for this server. When users log in with an email address suffixed with the specified domain name, the authentication request will be forwarded to this SAML server.
For instance, if a user enters "xxx@example.com" in the Email field, FortiWeb will forward the request to the SAML server which is configured with the domain name "example.com".
You can add multiple domain names for one SAML server. Similarly, it's allowed to associate multiple SAML server with the same domain name. - Click OK.
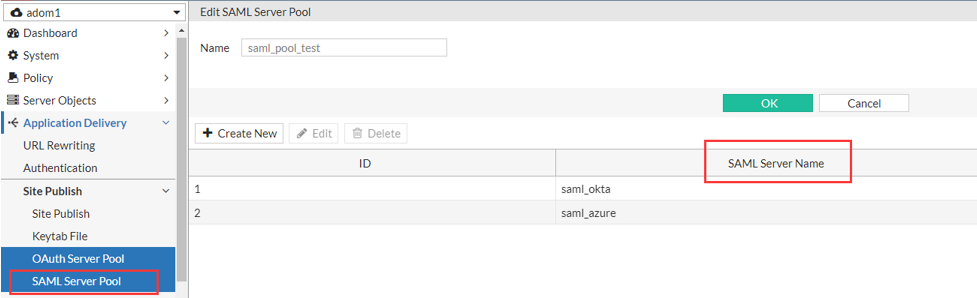
Step 2: Add SAML servers to a SAML server group
- Go to Site Publish > Saml Server Pool
To access this part of the web UI, your administrator's account access profile must have Read and Write permission to items in the Server Policy Configuration category. For details, see Permissions. - Click Create New.
- Enter a name for the SAML server pool that can be referenced by other parts of the configuration. The maximum length is 63 characters.
- Click OK.
- Click Create New to add a new SAML server.
- Enter a name for the server.
- Select the SAML Server you have created in the SAML Server tab of the User > Remote Server page.
- Click OK. Repeat the steps above if you want to add multiple SAML servers.
Step 3: Reference the SAML server group in a site publish rule
Refer to Offloaded authentication and optional SSO configuration for more information.
Step 4: Configure the SAML Login Page replacement message
When SAML Authentication is configured, the following login page will be displayed to the users of your application when they log in.
Based on their choice of the Identity Provider (IDP) or the email address they've entered, FortiWeb will forward the request to the corresponding SAML server configured with the specified IDP or domain name.
To customize the IDP names displayed in the IdP drop-down list on the login page, you must configure the SAML Login Page replacement message.
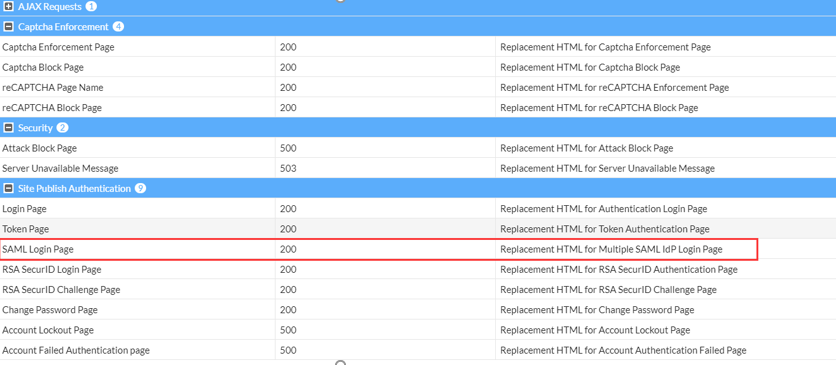
- Go to System > Config > Replacement Message.
- Click on SAML Login Page under Site Publish Authentication.
- Define the IdP names and the value parameter.
IdP names The name of the IDP shown on the login page. In this example, the IdP names are "Okta" and "Azure". value The name of the SAML server which you have configured with the corresponding IDP. In this example, the SAML server names are "saml_okta" and "saml_azure".