


Portals
To create a portal:
- Go to Authentication > Portals > Portals, and select Create New.
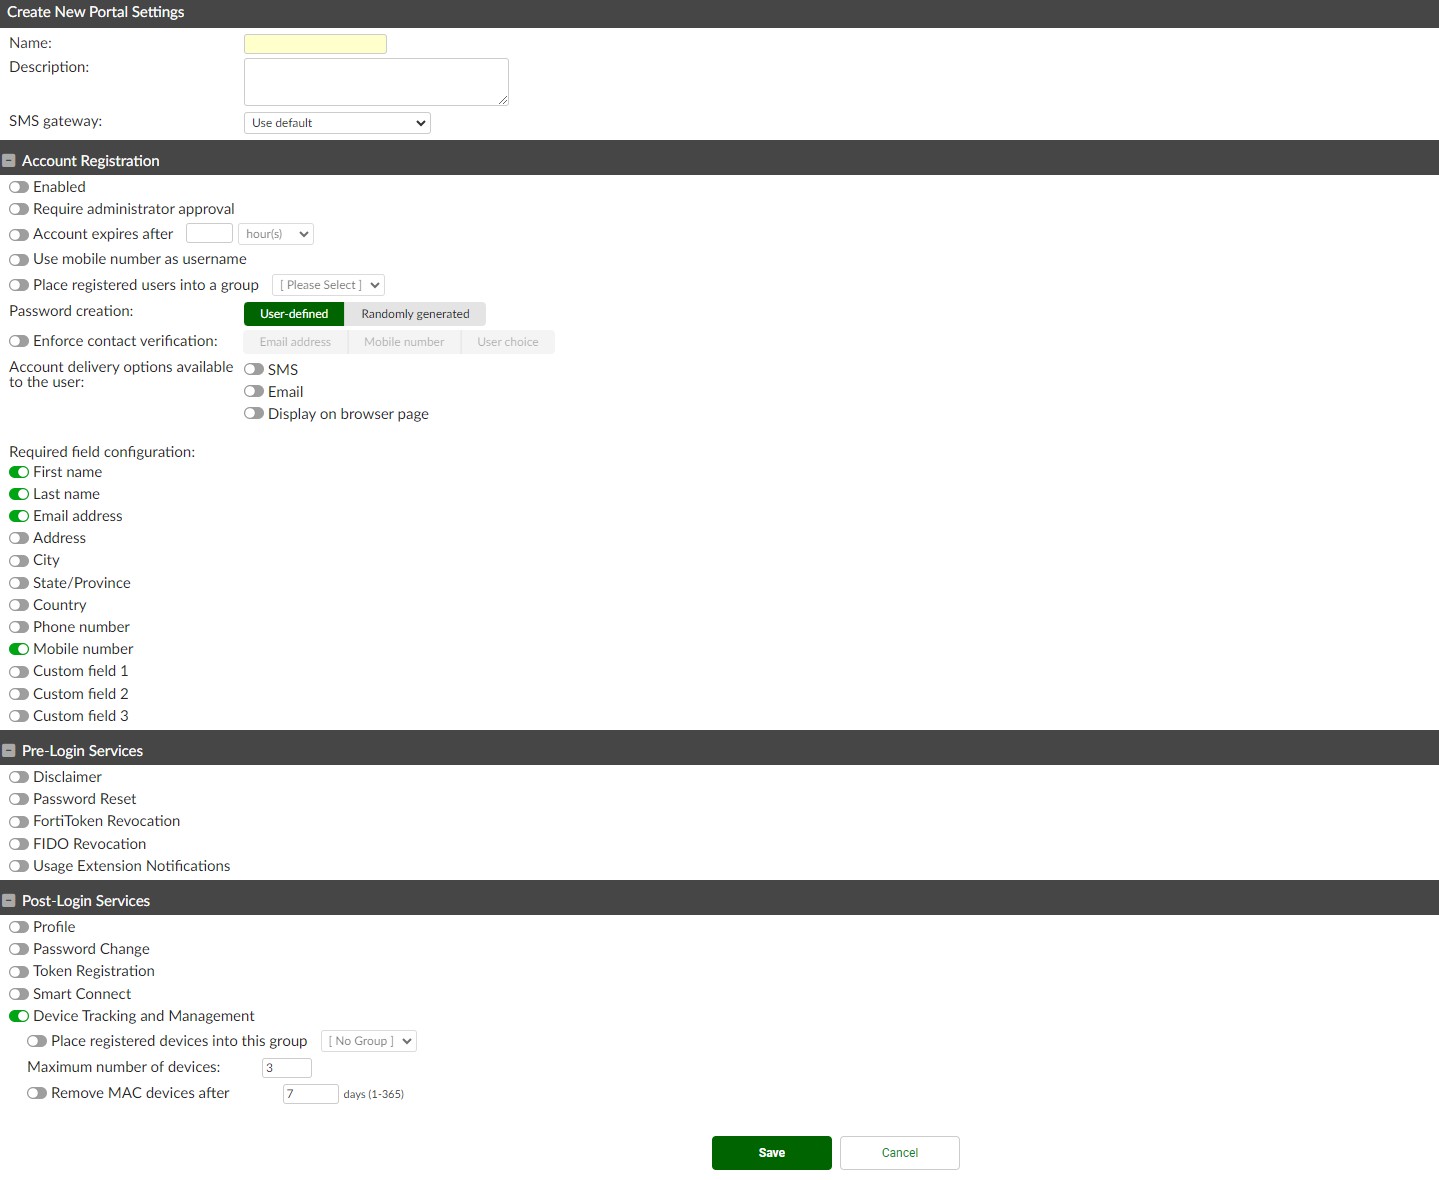
- Enter the following information:
Name Enter the name of the portal. Description Optionally, enter a description of the portal. SMS gateway
From the dropdown, select an SMS gateway for self-registered users.
Account Registration
Enabled
Enable to provide a link on the login page for new users to create an account.
Require administrator approval
Enable to require administrator approval to register an account.
Select from the following two options:
Enable email to freeform addresses: Enable and then specify administrator email addresses where the registration approval link for new users is sent.
Note: Email addresses must be separated by commas or entered in a new line.
Select User Groups allowed to approve new user registrations: Enable and then specify the approver groups. Users within these groups can approve registering new accounts.
Note: Ensure that users in the approver groups have email addresses set up.
Account expires after
Enable/disable account expiration.
If enabled, enter the number of hours, days, months, or years the account remains expired from the dropdown.
Use mobile number as username
Determine whether to require the user's mobile number as their username.
Place registered users into a group
Determine whether to place registered users into a group from the dropdown.
Password creation
Determine whether the user's password is user-defined or randomly generated.
Enforce contact verification
Enable/disable whether to enforce contact verification. If enabled, select whether to verify the user's email address or mobile number, or allow the user to decide between email address or mobile number.
New user is automatically logged-in after successful contact verification
Enable to allow newly registered users to access the guest network without having to enter their credentials. Disable to require users to enter their credentials to access the guest network after successful registration. This option is enabled by default.
Note: The option is only available when Enforce contact verification is enabled.
Account delivery options available to the user
Determine whether the user's account information is sent to them by SMS, email, or displayed on the browser page. If more than one option is selected, the self-registering user decides which account delivery method to use.
Note: If Require administrator approval is enabled, Display on browser page is disabled.
Required field configuration
Configure the available fields required by the user to enter:
First name
Last name
Email address
Address
City
State/Province
Country
Phone number
Mobile number
Custom field 1
Custom field 2
Custom field 3
Note: First name, Last name, Email address, and Mobile number are enabled by default.
Pre-login Services Configure various pre-login services to permit to users. Disclaimer Enable or disable the appearance of a disclaimer to the end-user that must be accepted before proceeding to the login page.
To configure the disclaimer, edit the Login Disclaimer Page replacement message under Authentication > Portals > Replacement Messages.
Password Reset Enable or disable pre-login password reset link. FortiToken Revocation Select to revoke tokens based on various conditions:
- Allow users to report a lost token to the Administrator at this email address
- Allow users to temporarily use SMS token authentication if a mobile number was pre-configured
- Allow users to temporarily use email token authentication if an email was pre-configured
- Allow users to re-provision their FortiToken Mobile
- Allow users to re-provision their FortiToken Cloud
FIDO Revocation
Select to revoke FIDO:
Temporary credential delivery options: You can select either SMS and/or Email.

The end-user must authenticate using an OTP via Email and/or SMS before completing the FIDO operation. One or both of Email/SMS must be selected.
Allow user to revoke all FIDO keys: Enable to allow the end-user to revoke all FIDO keys at once.
Allow users to re-register their FIDO token: Enable to allow end-users to re-register a FIDO token if their FIDO keys have been revoked.
Usage Extension Notifications Allow users who exceeded their time and/or data usage to request an extension via an email notification. Post-login Services Configure various post-login services to permit to users. Profile Select to determine whether authenticated users can view/edit their account information. Password Change Select to determine whether local and/or remote users have the ability to change their passwords after they log in. Token Registration Select to configure FortiToken Mobile self-provisioning privileges, including:
- Allow FortiToken Hardware self-provisioning
- Allow FortiToken Mobile self-provisioning
- Allow FortiToken Cloud self-provisioning
Allow FIDO token registration: End-user may register new FIDO authenticators up to a maximum of 5 per account.
Allow FIDO token revocation: End-user may revoke any of the FIDO authenticators previously registered under their account.
- Allow Email self-provisioning
- Allow SMS self-provisioning
- Allow user to request a token from Administrator at this email address
- Restrict token self-provisioning to members of specific group
Smart Connect Select to assign a Smart Connect profile.
See Smart Connect Profiles for more information.
Device Tracking and Management Select to require users to register their devices after they log in. Registered devices can be placed into a specified MAC device user group.
Remove MAC devices after
Enable and enter the number of days after which MAC devices expire (default = 7, 1 - 365).
Note: The option is disabled by default.
- Select Save to create the new portal.
Token self-revocation
Token self-provisioning is offered as a pre-login service for guest portals.
When the token self-revocation feature is enabled (Authentication > Self-service Portal > Token self-provisioning), the guest portal's token verification page will have an additional Lost my token link. Clicking this link provides access to the token self-revocation service page that includes the following options:
- Re-provision my FortiToken Mobile
- Switch to email token authentication
- Disable my account
Post-login device tracking
When the post-login service option Device Tracking and Management is enabled, the administrator must specify into which device group to put the self-registered devices, as well as specify the Maximum number of devices per user (up to 20; 3 by default). When enabled, users have access to a post-login interface where they can add/edit/delete their list of devices. If enabled but the device is not registered, the FortiAuthenticator presents a device registration page after account credential validation.
If the user reaches their device limit, they must select an existing device to replace. If the MAC address is currently associated with a different user, it is re-assigned to this newly logged-in user with the following warning message:
"Your device had previously been registered by another user. Ownership has now been changed to your account."