Fortinet white logo
Fortinet white logo

Administration Guide

HA between remote sites over managed FortiSwitches

HA between remote sites over managed FortiSwitches

In a multi-site FortiGate HA topology that uses managed FortiSwitches in a multi-chassis link aggregation group (MCLAG) to connect between sites, HA heartbeat signals can be sent through the switch layer of the FortiSwitches, instead of through back-to-back links between the heartbeat interfaces. This means that two fiber connections can be used, instead of four. The FortiSwitches can be different models, but must all support MCLAG and be running version 6.4.2 or later.

This example shows how to configure heartbeat VLANs to assign to the access ports that the heartbeat interfaces connect to, passing over the trunk between the FortiSwitches on the two sites.
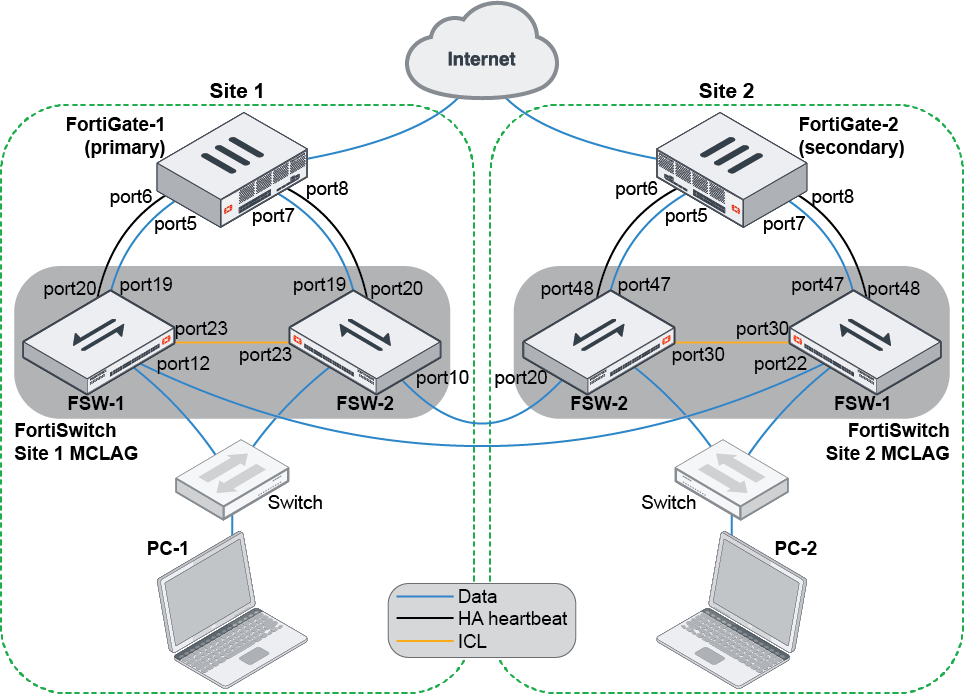
FortiGate HA is with two FortiGates in separate locations and the switch layer connection between the FortiSwitches is used for the heartbeat signal.

To configure the example:
  1. Disconnect the physical connections between Site 1 and Site 2:

    • Disconnect the cable on Site 1 FSW-1 port 12.

    • Disconnect the cable on Site 1 FSW-2 port 10.

  2. Configure Site 1:

    1. On the FortiGate, go to WiFi & Switch Controller > FortiLink Interface and configure FortiLink:

    2. Go to System > HA and configure HA:

      1. Set the heartbeat ports to the ports that are connected to FortiSwitch.

      2. Adjust the priority and enable override so that this FortiGate becomes the primary.

    3. Go to WiFi & Switch Controller > FortiSwitch VLANs and create a switch VLAN that is dedicated to the FortiGate HA heartbeats between the two FortiGates.

    4. Assign the native VLAN of the switch ports that are connected to the heartbeat ports to the created VLAN:

      1. Go to WiFi & Switch Controller > FortiSwitch Ports.

      2. In the Native VLAN column for the port, click the edit icon and select the Heartbeat VLAN.

    5. On each FortiSwitch, enable MCLAG-ICL on the trunk port:

      config switch trunk
          edit D243Z17000032-0
              set mclag-icl enable
          next
      end
  3. Configure Site 2 the same as Site 1, except set the HA priority so that the FortiGate becomes the secondary.

  4. Disconnect the physical connections for FortiGate HA and FortiLink interfaces on Site 2:

    • Disconnect the cable on Site 2 FSW-1 ports 47 and 48.

    • Disconnect the cable on Site 2 FSW-2 ports 47 and 48.

  5. Connect cables between the FortiSwitch MCLAG in Site 1 and Site 2:

    • Connect a cable from Site 1 FSW-1 port 12 to Site 2 FSW-1 port 22.

    • Connect a cable from Site 1 FSW-2 port 10 to Site 2 FSW-2 port 20.

  6. On all of the FortiSwitches, configure the auto-isl-port-group. The group must match on both sides.

    1. Site 1 FSW-1:

      Set members to the port that is connected to Site 2 FSW-1:

      config switch auto-isl-port-group
          edit 1
              set members port12
          next
      end 
    2. Site 1 FSW-2:

      Set members to the port that is connected to Site 1 FSW-1:

      config switch auto-isl-port-group
          edit 1
              set members port22
          next
      end 
    3. Site 2 FSW-1:

      Set members to the port that is connected to Site 2 FSW-2:

      config switch auto-isl-port-group
          edit 1
              set members port10
          next
      end 
    4. Site 2 FSW-2:

      Set members to the port that is connected to Site 1 FSW-2:

      config switch auto-isl-port-group
          edit 1
              set members port20
          next
      end 
  7. Connect the FortiGate HA and FortiLink interface connections on Site 2.

  8. Configure a firewall policy and route for traffic so that the client can reach the internet.

  9. Wait for HA to finish synchronizing and for all of the FortiSwitches to come online, then on FortiGate-1, go to WiFi & Switch Controller > Managed FortiSwitches and select the Topology view from the drop-down on the right.

    The page should look similar to the following:

To test the configuration to confirm what happens when there is a failover:
  1. On both PC-1 and PC-2, access the internet and monitor traffic. The traffic should be going through the primary FortiGate.
  2. Perform a continuous ping to an outside IP address, then reboot any one of the FortiSwitches.

    Traffic from both Site 1 and Site 2 to the internet should be recovered in approximately five seconds.

  3. Perform a continuous ping to an outside IP address, then force an HA failover (see Force HA failover for testing and demonstrations).

    Traffic from both Site 1 and Site 2 to the internet should be recovered in approximately five seconds.

  4. After an HA failover, on the new primary FortiGate, go to WiFi & Switch Controller > Managed FortiSwitch.

    The switch layer tiering will be changed so that the directly connected FortiSwitches are at the top of the topology.

HA between remote sites over managed FortiSwitches

HA between remote sites over managed FortiSwitches

In a multi-site FortiGate HA topology that uses managed FortiSwitches in a multi-chassis link aggregation group (MCLAG) to connect between sites, HA heartbeat signals can be sent through the switch layer of the FortiSwitches, instead of through back-to-back links between the heartbeat interfaces. This means that two fiber connections can be used, instead of four. The FortiSwitches can be different models, but must all support MCLAG and be running version 6.4.2 or later.

This example shows how to configure heartbeat VLANs to assign to the access ports that the heartbeat interfaces connect to, passing over the trunk between the FortiSwitches on the two sites.

FortiGate HA is with two FortiGates in separate locations and the switch layer connection between the FortiSwitches is used for the heartbeat signal.

To configure the example:
  1. Disconnect the physical connections between Site 1 and Site 2:

    • Disconnect the cable on Site 1 FSW-1 port 12.

    • Disconnect the cable on Site 1 FSW-2 port 10.

  2. Configure Site 1:

    1. On the FortiGate, go to WiFi & Switch Controller > FortiLink Interface and configure FortiLink:

    2. Go to System > HA and configure HA:

      1. Set the heartbeat ports to the ports that are connected to FortiSwitch.

      2. Adjust the priority and enable override so that this FortiGate becomes the primary.

    3. Go to WiFi & Switch Controller > FortiSwitch VLANs and create a switch VLAN that is dedicated to the FortiGate HA heartbeats between the two FortiGates.

    4. Assign the native VLAN of the switch ports that are connected to the heartbeat ports to the created VLAN:

      1. Go to WiFi & Switch Controller > FortiSwitch Ports.

      2. In the Native VLAN column for the port, click the edit icon and select the Heartbeat VLAN.

    5. On each FortiSwitch, enable MCLAG-ICL on the trunk port:

      config switch trunk
          edit D243Z17000032-0
              set mclag-icl enable
          next
      end
  3. Configure Site 2 the same as Site 1, except set the HA priority so that the FortiGate becomes the secondary.

  4. Disconnect the physical connections for FortiGate HA and FortiLink interfaces on Site 2:

    • Disconnect the cable on Site 2 FSW-1 ports 47 and 48.

    • Disconnect the cable on Site 2 FSW-2 ports 47 and 48.

  5. Connect cables between the FortiSwitch MCLAG in Site 1 and Site 2:

    • Connect a cable from Site 1 FSW-1 port 12 to Site 2 FSW-1 port 22.

    • Connect a cable from Site 1 FSW-2 port 10 to Site 2 FSW-2 port 20.

  6. On all of the FortiSwitches, configure the auto-isl-port-group. The group must match on both sides.

    1. Site 1 FSW-1:

      Set members to the port that is connected to Site 2 FSW-1:

      config switch auto-isl-port-group
          edit 1
              set members port12
          next
      end 
    2. Site 1 FSW-2:

      Set members to the port that is connected to Site 1 FSW-1:

      config switch auto-isl-port-group
          edit 1
              set members port22
          next
      end 
    3. Site 2 FSW-1:

      Set members to the port that is connected to Site 2 FSW-2:

      config switch auto-isl-port-group
          edit 1
              set members port10
          next
      end 
    4. Site 2 FSW-2:

      Set members to the port that is connected to Site 1 FSW-2:

      config switch auto-isl-port-group
          edit 1
              set members port20
          next
      end 
  7. Connect the FortiGate HA and FortiLink interface connections on Site 2.

  8. Configure a firewall policy and route for traffic so that the client can reach the internet.

  9. Wait for HA to finish synchronizing and for all of the FortiSwitches to come online, then on FortiGate-1, go to WiFi & Switch Controller > Managed FortiSwitches and select the Topology view from the drop-down on the right.

    The page should look similar to the following:

To test the configuration to confirm what happens when there is a failover:
  1. On both PC-1 and PC-2, access the internet and monitor traffic. The traffic should be going through the primary FortiGate.
  2. Perform a continuous ping to an outside IP address, then reboot any one of the FortiSwitches.

    Traffic from both Site 1 and Site 2 to the internet should be recovered in approximately five seconds.

  3. Perform a continuous ping to an outside IP address, then force an HA failover (see Force HA failover for testing and demonstrations).

    Traffic from both Site 1 and Site 2 to the internet should be recovered in approximately five seconds.

  4. After an HA failover, on the new primary FortiGate, go to WiFi & Switch Controller > Managed FortiSwitch.

    The switch layer tiering will be changed so that the directly connected FortiSwitches are at the top of the topology.