
Example CLI configuration
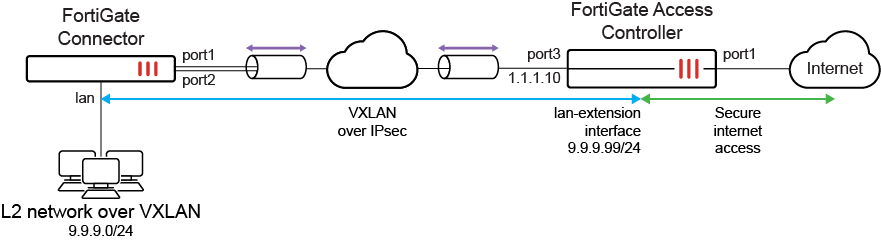
In this example, the Controller provides secure internet access to the remote network behind the Connector. The Controller has two WAN connections: an inbound backhaul connection and an outbound internet connection. The Connector has two wired WAN/uplink ports that are connected to the internet.
After the Connector discovers the Controller and is authorized by the Controller, the Controller pushes a FortiGate LAN extension profile to the Connector. The Connector uses the profile configurations to form two IPsec tunnels back to the Controller. Additional VXLAN aggregate interfaces are automatically configured to create an L2 network between the Connector LAN port and a virtual LAN extension interface on the Controller. Clients behind the Connector can then connect to the internet through the Controller that is securing the internet connection.
To discover and authorize the FortiGate Controller:
-
On the FortiGate Controller:
-
For high-end models (1000 series and higher), enable the FortiExtender setting:
config system global
    set fortiextender enable
end
This command is configured by default on entry-level and mid-range models (900 series and lower).
-
Enable IPAM and management of LAN extension interface addresses:
config system ipam set status enable set manage-lan-extension-addresses enable end -
Enable security fabric connections on port3 to allow the Connector to connect over CAPWAP:
config system interface
    edit "port3"
        set vdom "root"
        set ip 1.1.1.10 255.255.255.0
        set allowaccess fabric ping
        set ip-managed-by-fortiipam disable
    next
end
IPAM is specifically disabled for this interface since a static IP address is desired for this topology.
-
On the FortiGate Connector:
-
Enable VDOMs:
config system global
    set vdom-mode multi-vdom
end
You will be logged out of the device when VDOM mode is enabled.
-
For high-end models (1000 series and higher), enable the FortiExtender setting in the global VDOM:
config global
    config system global
        set fortiextender enable
    end
end
This command is configured by default on entry-level and mid-range models (900 series and lower).
-
Create the lan-ext VDOM while setting the VDOM type to LAN extension (making the VDOM act as a FortiExtender in LAN extension mode), and add the Controller IP address:
config vdom edit lan-ext config system settings set vdom-type lan-extension set lan-extension-controller-addr "1.1.1.10" set ike-port 4500 end next end -
Configure port1 and port2 to access the Controller:
config system interface edit "port1" set vdom "lan-ext" set ip 5.5.5.1 255.255.255.0 set allowaccess ping fabric set type physical set lldp-reception enable set role wan next edit "port2" set vdom "lan-ext" set ip 6.6.6.1 255.255.255.0 set allowaccess ping fabric set type physical set lldp-reception enable set role wan next end -
On the FortiGate Controller:
-
Extension controller configurations are automatically initialized:
config extension-controller fortigate-profile
    edit "FGCONN-lanext-default"
        set id 0
        config lan-extension
            set ipsec-tunnel "fg-ipsec-XdSpij"
            set backhaul-interface "port3"
        end
    next
end
config extension-controller fortigate edit "FGT60E0000000001" set id "FG5H1E0000000001" set device-id 0 set profile "FGCONN-lanext-default" next end -
Authorize the Connector:
config extension-controller fortigate
    edit "FGT60E0000000001"
        set authorized enable
    next
end
-
-
After the FortiGate Connector has been authorized, the Controller pushes the IPsec tunnel configuration to the Connector, forcing it to establish the tunnel and form the VXLAN mechanism.
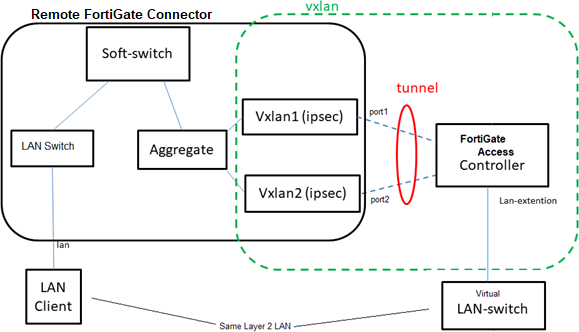
The VXLANs are built on the IPsec tunnels between the Connector and Controller. The VXLAN interfaces are aggregated for load balancing and redundancy. A softswitch combines the aggregate interface with the local LAN ports, allowing the LAN ports to be part of the VXLAN. This combines the local LAN ports with the virtual LAN extension interface on the FortiGate Controller.
-
The Connector receives the IPsec configurations from the Controller, and automatically creates tunnels for each uplink:
config vpn ipsec phase1-interface edit "ul-port1" set interface "port1" set ike-version 2 set peertype any set net-device disable set proposal aes128-sha256 aes256-sha256 aes128-sha1 aes256-sha1 set localid "peerid-T4YLv2rp62SU6JhoCPIv02MzjLtS7P5HlxRER1Qpi6O9ZsAsbPSpvoiE" set dpd on-idle set comments "[FGCONN] Do NOT edit. Automatically generated by extension controller." set remote-gw 1.1.1.10 set psksecret ****** next edit "ul-port2" set interface "port2" set ike-version 2 set peertype any set net-device disable set proposal aes128-sha256 aes256-sha256 aes128-sha1 aes256-sha1 set localid "peerid-T4YLv2rp62SU6JhoCPIv02MzjLtS7P5HlxRER1Qpi6O9ZsAsbPSpvoiE" set dpd on-idle set comments "[FGCONN] Do NOT edit. Automatically generated by extension controller." set remote-gw 1.1.1.10 set psksecret ****** next end -
VXLAN interfaces are automatically configured and formed over each tunnel:
config system vxlan edit "vx-port1" set interface "ul-port1" set vni 1 set dstport 9999 set remote-ip "10.252.0.1" next edit "vx-port2" set interface "ul-port2" set vni 1 set dstport 9999 set remote-ip "10.252.0.1" next end -
An aggregate interface is automatically configured to load balance between the two VXLAN interfaces, using the source MAC and providing link redundancy:
config system interface edit "le-agg-link" set vdom "lan-ext" set type aggregate set member "vx-port1" "vx-port2" set snmp-index 35 set lacp-mode static set algorithm Source-MAC next end -
The softswitch is automatically configured and bridges the aggregate interface and the local LAN to connect the LAN to the VXLAN bridged L2 network that goes to the FortiGate LAN extension interface:
config system switch-interface
    edit "le-switch"
        set vdom "lan-ext"
        set member "le-agg-link" "lan"
    next
end
-
To configure the LAN extension interface and firewall policy on the FortiGate Controller:
-
After the IPsec tunnel is setup and the VXLAN is created over the tunnel, the LAN extension interface is automatically created on the Controller:
config system interface
    edit "FGT60E0000000001"
        set vdom "root"
        set ip 192.168.0.254 255.255.255.0
        set allowaccess ping ssh
        set type lan-extension
        set role lan
        set snmp-index 27
        set ip-managed-by-fortiipam enable
        set interface "fg-ipsec-XdSpij"
    next
end
Devices on the remote LAN network will use this IP address as their gateway.
-
Observe that with IPAM enabled on the Controller that the DHCP server settings have been automatically configured:
config system dhcp server edit 3 set dns-service default set default-gateway 9.9.9.99 set netmask 255.255.255.0 set interface "FGT60E0000000001" config ip-range edit 1 set start-ip 9.9.9.100 set end-ip 9.9.9.254 next end set dhcp-settings-from-fortiipam enable config exclude-range edit 1 set start-ip 9.9.9.254 set end-ip 9.9.9.254 next end next end -
Configure the firewall policy to allow traffic from the LAN extension interface to the WAN interface (port1):
config firewall policy
    edit "2"
        set name "lan-ext"
        set srcintf "FGT60E0000000001"
        set dstintf "port1"
        set action accept
        set srcaddr "all"
        set dstaddr "all"
        set schedule "always"
        set service "ALL"
        set nat enable
    next
end
Optionally, security profiles and other settings can be configured.
The policy allows remote LAN clients to access the internet through the backhaul channel. Clients in the remote LAN behind the Connector receive an IP address over DHCP and access the internet securely through the Controller.
To verify the FortiGate LAN extension configuration:
-
Verify the IPsec tunnels' phase 1 and phase 2 negotiations on the Controller and Connector:
# diagnose ike vpn gateway list
# diagnose vpn tunnel list
-
Verify the VXLAN tunnel forwarding database list on the Controller and Connector:
# diagnose sys vxlan fdb list
-
Verify the DHCP server lease list on the Controller:
# execute dhcp lease-list
-
Verify the LAN extension session information on the Controller:
Controller-FGT # get extender session-info
Total 1 WS sessions, 0 AS sessions:
fg connector sessions:
FGT60E0000000001 : 1.1.1.10:5246 (dport 65535)lan-extension,  running,  install, data-enable, refcnt 6, miss_echos -1, up-time 1554 secs, change 1
extender sessions:
In this example, the Connector is in a working state.
-
Verify the LAN extension status on the Connector:*
Connector-FGT (lan-ext) # get extender lanextension-vdom-status

Control-Channel:
        controller ip: 1.1.1.0
        controller port: 5246
        controller name: FG5H1E0000000001
        missed echo: 0
        up time(seconds): 29483
        status: EXTWS_RUN
Data-Channel:
uplink [0]: port1
        IPsec tunnel ul-port1
        VxLAN interface vx-port1
uplink [1]: port2
        IPsec tunnel ul-port2
        VxLAN interface vx-port2
downlink [0]: lan
In this example, the Connector is in a working state.