
Integration with FortiData 7.6.4
|
|
This information is also available in the FortiOS 7.6 Administration Guide: |
FortiData is a data security product for discovering, classifying, and labeling files with sensitive data within your file storage system. Integration of FortiData with FortiGate lets you configure FortiGate to pass the fingerprint of transferred files to FortiData to check the label of the file. The labeling result is then returned and used for DLP processing in FortiGate policies.
This topic lists the FortiData Requirements and describes the FortiOS CLI syntax needed to support FortiData.
The Integration configuration section describes how to configure both FortiData and FortiGate to establish a connection between them, and the Example section provides several DLP processing scenarios.
See the FortiData Administration Guide for more information about FortiData.
Requirements
-
FortiData 7.6.1
-
FortiOS 7.6.4
CLI syntax
A new config system fortidata command is available:
config system fortidata
    set status {enable | disable}
    unset source-ip <string>
    set interface-select-method {auto | sdwan | specify}
    set vrf-select <integer>
end
|
Command |
Description |
|---|---|
|
status {enable | disable} |
Enable/disable FortiData. |
|
source-ip <string> |
Source IPv4 address used to communicate with FortiData. |
|
interface-select-method {auto | sdwan | specify} |
Specify how to select outgoing interface to reach server.
|
|
vrf-select |
VRF ID used for connection to server (0 to 511, default = 0). |
A new attribute is available in DLP profiles:
config dlp profile
    edit <name>
        set fortidata-error-action {log-only | block | ignore}
    next
end
|
Command |
Description |
|---|---|
|
fortidata-error-action {log-only | block | ignore} |
Action to take if FortiData query fails (default = block):
|
New fortidata type of DLP label is available:
config dlp label
    edit "label1"
        set type {mpip | fortidata}
        config entries
            edit 1
                set fortidata-label-name <string>
            next
        end
    next
end
|
Command |
Description |
|---|---|
|
type {mpip | fortidata} |
Type of DLP label:
|
|
fortidata-label-name <string> |
Name of FortiData label. Available when |
New diagnose sys fortidata commands are available:
# diagnose sys fortidata labels
# diagnose sys fortidata local-labels
# diagnose sys fortidata service-ip
|
Command |
Description |
|---|---|
|
fortidata labels |
Performs a fabric query to the FortiData appliance on the Fabric to get and print its list of labels. |
|
fortidata local-labels |
Displays the list of labels currently saved on disk as saved from the latest update. |
|
fortidata service-ip |
Performs a Fabric query to the FortiData appliance to get and print the HTTP2 service information for the query service. |
Integration configuration
To integrate FortiData with FortiGate, you must configure both to establish the connection between them. Configure the products in the following order:
-
FortiData. See FortiData configuration.
-
FortiGate. See FortiGate configuration.
Information about Diagnostics is also included.
FortiData configuration
On FortiData, configure a fabric connector for FortiGate, identify a TLS certificate, and configure the HTTP2 service. Add FortiGate as an allowed device in FortiData.
To configure FortiData in the GUI:
-
In FortiData on the Fabric > Connector page, enable security fabric, specify the details of the FortiGate, and click SAVE.
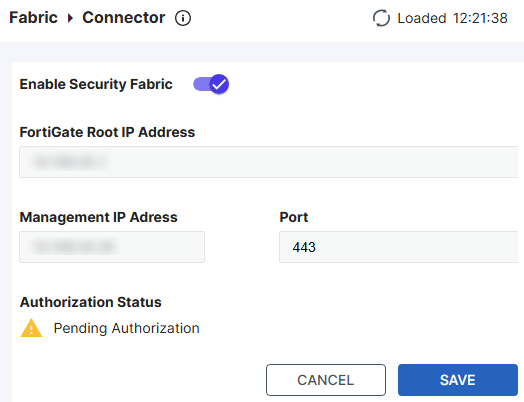
The authorization status is shown as Pending Authorized at this point as the FortiGate configuration is not complete yet.
-
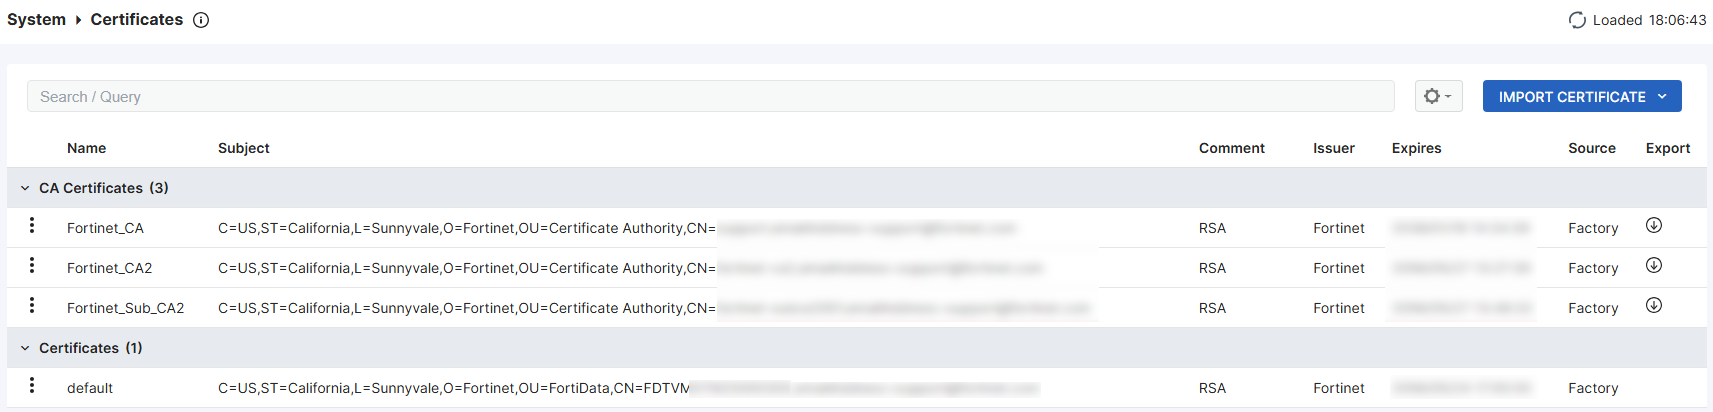
On the System > Certificates page, verify that at least one TLS certificate is listed. FortiData includes a default certificate that you can use.
-
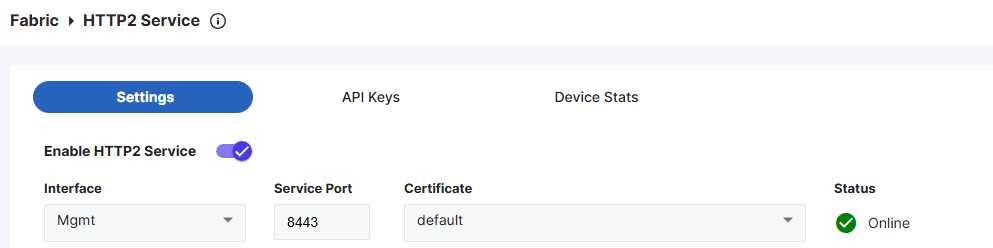
On the Fabric > HTTP2 Service page, ensure you have selected a valid certificate, which is required for the HTTPS connection between the FortiGate and FortiData. The default certificate will be used if you do not have any custom ones imported.
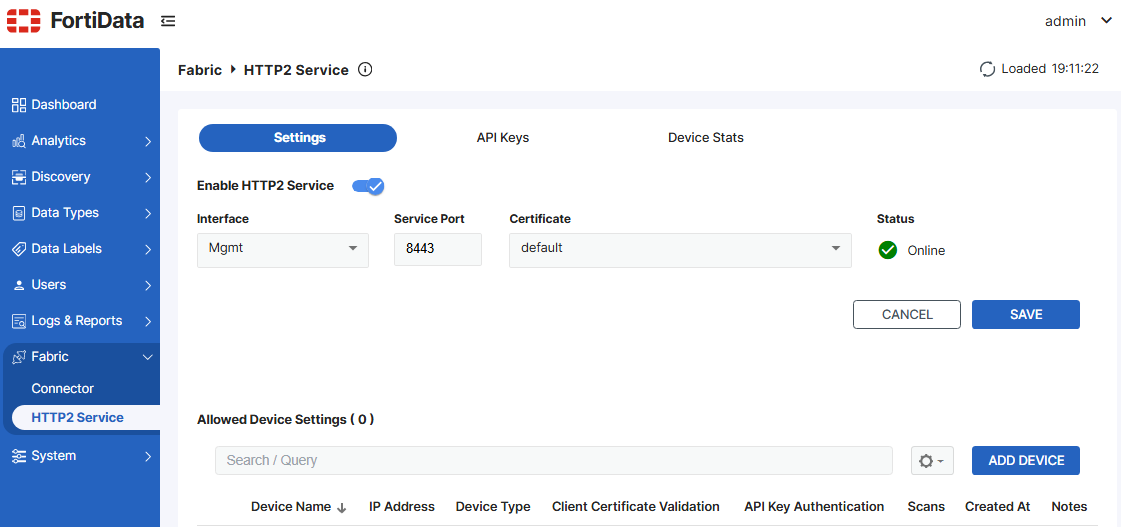
To add FortiGate as an allowed device in the GUI:
-
Go to Fabric > HTTP2 Service.
-
Under Settings, click ADD DEVICE.
-
From the Device Type dropdown list, select FortiGate.
-
In the IPv4 Address / Ranges field, enter
0.0.0.0/0to allow all IP addresses, or enter a specific IP or IP range for the FortiGate to restrict access for security reasons.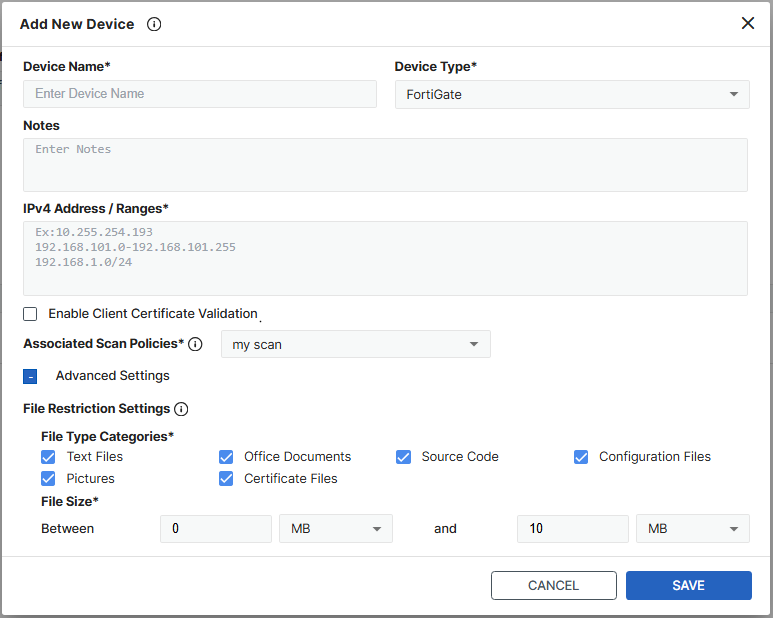
-
From the Associated Scan Policies dropdown list, select the desired scan policy, or create a new one.
-
Configure any advanced settings as needed to narrow down the file types and size to scan.
-
Click Save.
FortiGate configuration
On FortiGate, enable and authorize FortiData to establish a connection between the two products. Configure a DLP label, and reference the label in a DLP profile. Apply the DLP profile to a proxy-based firewall policy.
To configure FortiGate:
-
In FortiOS, enable FortiData:
config system fortidata set status enable unset source-ip set interface-select-method auto set vrf-select 0 end -
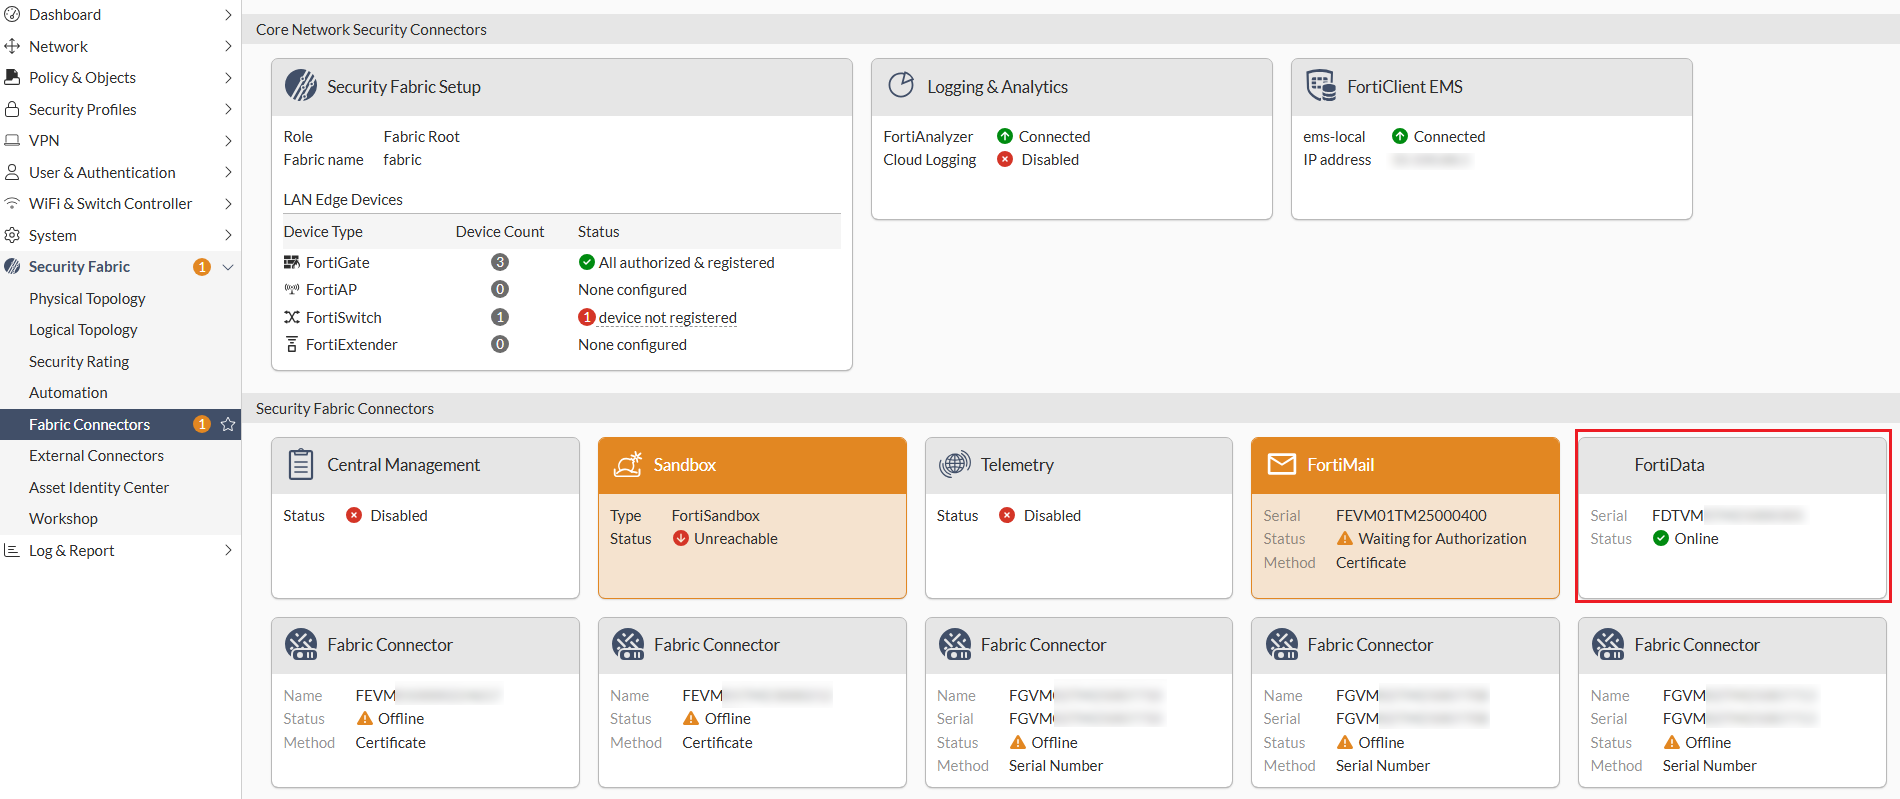
On the Security Fabric > Fabric Connectors page, click the FortiData card and select Authorize. Accept the certificate and verify that the status of the FortiData card changes to Online.
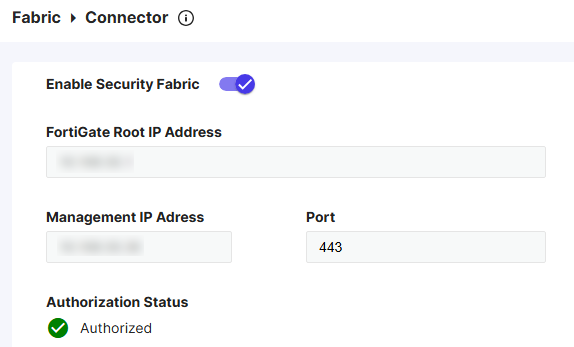
To further verify the authorization status, in FortiData, go to the Fabric > Connector page and ensure that the authorization status is Authorized.
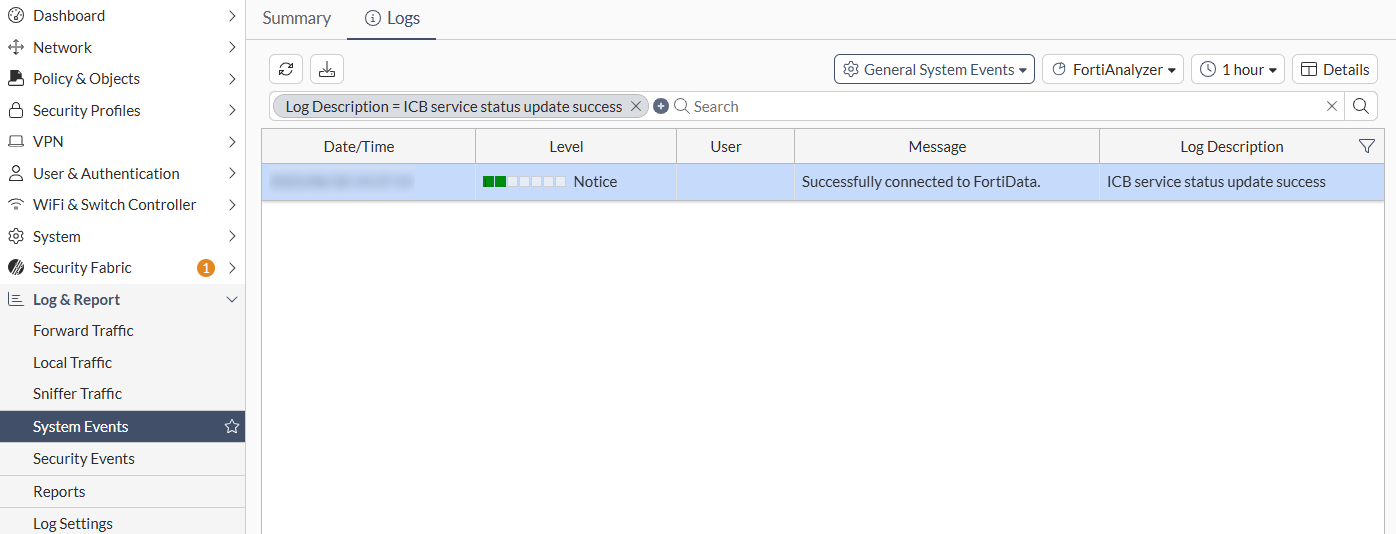
-
Go to the Log & Report > System Events page and verify the log stating that the FortiGate is successfully connected to the FortiData.
-
Configure a DLP label of the FortiData type:
config dlp label edit "fortidata" set type fortidata config entries edit 1 set fortidata-label-name "Critical" next end next end -
Reference the FortiData DLP label in your DLP profile:
config dlp profile edit "fortidata" set feature-set proxy config rule edit 1 set proto set filter-by label set name fortidata set action block next end next end -
Apply your DLP profile into a proxy-based firewall policy on your FortiGate to scan your traffic and detect any data loss based on the label of your document.
config firewall policy
    edit 1
        set inspection-mode proxy
        set dlp-profile fortidata
    next
end
Diagnostics
Use the following diagnose commands to debug FortiData integration issues:
-
Verify the integration is successful and a list of supported file types is returned:
# diagnose sys icb status
current time 2025-06-18 15:32:39 -07:00
icb.status_updated.count: 21
icb.status_updated.last.time: 1750282634
icb.status_updated.last.ago: 3325
icb.status_updated.last.local: 2025-06-18 14:37:14 -0700
======= fai =======
icb.state: stop
icb.file_type_list: not available
======= fsa =======
icb.state: stop
icb.file_type_list: not available
======= fortidata =======
icb.state: ready
icb.file_type_list:
ft.1: AVFT_JAVASCRIPT (7)
ft.2: AVFT_MSOFFICE (10)
ft.3: AVFT_PDF (42)
ft.4: AVFT_MSOFFICEX (52)
ft.5: AVFT_C_CPP (110)
ft.6: AVFT_JPEG (1006)
ft.7: AVFT_GIF (1007)
ft.8: AVFT_TIFF (1008)
ft.9: AVFT_PNG (1009)
ft.10: AVFT_BMP (1010)
icb.file_type_extensions:
ext.1: avif
ext.2: cer
ext.3: cfg
ext.4: conf
ext.5: crt
ext.6: csv
ext.7: env
ext.8: go
ext.9: ini
ext.10: java
ext.11: jpeg
ext.12: json
ext.13: key
ext.14: kt
ext.15: md
ext.16: odp
ext.17: ods
ext.18: odt
ext.19: p7b
ext.20: pem
ext.21: php
ext.22: py
ext.23: rtf
ext.24: service
ext.25: sh
ext.26: tiff
ext.27: toml
ext.28: txt
ext.29: webp
ext.30: yaml
ext.31: yml
-
Show statistics:
# diagnose sys icb stats
-
Restart the ICB manager daemon:
# diagnose sys icb restart
-
Query FortiData-related information:
# diagnose sys fortidata {labels | local-labels | service-ip}
Example
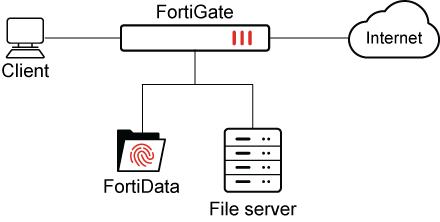
In this example, the integration configuration between FortiData and FortiGate is complete. A file server is configured, and labels are selected in FortiData. FortiData scans the file server and applies labels to matching files.
Following is an example FortiData file source with the labels health-care, credit-card, and python-source-code. Only the health-care label is visible in the screen shot:
The next step is to configure FortiGate to use the FortiData labels.
To configure FortiGate:
-
In FortiOS, configure DLP FortiData labels:
config dlp label edit "fortidata-label" set type fortidata config entries edit 1 set fortidata-label-name "python-source-code" next edit 2 set fortidata-label-name "credit-card" next edit 3 set fortidata-label-name "health-care" next end next end -
Configure a DLP profile:
In this example,
actionis set toblock, andfortidata-error-actionis set toblock:config dlp profile edit "fortidata-sensitive" set feature-set proxy config rule edit 1 set type file set proto http-get http-post ftp set filter-by label set label "fortidata-label" set action block next end set fortidata-error-action block next end -
Create a firewall policy:
config firewall policy
    edit 1
        set uuid 19e776e0-5c63-51f0-9d68-3053988cbc21
        set srcintf "port2"
        set dstintf "port1"
        set action accept
        set srcaddr "all"
        set dstaddr "all"
        set srcaddr6 "all"
        set dstaddr6 "all"
        set schedule "always"
        set service "ALL"
        set utm-status enable
        set inspection-mode proxy
        set profile-protocol-options "protocol"
        set ssl-ssh-profile "protocols"
        set dlp-profile "fortidata-sensitive"
        set nat enable
    next
end
With FortiData and FortiGate configured, the labels can be used for DLP processing in FortiGate policies. The results of DLP processing are described in the following example scenarios:
Scenario 1: FortiData error action
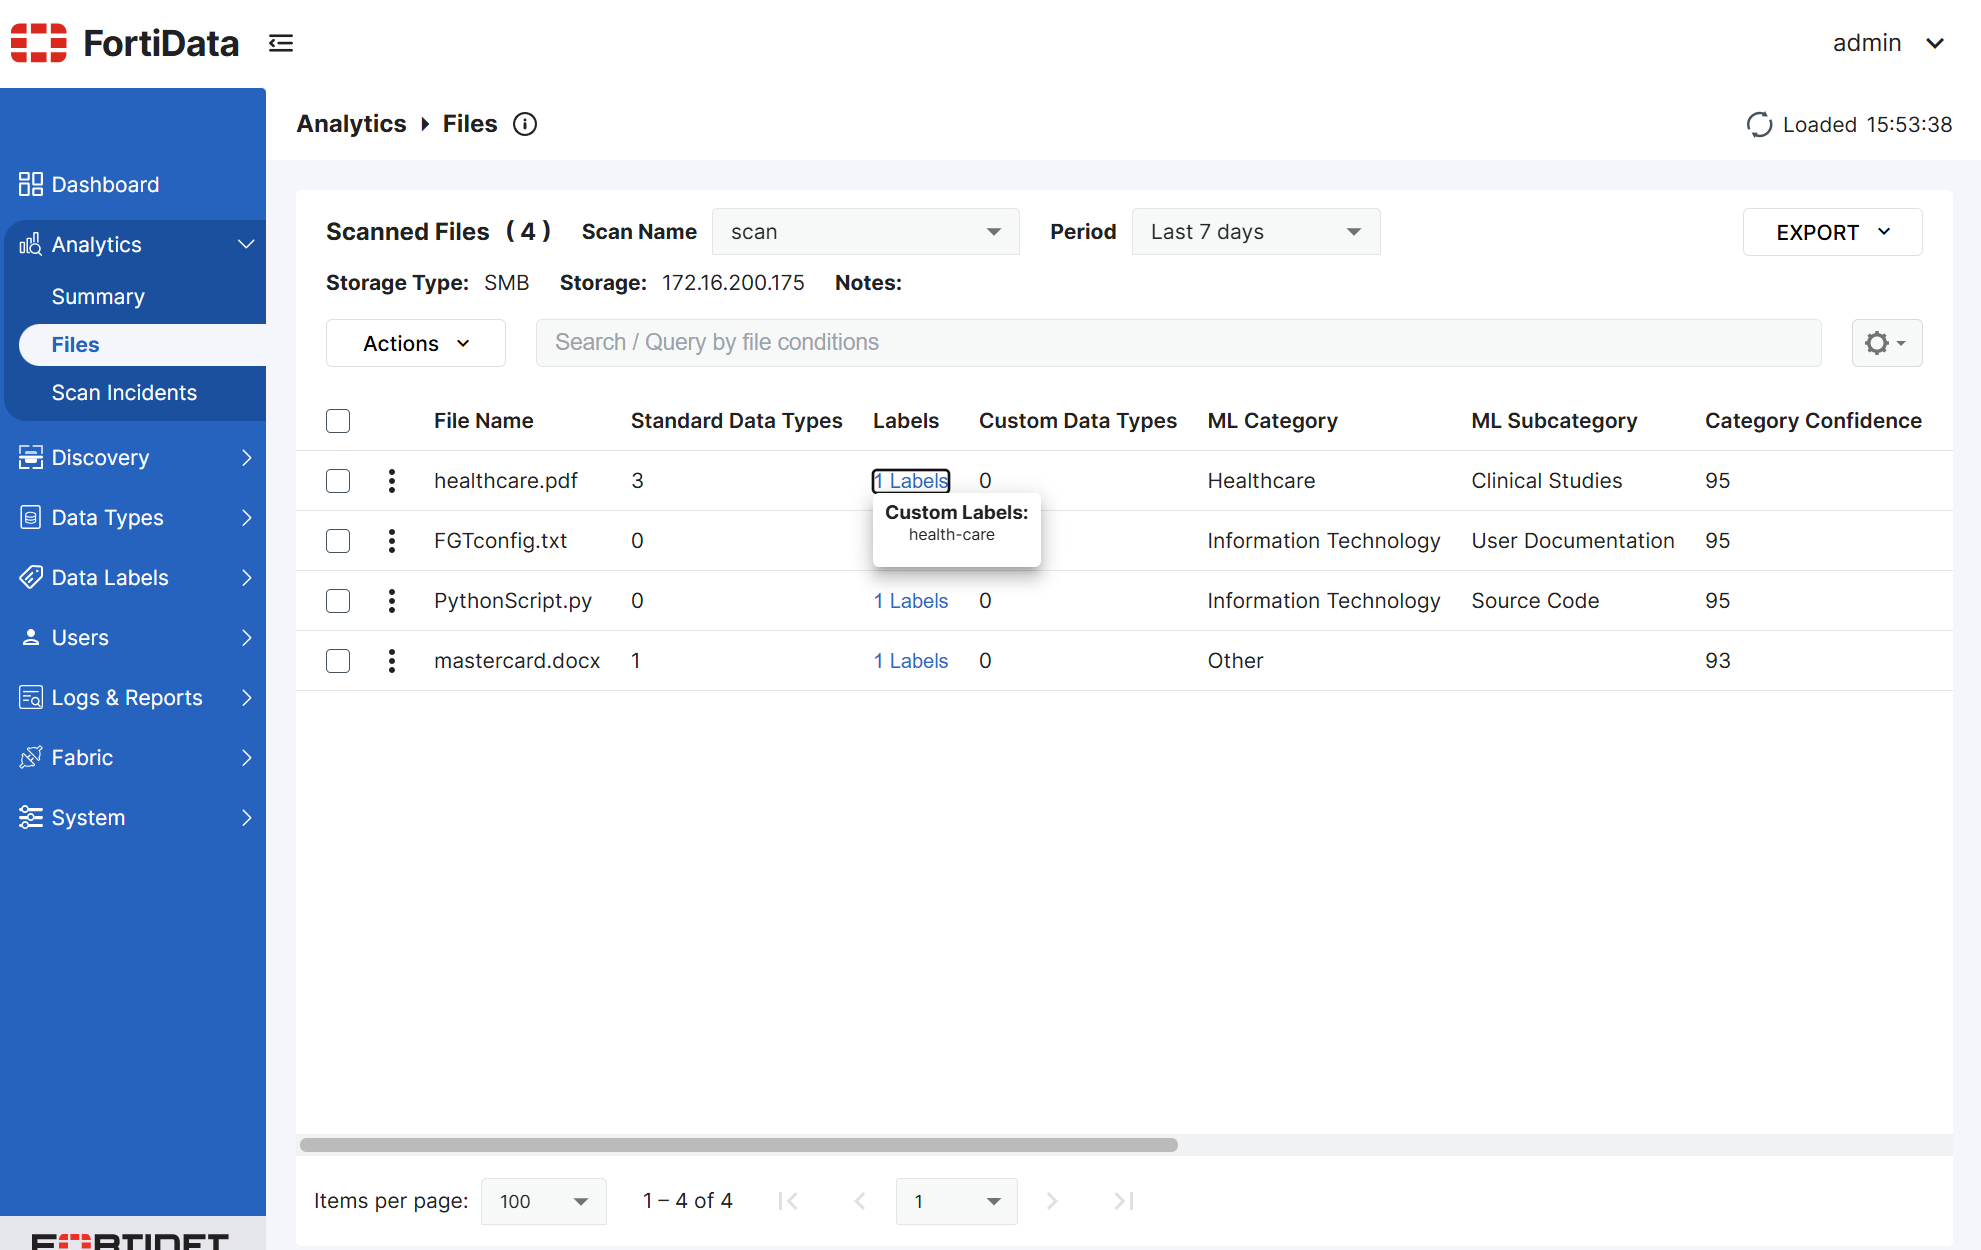
This scenario demonstrates what happens when the FortiGate DLP profile has fortidata-error-action set to block, and the FortiData query fails.
When the user attempts to post a PythonScript.py file through FTPS and the FortiData query fails, FortiGate blocks the attempt with an error message.
The following screen shot shows the PythonScript.py file has been blocked:
A DLP log with block action is generated on FortiGate, and you can view the log in the GUI on the Log & Report > Security Events > Data Loss Prevention pane:

You can also view the log in the CLI:
30: date=2025-07-06 time=17:55:24 eventtime=1751849724254438363 tz="-0700" logid="0956024581" type="utm" subtype="dlp" eventtype="dlp-error" level="warning" vd="vdom1" error="fortidata" dlpextra="internal_error" policyid=1 poluuid="8a20ddd4-5abf-51f0-3fcd-80a21a2eac18" policytype="policy" sessionid=3142 epoch=0 eventid=0 srcip=10.1.100.241 srcport=58837 srccountry="Reserved" srcintf="port2" srcintfrole="undefined" srcuuid="5146e274-5abf-51f0-48e4-5a4728500b83" dstip=172.16.200.175 dstport=40325 dstcountry="Reserved" dstintf="port1" dstintfrole="undefined" dstuuid="5146e274-5abf-51f0-48e4-5a4728500b83" proto=6 service="FTPS" filetype="python" direction="outgoing" action="block" filename="PythonScript.py" filesize=4493 profile="fortidata-sensitive"
Scenario 2: DLP action quarantine
This scenario demonstrates what happens when the FortiGate DLP profile has action set to quarantine-ip:
config dlp profile
    edit "fortidata-sensitive"
        set feature-set proxy
        config rule
            edit 1
                set proto http-get http-post ftp ssh
                set filter-by label
                set label "fortidata-label"
                set action quarantine-ip
            next
        end
    next
end
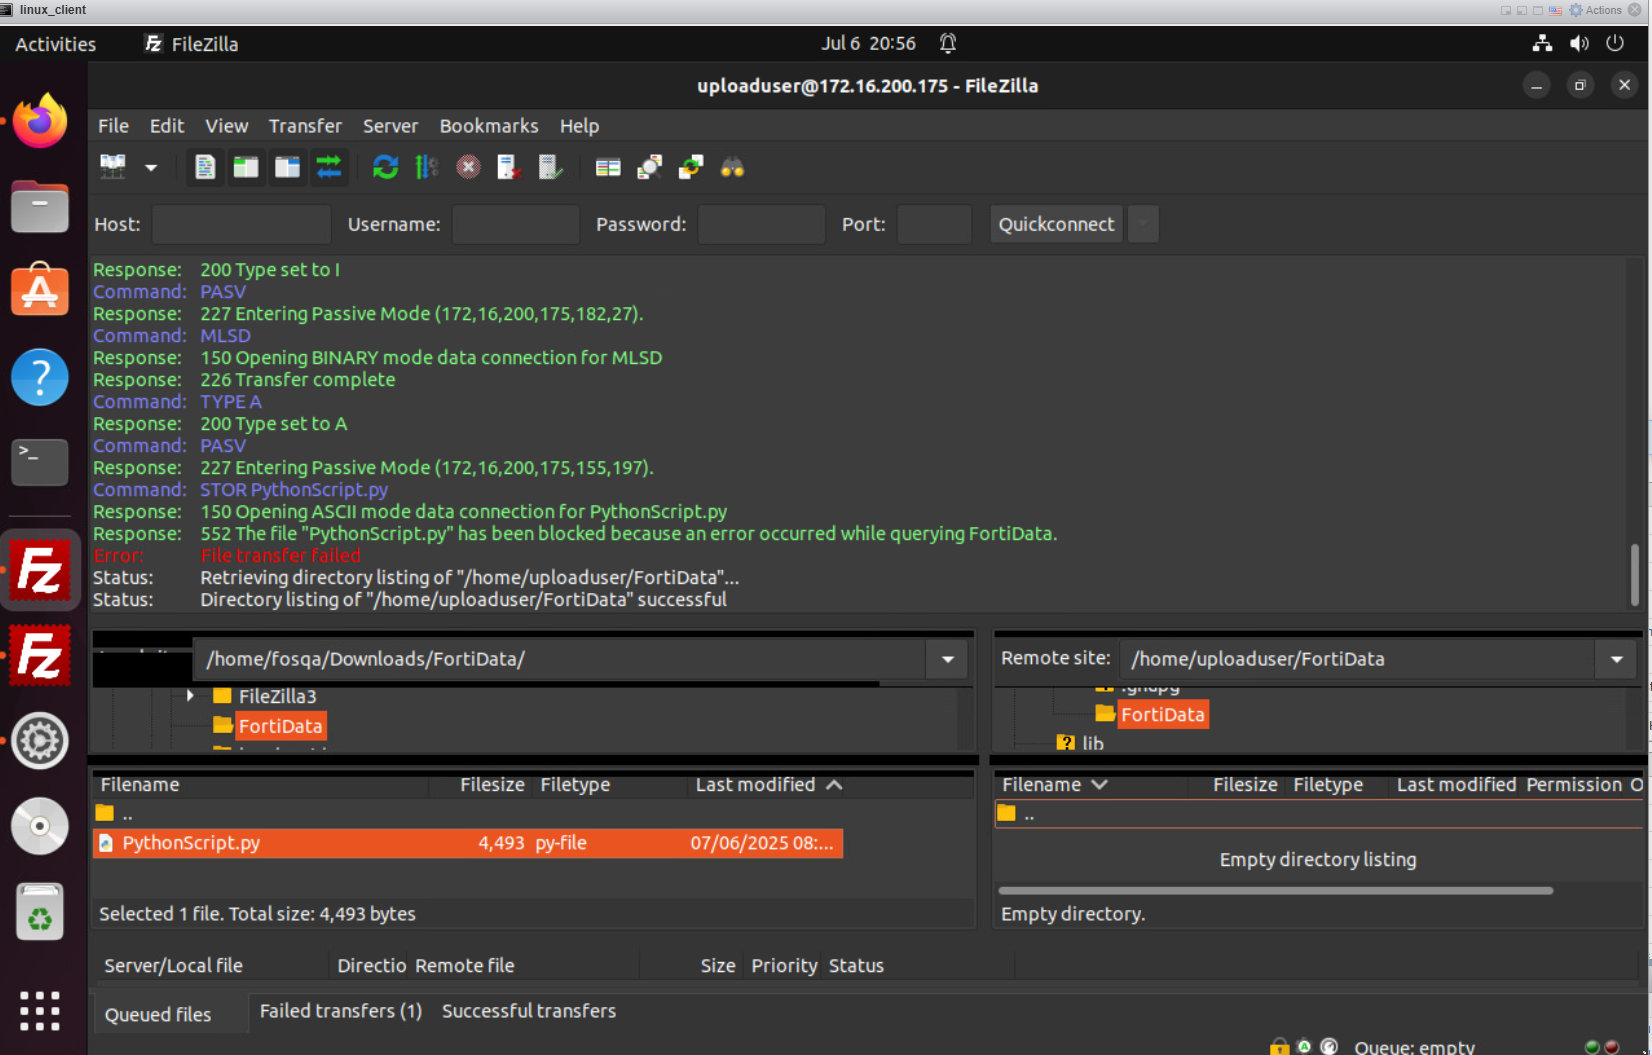
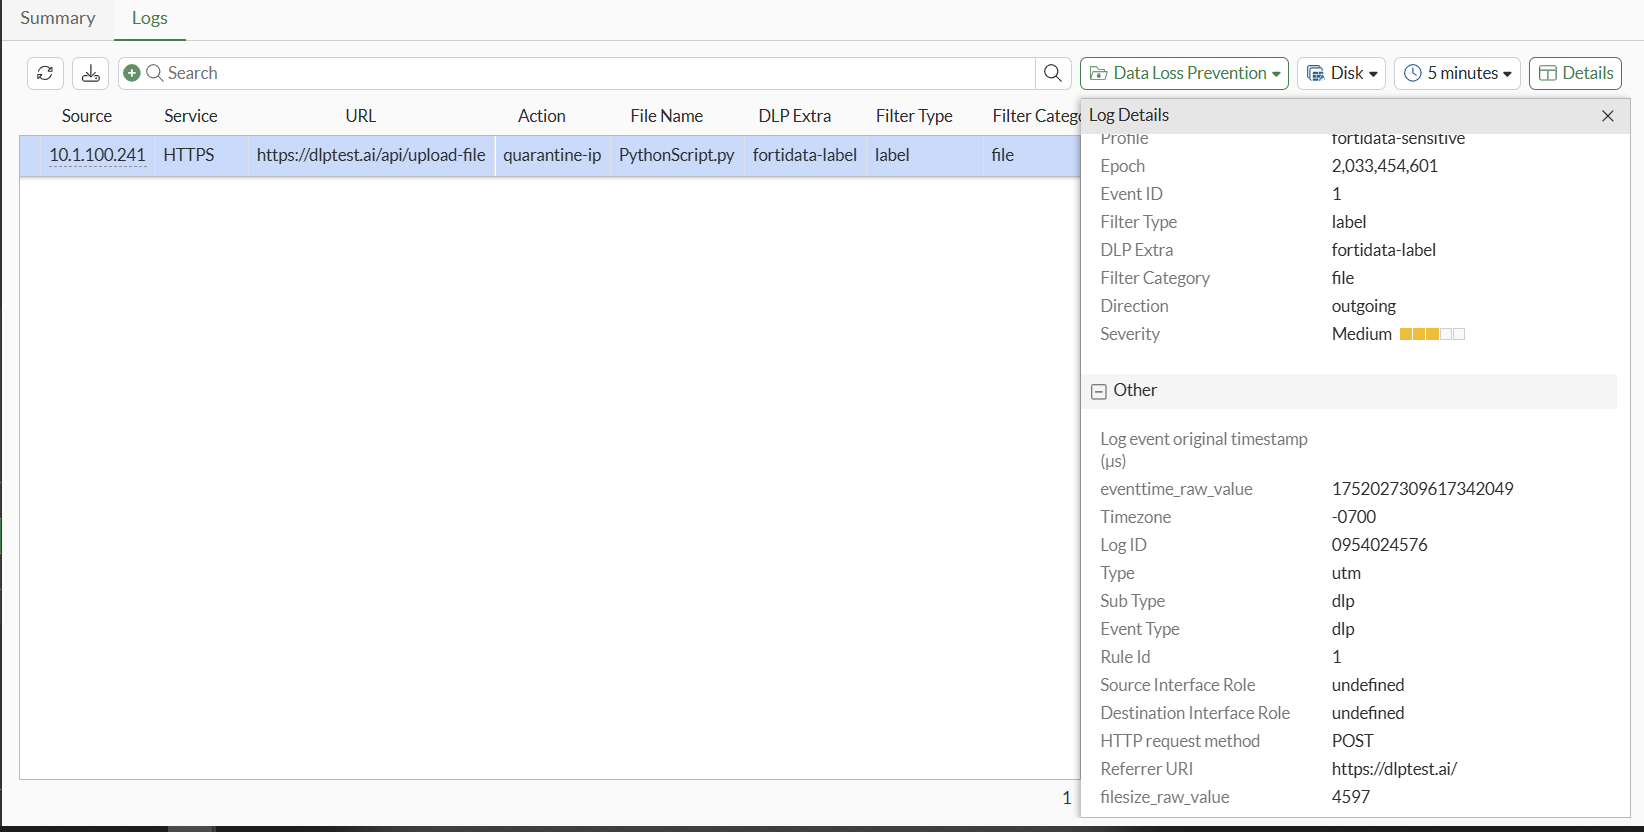
When the user attempts to post a PythonScript.py file through dlptest.ai that matches python-source-code FortiData label, FortiGate blocks the file and quarantines the IP:
In FortiGate, the client is banned:
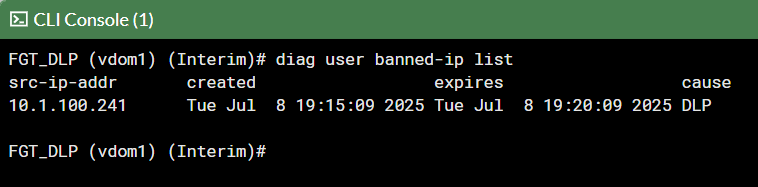
The client cannot ping the server through FortiGate:

A DLP log with quarantine-ip action is generated on FortiGate, and you can view the log in the GUI on the Log & Report > Security Events > Data Loss Prevention pane:
You can view the log in the CLI:
1: date=2025-07-08 time=19:15:09 eventtime=1752027309617342049 tz="-0700" logid="0954024576" type="utm" subtype="dlp" eventtype="dlp" level="warning" vd="vdom1" ruleid=1 dlpextra="fortidata-label" filtertype="label" filtercat="file" severity="medium" policyid=1 poluuid="19e776e0-5c63-51f0-9d68-3053988cbc21" policytype="policy" sessionid=3465 epoch=2033454601 eventid=1 srcip=10.1.100.241 srcport=37258 srccountry="Reserved" srcintf="port2" srcintfrole="undefined" srcuuid="dea915de-5c62-51f0-b993-090ad249da82" dstip=206.47.132.132 dstport=443 dstcountry="Canada" dstintf="port1" dstintfrole="undefined" dstuuid="dea915de-5c62-51f0-b993-090ad249da82" proto=6 service="HTTPS" filetype="python" direction="outgoing" action="quarantine-ip" hostname="dlptest.ai" url="https://dlptest.ai/api/upload-file" agent="Mozilla/5.0 (X11; Ubuntu; Linux x86_64; rv:139.0) Gecko/20100101 Firefox/139.0" httpmethod="POST" referralurl="https://dlptest.ai/" filename="PythonScript.py" filesize=4597 profile="fortidata-sensitive"
Scenario 3: DLP action monitor
This scenario demonstrates what happens when the FortiGate DLP profile has action set to monitor:
config dlp profile
    edit "fortidata-sensitive"
        set feature-set proxy
        config rule
            edit 1
                set proto http-get http-post ftp ssh
                set filter-by label
                set label "fortidata-label"
                set action monitor
            next
        end
    next
end
When the user attempts to post a file (mastercard.docx) that matches a FortiData label, FortiGate passes the file through.
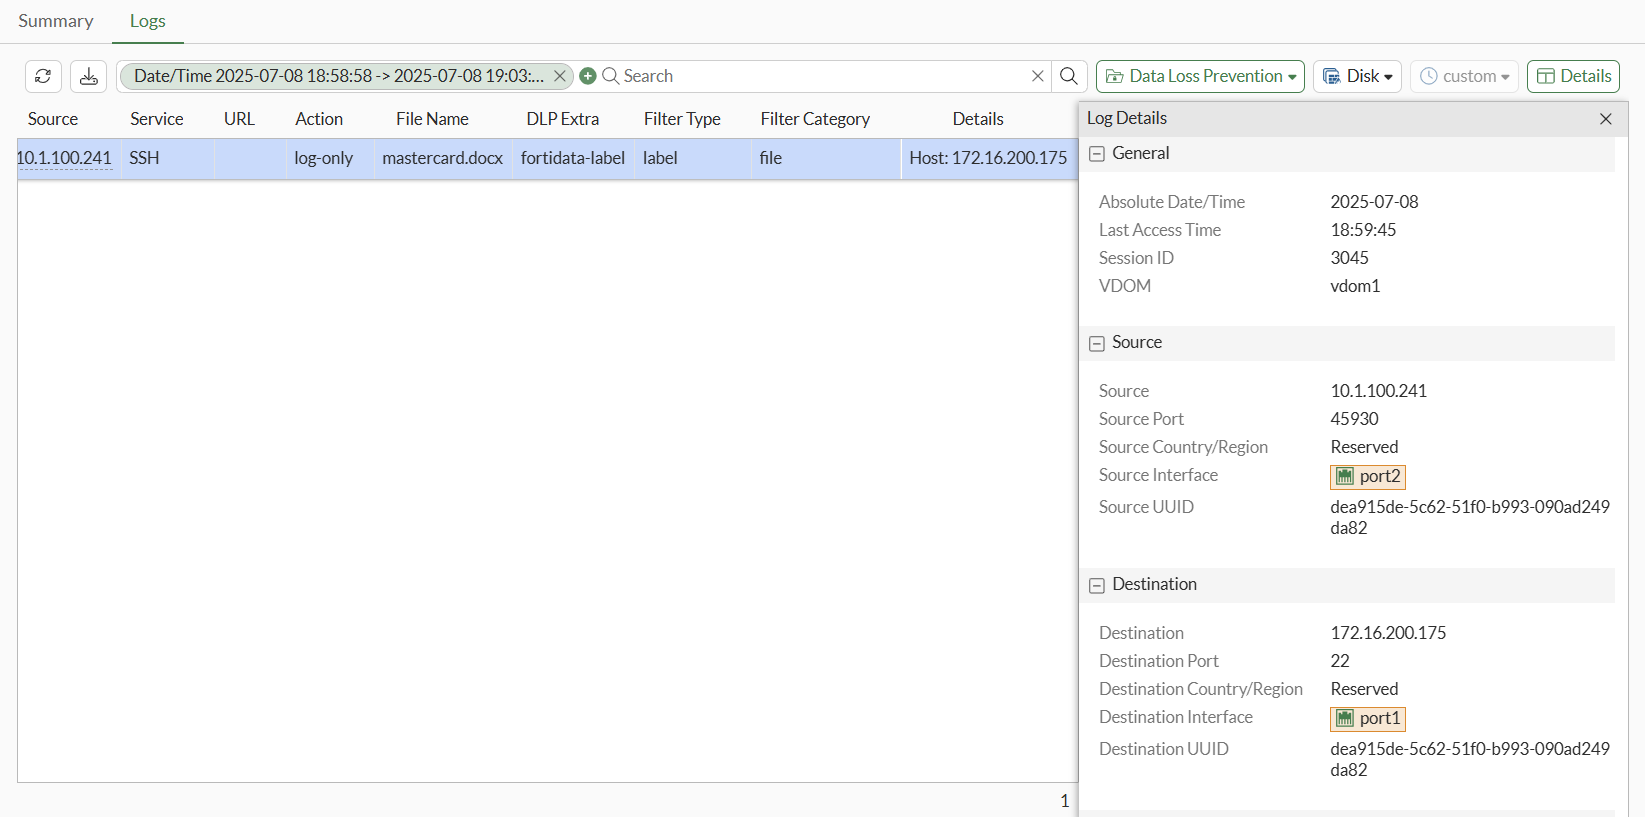
User secure copy to upload the mastercard.docx file to the server:

A DLP log with log-only action is generated on FortiGate, and you can view the log in the GUI on the Log & Report > Security Events > Data Loss Prevention pane
You can view the log in the CLI:
1: date=2025-07-08 time=18:59:45 eventtime=1752026384529707336 tz="-0700" logid="0954024577" type="utm" subtype="dlp" eventtype="dlp" level="notice" vd="vdom1" ruleid=1 dlpextra="fortidata-label" filtertype="label" filtercat="file" severity="medium" policyid=1 poluuid="19e776e0-5c63-51f0-9d68-3053988cbc21" policytype="policy" sessionid=3045 epoch=2033454538 eventid=0 srcip=10.1.100.241 srcport=45930 srccountry="Reserved" srcintf="port2" srcintfrole="undefined" srcuuid="dea915de-5c62-51f0-b993-090ad249da82" dstip=172.16.200.175 dstport=22 dstcountry="Reserved" dstintf="port1" dstintfrole="undefined" dstuuid="dea915de-5c62-51f0-b993-090ad249da82" proto=6 service="SSH" subservice="SCP" filetype="msofficex" direction="outgoing" action="log-only" filename="mastercard.docx" filesize=12604 profile="fortidata-sensitive"