
SAML-based authentication for FortiClient remote access VPNs
SAML-based authentication for FortiClient remote access VPNs can be configured using FortiClient 7.2.4 and later. Support is only available using IKEv2. Two factor authentication using FortiToken push is also supported.
The FortiGate authd daemon can support SAML authentication by listening for authentication messages from the FortiClient on the TCP port number configured in the auth-ike-saml-port setting (0 - 65535, default = 1001). This setting can be configured in the CLI:
config system global
    set auth-ike-saml-port <integer>
end
This allows the FortiGate to act as a SAML service provider (SP) for IKEv2 FortiClient remote access IPsec VPN clients by forwarding the FortiClient’s SAML request to the configured SAML identity provider (IdP) for user authentication.
In 7.6.1 and later, FortiGate can also listen for SAML authentication messages on the port defined in ike-tcp-port. This is helpful in the scenario where administrators have configured IPsec VPN over TCP and they are constrained by the port(s) allowed by their ISP provider. Usually in these cases, VPN can only be established on port 443. As such, the single port defined in ike-tcp-port will be used by the iked process to listen for VPN traffic as well as authentication messages. If the packet does not contain the IKE TCP special message, it will pass the traffic to the authd daemon.
In this scenario, it is recommended to use different ports for ike-tcp-port and auth-ike-saml-port to prevent the authd daemon from accidentally processing IKE TCP packets and dropping them.
config system setting
    set ike-tcp-port <port listened by iked>
end
config system global
    set auth-ike-saml-port <unique port>
end
Using TCP as transport requires FortiClient 7.4.1 or later. See IPsec VPN over TCP.
For more information and an example on using a single port for VPN over TCP and SAML authentication, see the community article Using the same TCP port for IPsec SAML authentication and IKE TCP encapsulation in FortiOS v7.6.1.
The ike-saml-server setting enables a configured SAML server to listen on a FortiGate interface for SAML authentication requests from FortiClient remote access IPsec VPN clients. It must be configured on the interface that is directly receiving the SAML authentication requests from FortiClient. This setting can be configured in the CLI:
config system interface
    edit <name>
        set ike-saml-server <saml_server>
    next
end
|
|
The For example, if FortiClient user SAML authentication traffic is always routed to the FortiGate on the WAN1 interface, then |
FortiClient will validate the certificate presented to it by FortiGate during its initial SAML connection. This certificate can be configured on the FortiGate from the GUI under User & Authentication > Authentication Settings > Certificate under User Authentication Options. To import the certificate on the FortiGate, see Import a certificate.
This certificate can also be configured in the CLI:
config user setting
     set auth-cert <certificate>
end
To prevent an invalid server certificate prompt on FortiClient, the certificate’s common name (CN) should match the IPsec VPN remote gateway’s FQDN. If the certificate is signed by a custom Certificate Authority or one that is not well-known, the Certificate Authority’s (CA) certificate should be imported in FortiClient endpoint’s Trusted Root Certificate Authority store. For details on installing a CA certificate on the endpoint, see Installing certificates on the client.
|
|
Dialup IPsec VPN with SAML using an external browser for authentication is supported starting from FortiOS 7.6.1, FortiClient (Windows) and (macOS) 7.2.5 and 7.4.1 and FortiClient (Linux) 7.4.3. |
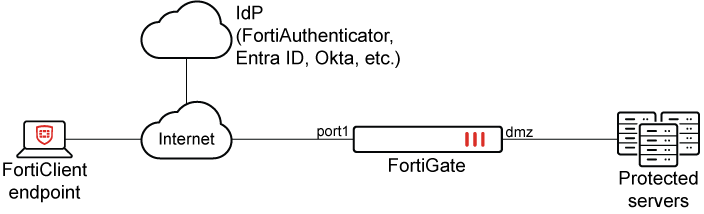
SAML authentication flow with IPsec
The SAML Authentication flow when using IPsec where FortiGate is the Service Provider (SP), FortiAuthenticator, Entra ID, Okta, or another SAML IdP is the Identity Provider (IdP) and FortiClient is the web-browser:
-
When the FortiClient user clicks on Connect on FortiClient to connect to IPsec VPN Gateway (i.e. FortiGate), FortiClient first initiates a connection to FortiGate on the
auth-ike-saml-portconfigured on FortiGate. -
The FortiGate sends a SAML Authentication Requests inside a redirect to FortiClient. The redirect consists of URLs to reach the IdP.
-
FortiClient uses these redirects to send SAML Authentication Request to the IdP after which the login page on the IdP opens up.
-
The user authenticates to the IdP using their SAML credentials configured on the IdP.
-
The IdP sends a SAML Authentication Response that contains the user and group information in form of SAML Assertions to FortiClient.
-
FortiClient sends a SAML Authentication Response to FortiGate.
-
The FortiGate consumes the SAML Authentication Response and SAML Assertions after verifying the IdP using its IdP’s certificate and provides FortiClient with a temporary token ID.
-
FortiClient initiates IPsec tunnel and presents the token ID for authentication. Upon successful verification of token ID, IPsec tunnel establishes.
SAML configuration example with different IdPs
The following example shows configuring IPsec with SAML authentication using different IdPs on FortiGate and FortiClient. These examples are based on VPN over UDP.
The configuration steps on the FortiGate, different IdPs and FortiClient are as follows:
|
|
Only Configuring SAML IdP and SAML SP is unique to individual IdPs. All other steps listed above are the same on FortiGate and FortiClient when using different IdPs. |
Configuring IKE-SAML authentication port number on FortiGate
Configure a suitable TCP port number for SAML authentication (auth-ike-saml-port) used by FortiGate. This example uses port 9443 and the setting is configurable using the CLI.
config system global
    set auth-ike-saml-port 9443
end
|
|
If VPN over TCP is used, then the port defined in ike-tcp-port takes precedence: config system setting
set ike-tcp-port <port listened by iked>
end
Use the |
Configuring IPsec VPN certificate
In this step, using either the GUI or the CLI, configure the IPsec VPN certificate that is presented to FortiClient upon its initial connection.
To configure the IPsec VPN certificate in the GUI:
-
Go to User & Authentication > Authentication Settings.
-
Select the certificate from the Certificate dropdown menu. To import the certificate on FortiGate, see Import a certificate.
To configure the IPsec VPN certificate in the CLI:
If the certificate VPN_Certificate has already been imported on the FortiGate, then use the following CLI commands:
config user setting
    set auth-cert "VPN_Certificate"
end
Configuring SAML IdP and SAML SP
The SAML configuration on SP (FortiGate) will vary based on selected IdPs from the list below. Select the preferred combination of SP and IdP as per your requirement from the following list.
-
Configure FortiAuthenticator as SAML IdP and FortiGate as SAML SP
-
Configure Microsoft Entra ID as SAML IdP and FortiGate as SAML SP
|
|
SAML IdPs other than FortiAuthenticator or Microsoft Entra ID can be used. Please refer to the documentation of the respective SAML IdP for details. |
Configuring IPsec IKEv2 on FortiGate
Configuring Remote access VPN on FortiGate enables FortiClient to connect to the IPsec VPN gateway configured on FortiGate. FortiClient 7.2.4 GA and above supports only IKEv2 for SAML authentication.
Different options can be selected between transport methods such as UDP, TCP, or Auto mode for IKE negotiation and encapsulation of ESP packets.
Traditionally, dial-up IPsec VPNs have used UDP as the transport protocol for IKE negotiations and encrypted traffic. With recent enhancements, IPsec VPNs can now operate over TCP, providing greater flexibility and compatibility in restrictive network environments. Using TCP as transport is beneficial in scenarios where ISPs, firewalls, or proxy servers only allow inbound and outbound TCP traffic and block UDP traffic. You can also specify a custom TCP port for IPsec communication for both FortiGate and FortiClient. For details on configuring a custom TCP port on FortiClient, see IPsec VPN over TCP. For details on configuring a custom TCP port on FortiGate, see Dialup IPsec VPN using custom TCP port.
Using TCP as transport requires IKEv2 and FortiClient 7.4.1 or later. See IPsec VPN over TCP.
The example discussed uses full-tunnel IPsec VPN. For split-tunnel configuration and other advanced configurations as per your requirement, see Remote access.
To configure IPsec VPN on FortiGate with FortiClient as the dialup client:
-
Go to VPN > VPN Tunnels.
-
Click Create New > Custom IPsec Tunnel.
-
Configure the following options:
Field
Value
Name
FCT_SAML
Comments
(Optional)
Network
IP Version
IPv4
Remote Gateway
Dialup User
Interface
port1
Select the IPsec tunnel gateway interface.
Mode Config
Enable
Select IPv4.
Assign client IP
Enable
Select Address/Address Group from the dropdown list.
IPv4 client IP range
VPN_Client_IP_Range
VPN_Client_IP_Range is configured from 10.212.134.1 to 10.212.134.200. If it is not already created, select Create > Address from the dropdown menu to create a new address object. See IP range for more information.
Subnet Mask
255.255.255.255
DNS
Specify
IPv4 DNS
8.8.8.8
IPv4 split tunnel
Disable
Transport
UDP
Optionally, if using FortiClient 7.4.1 or later for remote access:
-
Select TCP encapsulation to use TCP as transport.
-
Select Auto to use Auto mode.
Authentication
Method
Pre-shared key
Pre-shared key
Enter the unique pre-shared key. Use the same key on FortiClient.
IKE
version 2
EAP
Enable
Select EAP identity request
Network overlay
Enable when multiple dialup tunnels are configured. Specify a different network ID for each.
User group
Inherit from policy
One or more user groups can be used; see Using single or multiple user groups for user authentication.
-
-
In the Phase 2 selectors table click Create New:
-
Set Name to FCT_SAML.
-
Click OK.
-
-
Click OK. The newly created IPsec tunnel would be now visible under VPN > IPsec Tunnels.
For other advanced custom configurations as per your requirement, see Remote access.
|
|
The SAML group configured, See Using single or multiple user groups for user authentication for more information. |
Configuring firewall policies for IPsec tunnel
To configure firewall policies for IPsec tunnel:
-
Go to Policy & Object > Firewall Policy.
-
Click Create New.
-
Enter the following configuration:
Name
IPsec to DMZ
Enter the desired name.
Incoming interface
FCT_SAML
Select the configured IPsec tunnel.
Outgoing interface
DMZ
Select the interfaces that FortiClient needs access to when it connects to VPN.
Source
Under Address, select VPN_Client_IP_Range.
Under User, select SAML-FAC-Group (or SAML-ENTRA-ID-Group).

The group under User is the SAML user group configured in the earlier steps.
Destination
DMZ subnet
Click Create if it is not already created. See Subnet for more information.
Service
ALL
-
Click OK.
-
As IPsec tunnel configured as full-tunnel, create another policy to allow traffic from IPsec to Internet, to allow FortiClient to access Internet through IPsec tunnel.
For additional custom settings as per your requirement, see Firewall policy.
Configuring IPsec VPN profile on FortiClient
To configure an IPsec VPN profile on FortiClient:
-
In FortiClient, go to Remote Access > Configure VPN or Add a new connection.
-
Set the following settings to configure an IPsec IKEv2 profile on FortiClient:
Connection Name
VPN-Tunnel
Remote Gateway
<VPN Gateway FQDN> or <VPN Gateway IP>
Authentication Method
Pre-shared key with Enable Single Sign On (SSO) for VPN Tunnel enabled.
Customize port
9443
Advanced Settings > VPN Settings
IKE
Version 2
Options
Mode Config
Advanced Settings > Phase 1
IKE Proposal
Encryption: AES 128, Authentication: SHA 256
Encryption: AES 256, Authentication: SHA 256
DH Group
20, 21
Advanced Settings > Phase 2
IKE Proposal
Encryption: AES 128, Authentication: SHA 256
Encryption: AES 256, Authentication: SHA 256
DH Group
20
-
Make sure that the Phase 1 and Phase 2 settings, including encryption algorithms, authentication methods, Diffie-Hellman (DH) groups, and other parameters, that are configured on FortiClient exactly match the corresponding Phase 1 and Phase 2 settings defined on the FortiGate IPsec tunnel. A mismatch in any of these parameters will cause the tunnel negotiation to fail.
-
Click Save.
To explore additional custom options to configure IPsec VPN profile, see Configuring an IPsec VPN connection.
FortiClient EMS 7.4.4 and later support configuring the Network ID on the IPsec VPN Phase 1 settings in the GUI. For earlier versions, refer to the XML reference guide for IKE settings for details on configuring the <networkid> setting.
Verifying IPsec connection
To verify the IPsec connection in the GUI:
-
On the client PC, open FortiClient and select the Remote Access tab.
-
Select the VPN tunnel, VPN-Tunnel, and click Connect.
-
If the connection is successful, a FortiClient pop-up will appear briefly indicating that the IKE negotiation succeeded. The Remote Access window now displays VPN Connected and the associated VPN tunnel details.
-
In FortiOS, go to Dashboard > Network and locate the IPsec widget. Click the widget to expand to full view and view more details.
To verify the IPsec connection in the CLI:
The following debugs are from FortiGate when used with FortiAuthenticator as the IdP. The debugs should be similar for other IdPs depending on the SAML attributes supported and sent by the IdP.
-
Verify the IKE gateway list:
# diagnose vpn ike gateway list
vd: root/0
name: FCT_SAML_0
version: 2
interface: port1 3
addr: 10.100.66.99:4500 -> 208.91.115.30:64917
tun_id: 10.212.134.1/::10.0.0.18
remote_location: 0.0.0.0
network-id: 0
transport: UDP
created: 33s ago
eap-user: testuser
2FA: no
groups:
  SAML-FAC-Group 5
peer-id: 172.19.50.196
peer-id-auth: no
FortiClient UID: 19E1FA565259468FB46EDAA9D595176F
assigned IPv4 address: 10.212.134.1/255.255.255.255
nat: me peer
PPK: no
IKE SA: created 1/1  established 1/1  time 1680/1680/1680 ms
IPsec SA: created 1/1  established 1/1  time 40/40/40 ms

  id/spi: 1049 f883b783547b0c64/f45745cd8b228850
  direction: responder
  status: established 33-31s ago = 1680ms
  proposal: aes256-sha256
  child: no
  SK_ei: 09d0e99e4ee86518-82da5e46c7ef0425-0816ef283fed3ca6-3fa0eeb56ac863a5
  SK_er: 50e94be11ece32f8-aa13e54400e29531-684473a924ff04c5-8ebf45d854a59412
  SK_ai: 3d95eec2deb54cf1-a59a945f0156c214-fe9aa188a96dd70c-f2394e1f7bb647b0
  SK_ar: 0c0a478b800c7c9c-9dc56c05e9657200-7399b15d13ab8ad9-13984182abea936c
  PPK: no
  message-id sent/recv: 0/12
  QKD: no
  lifetime/rekey: 86400/86098
  DPD sent/recv: 00000000/00000000
  peer-id: 172.19.50.196
-
Verify the authd daemon debug output:
# diagnose debug application authd -1
...
[authd_http_on_method_post:5151]: src 10.1.100.253 flag 00008000
[authd_local_saml_auth:5602]: SAML login with UID '19E1FA565259468FB46EDAA9D595176F'.
[authd_http_prepare_javascript_redir:3852]: https://<VPN Gateway FQDN>:9443/saml?0704048f9683e491
...
-
Verify the samld daemon debug output:
# diagnose debug application samld -1
...
</Session>
samld_send_common_reply [99]:     Attr: 17, 31, magic=040c07809dafc13e
samld_send_common_reply [99]:     Attr: 18, 29, 2024-03-19T21:42:21Z
samld_send_common_reply [95]:     Attr: 10, 26, 'username' 'testuser'
samld_send_common_reply [95]:     Attr: 10, 17, 'group' 'IT'
...
-
Verify the fnbamd daemon debug output:
# diagnose debug application fnbamd -1
...
[2426] handle_req-Rcvd auth cache message
[133] __saml_auth_cache_push-Auth cache created, user='19E1FA565259468FB46EDAA9D595176F', SAML_server='saml-fac', vfid=0
[140] __saml_auth_cache_push-Hash bucket 227
[182] __saml_auth_cache_push-New auth cache entry is created, user='19E1FA565259468FB46EDAA9D595176F', expires=1648598587, SAML_server='saml-fac', vfid=0
[1918] handle_req-Rcvd auth req 994781475 for 19E1FA565259468FB46EDAA9D595176F in ipsec opt=00000000 prot=5
[466] __compose_group_list_from_req-Group 'saml-fac', type 1
[971] fnbamd_saml_auth_cache_lookup-Authneticating '19E1FA565259468FB46EDAA9D595176F'.
[1005] fnbamd_saml_auth_cache_lookup-Authentication passed.
-
Verify the IPsec daemon debug output:
# diagnose debug application ike -1
...
ike V=root:0:FCT_SAML: user 'testuser' authenticated group 'SAML-FAC-Group' 5
ike V=root:0:FCT_SAML:1180: responder preparing EAP pass through message
...
ike V=root:0:FCT_SAML_0:1180: mode-cfg assigned (1) IPv4 address 10.212.134.1
ike V=root:0:FCT_SAML_0:1180: mode-cfg assigned (2) IPv4 netmask 255.255.255.255
ike V=root:0:FCT_SAML_0:1180: mode-cfg send (13) 0:0.0.0.0/0.0.0.0:0
ike V=root:0:FCT_SAML_0:1180: mode-cfg send (3) IPv4 DNS(1) 8.8.8.8
...
ike V=root:0:FCT_SAML_0: sent tunnel-up message to EMS: (fct-uid=19E1FA565259468FB46EDAA9D595176F, intf=FCT_SAML_0, addr=10.212.134.1, vdom=root)
ike V=root:0:FCT_SAML_0: user 'testuser' 10.212.134.1 groups 1
...