


Configuring FortiManager and FortiAuthenticator for SCEP certificate deployment
Simple Certificate Enrollment Protocol (SCEP) is an open source protocol that allows for organizations to manage and deploy certificates in a scalable and secure fashion. This guide covers how to configure FortiAuthenticator as a Certificate Authority (CA) to conditionally sign certificates for FortiGates. These FortiGates will be managed by FortiManager and handles SCEP configuration as well as certificate usage for the FortiGates.
This section includes the following topics:
Configuring FortiAuthenticator
The FortiAuthenticator has two roles in this guide: create and act as a Certificate Authority, and participate in the SCEP process as the SCEP server.
There are three configuration sections for FortiAuthenticator:
Enable SCEP communications
To enable FortiAuthenticator for SCEP communications, you must enable the service as follows:
-
Navigate to System > Network > Interfaces.
-
Double click on the interface that FortiManager will communicate with the FortiAuthenticator on.
-
In the Access Rights > Services section, enable HTTP, and then SCEP and CRL Downloads.

Select or create a CA certificate
Certificate enrollment involves end entities, FortiGates in this example, receiving signed certificates. We will use FortiAuthenticator to generate the CA certificate that will be used to sign these certificates. If you already have a CA on FortiAuthenticator, you may skip this step.
To create a CA certificate on FortiAuthenticator:
-
Navigate to Certificate Management > Certificate Authorities > Local CAs.
-
Click Create New.
-
Provide the following details to create your CA. You may elect to add more details as you see fit.
Certificate ID
External_PKI
Certificate type
Root CA
Subject input method
Field-by-field
Name (CN)
external_pki
Department
FortiDocuments
Company
Fortinet
Key size
4096
Hash algorithm
SHA-256

-
Click Save.
-
Use the checkbox on the left side to select the newly created CA.
-
Select Export Certificates at the top to export the CA.
|
|
This certificate will need to be uploaded to any device which needs to verify the certificates signed by it. That might mean end user desktops for GUI admin access or deep inspection, or to FortiGates for site-to-site VPN. |
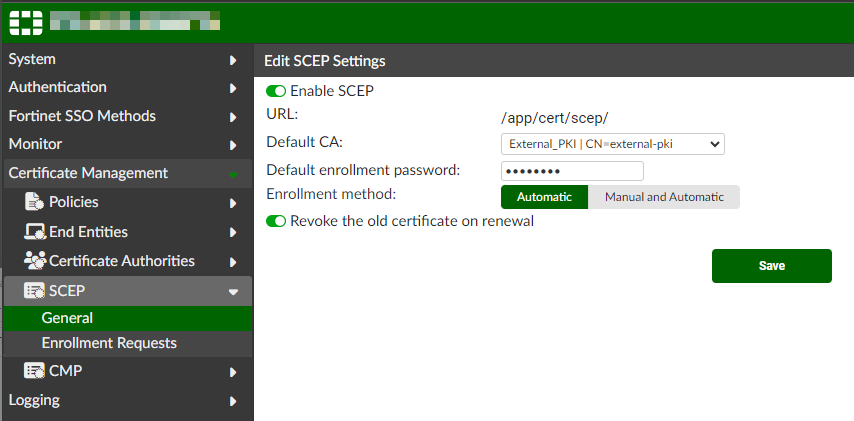
SCEP configuration
To enable SCEP:
-
Navigate to Certificate Management > SCEP > General.
-
Enable SCEP.
-
Ensure External_PKI is selected for Default CA.
-
Set the Default enrollment password.
-
Leave Enrollment method on Automatic.
-
Leave Revoke the old certificate on renewal enabled.
-
Select Save.
To configure enrollment requests:
-
Select Certificate Management > SCEP > Enrollment Requests.
-
Click Create New.
-
Provide the following details:
Automatic request type
Wildcard
Certificate authority
External_PKI | CN=external-pki
Subject input method
Field-by-field
Department
FortiDocuments
Company
Fortinet
Hash algorithm
SHA-256
Password generation
Default
Allow renewal ___ days before certificate is expired
Enabled, 7
Allow renewal if revoked
Enabled
Allow renewal if expired
Enabled
Add CRL Distribution Points extension
Enabled
Add OSCP Responder URL
Enabled
The wildcard request type allows you to create a single enrollment request to match all requests coming from FortiManager. Hover over the Wildcard option on FortiAuthenticator to learn more about the requirements and caveats.
-
Click Save.

Configuring FortiManager
There are four configuration sections for FortiManager:
Creating a certificate template
The certificate template is used to define a certificate object for one or more FortiGates. Like most objects in FortiManager, this object can be mapped to many FortiGates so that a common configuration can apply a unique certificate to each managed FortiGate.
To create a certificate template:
-
Navigate to Device Manager > Provisioning Templates.
-
Select Certificate from the top menu bar.
-
Select Create New.
-
Provide the following details:
Type
External
Certificate Name
external_pki
Organization Unit
FortiDocuments
Organization
Fortinet
Key Type
RSA
Key Size
4096
Hash Algorithm
SHA-256
CA Server URL
http://<FAC_IP>/app/cert/scepChallenge Password
<The enrollment password created on the FAC>

The CA Server URL is the URL that the FortiManager can reach FortiAuthenticator on plus the directory that was given after enabling SCEP.
-
Click OK.
-
Navigate to Policy & Objects > Advanced > Dynamic Local Certificate. Note how there is a new certificate created named external_pki. If you edit this certificate, you will notice that there are no per-device mappings. This is expected as the certificate has not yet been requested from FortiAuthenticator, therefore there are no mappings.
Import the External_PKI CA certificate
This certificate will be used by FortiGates to help validate any certificates that this CA certificate has signed. After importing the CA certificate here, it will be included in the next install for FortiGates in the VDOM.
To import the External_PKI CA certificate:
-
Navigate to Policy & Objects > Advanced, and select Tools > Feature Visibility at the top to enable Advanced > CA Certificates.
-
Select OK to save the feature visibility.
-
Select CA Certificates from the top menu bar.
-
Select Import in the top left to provide the following details:
-
Certificate Name: ca_external_pki.
-
Import CA Certificate: Upload the certificate exported from FortiAuthenticator in an earlier step.
-
-
Click OK to save.

Use the certificate in FortiManager
You can now use the certificate in a FortiGate configuration so it will be downloaded and installed to the FortiGate. The certificate may be used in several ways. This example demonstrates how it may be used for IPsec tunnel authentication.
|
|
This guide edits an existing hub and spoke VPN set up that is using a PSK for authentication. |
To use the certificate in FortiManager:
-
Navigate to VPN Manager > IPsec VPN Communities.
-
Select the VPN community you want to update to use automatic certificate enrollment. In this example, the VPN community is VPN1 and there are three FortiGates in this community: 1 HUB (fgt) and 2 spokes (contained in the Branches group: fgt1, fgt2).

-
Edit the community to adjust Authentication from Pre-Shared Key to Certificates, and select the external_pki certificate created from the certificate template, and select OK to save the selected certificate.

-
Select OK to save the community.
Install the certificate to FortiGate
To install the certificate to a FortiGate:
-
Select Install Wizard from the top menu bar.
-
Select the Policy Package for the spoke FortiGates, and select Next.
-
Ensure the FortiGates are selected and select Next.
-
Once the wizard has completed Installation Preparation (Validate Devices, step 3/4), check the enrollment status on the FortiAuthenticator.


-
Select Install on FortiManager to complete the Install Wizard and certificate deployment.
-
Repeat the above steps for the HUB FortiGate.

Verification of certificate deployment
Several certificates will now have been successfully deployed using SCEP. To verify the work, examine the FortiManager and FortiGate configuration.
Verification on FortiManager
On the FortiManager, review the dynamic certificate object, and some VPN monitors.
Dynamic certificate object
Navigate to Policy & Objects > Advanced > Dynamic Local Certificate to examine the external_pki certificate. Notice that there are three mappings for the HUB and two branch FortiGates.

You can assign this dynamic certificate to FortiGates without mappings and the SCEP process will automatically generate and deploy a certificate matching the assigned FortiGate.
IPsec VPN map
Review the VPN Manager > IPsec VPN Map > Topology View and Traffic View. Try enabling Show Table on Traffic View, and notice the Peer ID column. This can be easily used to authenticate.

Verification on FortiGate
Review the certificate and configuration on the FortiGate.
Certificate usage
You can verify the certificate on the FortiGate by navigating to VPN > IPsec Tunnels, then double clicking on a tunnel. This shows that a certificate named external_pki was used for authentication.


Certificate details
Review the external_pki certificate being used in the VPN tunnel.
- Navigate to System > Certificates (enable Certificates in Feature Visibility if necessary).
- Notice that the external_pki exists in the Local Certificates section.
- Notice that ca_external_pki exists in the Remote CA Certificate section.
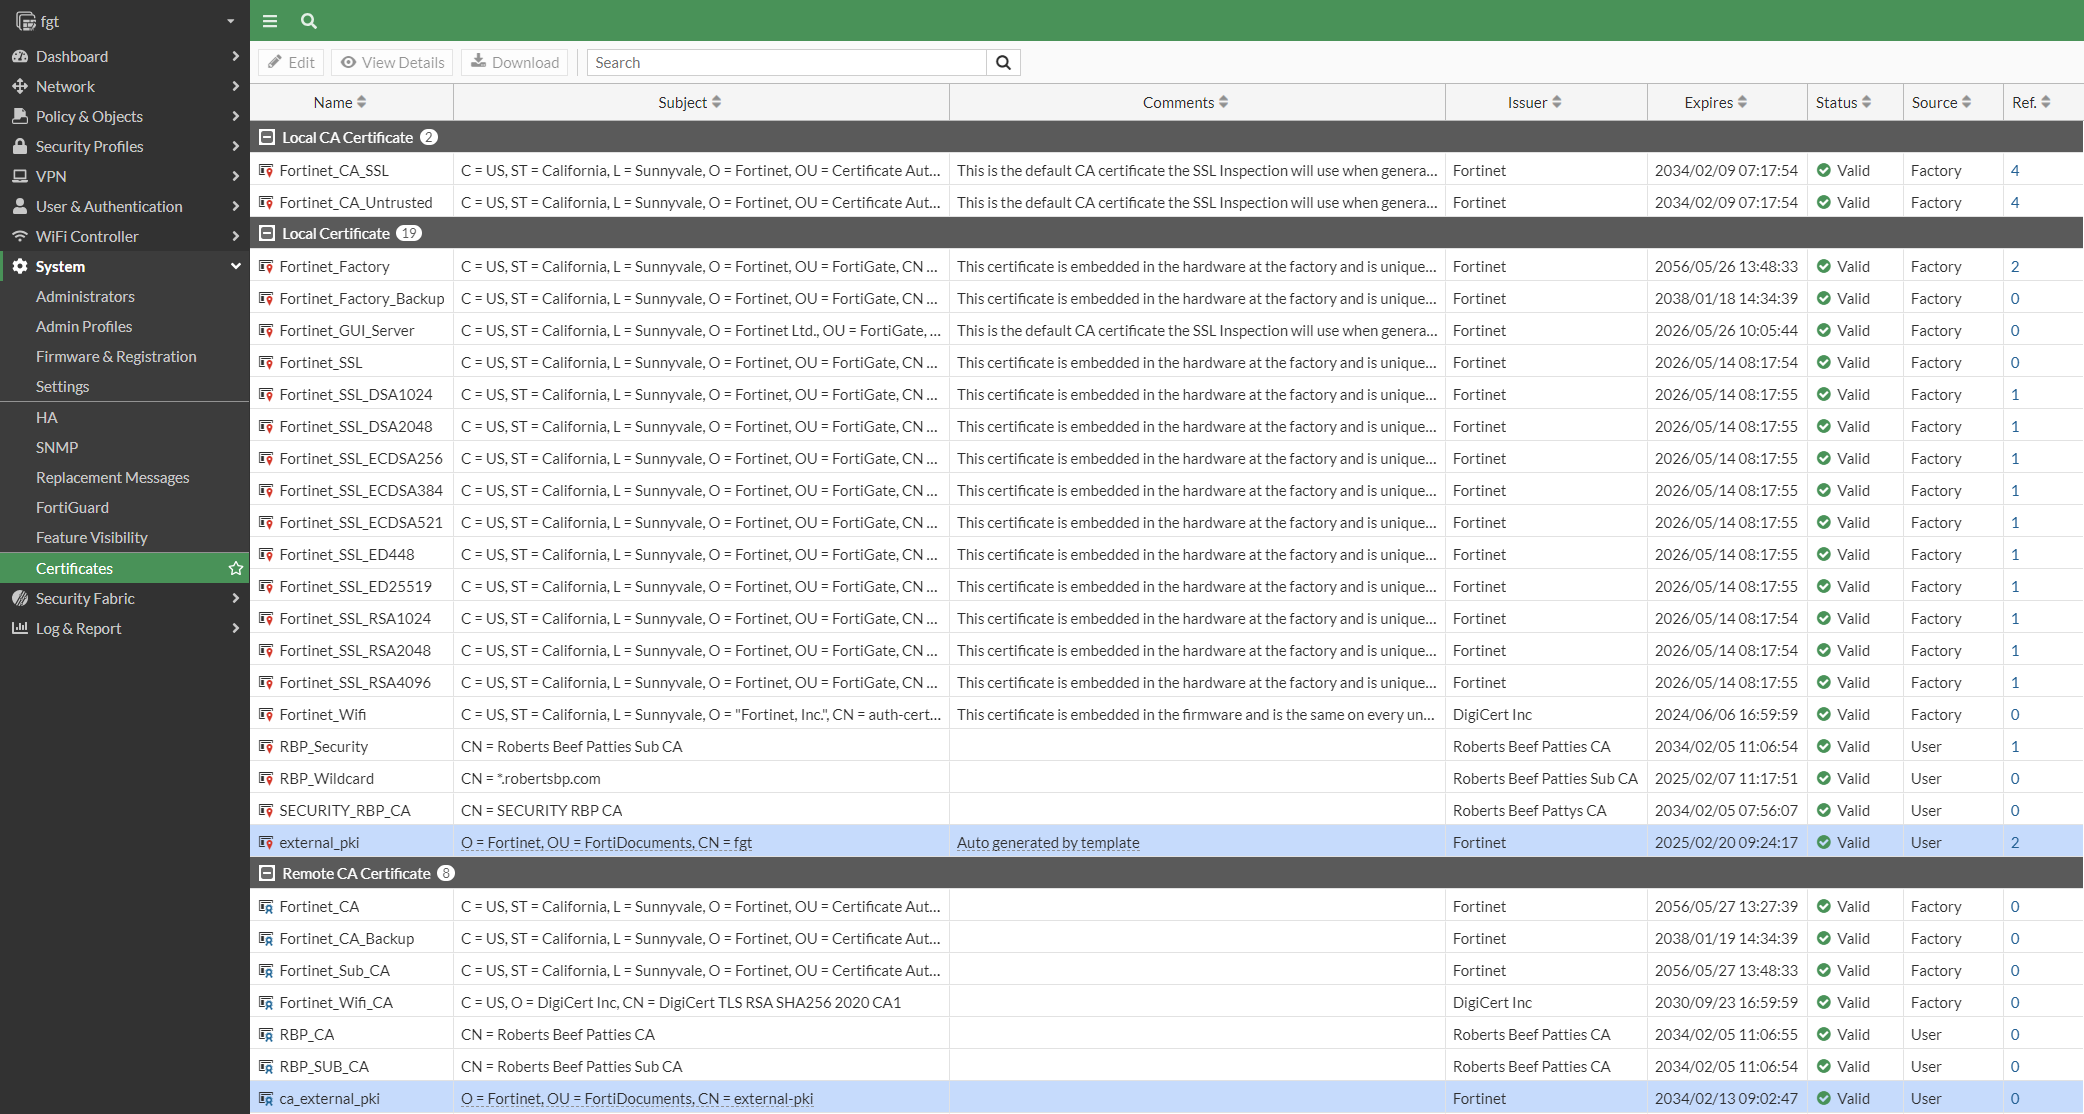
- Double-click either or both certificates to review their details.