


Using single sign-on with the FSSO agent
You can configure the FortiProxy unit to receive user group information from a Directory Service server equipped with the Fortinet Single Sign-On (FSSO) Agent. You can specify up to five computers on which an FSSO collector agent is installed. The FortiProxy unit uses these collector agents in a redundant configuration, whereby if the first agent fails, the FortiProxy unit attempts to connect to the next agent in the list, and so on.
Step 1: Create the FSSO agent
Using the GUI:
- Go to User & Device > Single Sign-On and select Create New.
- For the Type, select Fortinet Single-Sign-On Agent.
- For the Name, enter the name of the single sign-on server.
- For the Primary FSSO Agent, enter the domain name or IP address and the password for the single sign-on server.

- Select OK.
Using the CLI:
config user fsso
edit <server_name>
set server <domain_name_or_IPv4_address>
set password <password>
next
end
For example:
config user fsso
edit "winad"
set server "10.1.1.111"
set password ENC kct1/ZlxQBQ9WCHHDxt2vjlHbZy3jCKvaMjy3sRKClN0LR1jfk6G1zqHFXC7zBhygoSjtMjfsiXsaEFSLcPQ0B+Ae4UuTy8a/F+drAlpa6wcpzVnkMhtAO3/0S8bAjVbSDlse6wf5cqUxdmiwS56OafNcQEF+1VD0QzZNuZ+joLM1wBhisaKyk567o/aj9wRRaB5bA==
next
end
Step 2: Create the FSSO user group
Using the GUI:
- Go to User & Device > User Group and select Create New.
- For the Name, enter the name of the user group.
- For the Type, select Fortinet Single Sign-On (FSSO).
- For the Members, select + and add members for the user group.

- Select OK.
Using the CLI:
config user group
edit <user_group_name>
set group-type fsso-service
set member "<list_of_user_group_members>"
next
end
For example:
config user group
edit "fsso1"
set group-type fsso-service
set member "CN=DOMAIN USERS,CN=USERS,DC=QA,DC=BERBER,DC=COM"
next
end
Step 3: Create an authentication scheme
Using the GUI:
- Go to Policy & Objects > Authentication Rules.
- Select Create New > Authentication Schemes.
- For the Name, enter a name for the authentication scheme.
- For the Method, select + and then select Fortinet Single Sign On (FSSO).

- Select OK.
Using the CLI:
config authentication scheme
edit <authentication_scheme_name>
set method fsso
next
end
For example:
config authentication scheme
edit "sso1"
set method fsso
next
end
Step 4: Create an authentication rule
Using the GUI:
- Go to Policy & Objects > Authentication Rules.
- Select Create New > Authentication Rules.
- For the Name, enter a name for the authentication rule.
- For the Source Interface, select + and then select the incoming (ingress) interfaces.
- For the Source Address, select + and then select the source addresses.
- For the Destination Address, select + and then select the destination addresses.
- Move the Single Sign-On Method slider to enable it.
- For the Single Sign-On Method, select the authentication scheme that you created in Step 3.
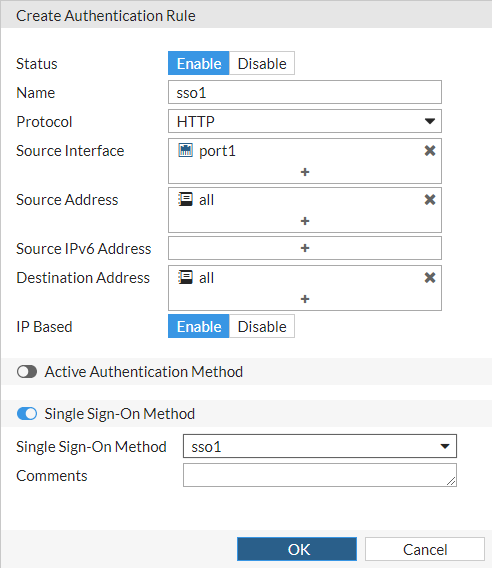
- Select OK.
Using the CLI:
config authentication rule
edit <authentication_rule_name>
set srcintf <list_of_incoming_interfaces>
set srcaddr <IPv4_addresses | all | none>
set dstaddr <IPv4_addresses | all | none>
set sso-auth-method <authentication_scheme_name>
next
end
For example:
config authentication rule
edit "sso1"
set srcintf "port1"
set srcaddr "all"
set dstaddr "all"
set sso-auth-method "sso1"
next
end
Step 5: Create a firewall policy
Using the GUI:
- Go to Policy & Objects > Policy and select Create New.
- For Type, select Explicit.
- For Name, enter a policy name or number.
- For Explicit Web Proxy, select web-proxy.
- For Outgoing Interface, select + and then select the same source interfaces that you selected for the authentication rule.
- For Source, select + and then select the same source addresses that you selected for the authentication rule and select the FSSO user group that you created in Step 2.
- For Destination, select + and then select the same destination addresses that you selected for the authentication rule.
- For Action, make sure that ACCEPT is selected.
- For Schedule, make sure that always is selected.
- For Application/Service, select + and then select webproxy.
- Make sure that Enable this policy is enabled.
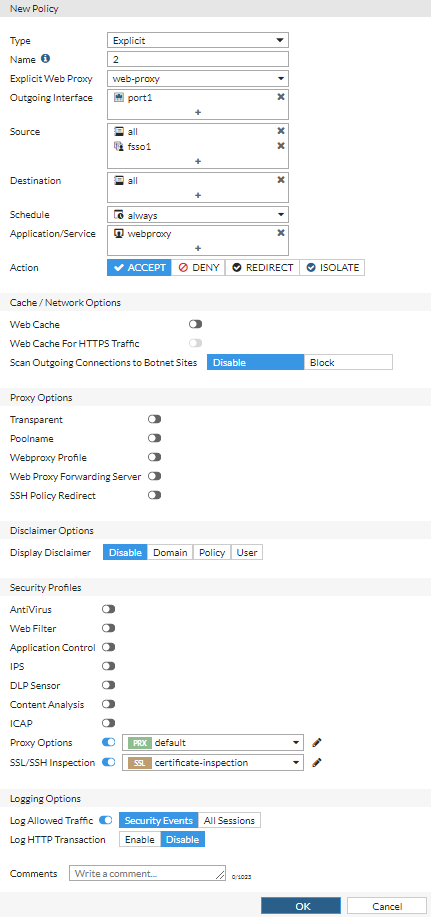
- Select OK.
Using the CLI:
config firewall policy
edit <policy_identifier>
set type explicit-web
set explicit-web-proxy "web-proxy"
set dstintf <list_of_incoming_interfaces>
set srcaddr <IPv4_addresses | all | none>
set dstaddr <IPv4_addresses | all | none>
set action accept
set schedule "always"
set service "webproxy"
set groups <user_group_name>
set utm-status enable
next
end
For example:
config firewall policy
edit 2
set type explicit-web
set explicit-web-proxy "web-proxy"
set dstintf "port1"
set srcaddr "all"
set dstaddr "all"
set action accept
set schedule "always"
set service "webproxy"
set groups "fsso1"
set utm-status enable
next
end
Step 6: Verify that the user was authenticated
Using the GUI:
To check FSSO logons, go to FortiView > User Monitor and select Show all FSSO Logons.
Using the CLI:
diagnose wad user list

ID: 3, IP: 10.1.1.51, VDOM: root
	user name   : BER
	worker      : 0
	duration    : 43
	auth_type   : IP
	proxy_type  : Explicit Proxy
	auth_method : FSSO
	pol_id      : 2
	g_id        : 2
	user_based  : 0
	expire      : no
	LAN:
		bytes_in=58749 bytes_out=1832213
	WAN:
		bytes_in=1837078 bytes_out=53225