
Create or edit a SAML server
To add a new SAML server in the GUI:
-
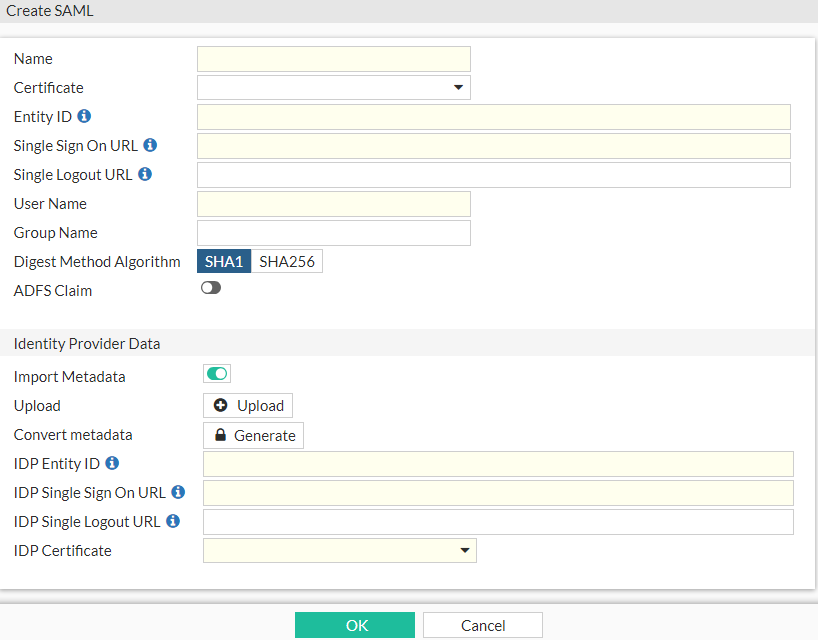
In the SAML server list, click Create New from the toolbar. The Create SAML window opens.
-
Configure the following:
Name
Enter the name that identifies the SAML server on the FortiProxy unit.
Certificate
Select the certificate to sign SAML messages.
Entity ID
Enter the service provider entity identifier. The URL must start with
http://orhttps://.Single Sign On URL
Enter the service provider single sign-on URL. The URL must start with
http://orhttps://.Single Logout URL
Enter the service provider single logout URL. The URL must start with
http://orhttps://.User Name
Enter the user name in the assertion statement.
Group Name
Enter the group name in the assertion statement.
Digest Method Algorithm
Select the algorithm used for the digest method.
ADFS Claim
Enable or disable the ADFS claim for the user and group attributes in the assertion statement.
Identity Provider Data
Import Metadata
Enable or disable importing metadata. When enabled, use the Upload or Convert metadata fields to import an IdP metadata file or convert the metadata to a user SAML CLI configuration.
Upload
Click Upload to import an IdP metadata file.
Convert metadata
Click Generate to convert the metadata to a user SAML CLI configuration.
IDP Entity ID
Enter t he identity provider entity identifier. The URL must start with
http://orhttps://.IDP Single Sign On URL
Enter the identity provider single sign-on UR. The URL must start with
http://orhttps://.IDP Single Logout URL
Enter the identity provider single logout URL. The URL must start with
http://orhttps://.IDP Certificate
Enter the identity provider certificate name.
-
Click OK to create the new SAML server.
To edit a SAML server in the GUI:
-
Select the SAML server you want to edit and then click Edit from the toolbar. The Edit SAML window opens.
-
Edit the server information as required and click OK to apply your changes.
To add a new SAML server or edit an existing SAML server in the CLI:
Use the config user saml command.