
Connecting to FortiTelemetry agents
This topic applies only to a FortiGate acting as a FortiTelemetry Controller with FortiTelemetry enabled on the System > Feature Visibility page. For a summary of FortiTelemetry-related tasks that you can do in FortiOS, see FortiTelemetry. See also FortiTelemetry Administration Guide.
The FortiTelemetry Controller connects to FortiTelemetry agents through the Telemetry connector. The following agent connection methods are supported:
-
FortiTelemetry Controller automatically discovers telemetry agents and displays them in the Telemetry connector for manual authorization. You must authorize each agent before the controller can use it.
-
You can configure pre-authorized telemetry connectors, and FortiTelemetry Controller uses the connectors to automatically authorize discovered telemetry agents for use.
FortiTelemetry agents are either hardware-based or software-based. Deployed agents must be in the same subnet as the internal interface of the FortiTelemetry Controller.
After FortiTelemetry agents are authorized, a telemetry address with the agent's name and Telemetry sub-type is automatically created.
Viewing the Telemetry connector and agents
The Telemetry connector displays the number of FortiTelemetry agents. Edit the Telemetry card to display the list of agents, and edit each agent to display and edit its details.
To view the Telemetry connector and FortiTelemetry agents:
-
Go to Security Fabric > Fabric Connectors. The Telemetry connector is displayed.
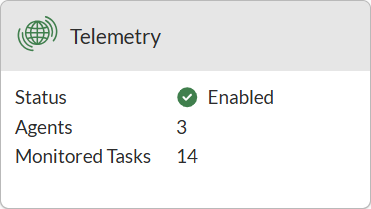
Status
Status of FortiTelemetry: Enabled or Disabled.
Agents
The number of online, authorized FortiTelemetry agents discovered by the FortiTelemetry Controller.
Monitored Tasks
Number of tasks being monitored by the FortiTelemetry agents based on the configured telemetry profile(s) selected in the firewall policy used by the FortiTelemetry Controller.
-
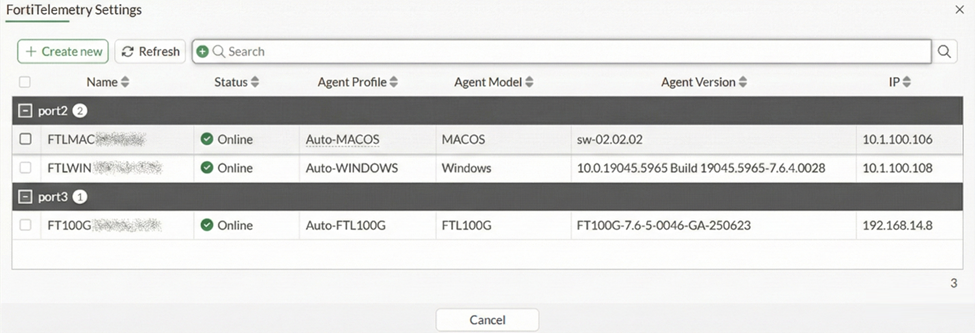
Click the Telemetry connector, and click Edit. The FortiTelemetry Settings pane opens.
FortiTelemetry agents are grouped by interface.
Create new
Click to create pre-authorized Telemetry connectors to automatically authorize FortiTelemetry agents. See Configuring pre-authorized telemetry connectors .
Name
Name of the FortiTelemetry agent.
Status
Status of the FortiTelemetry agent.
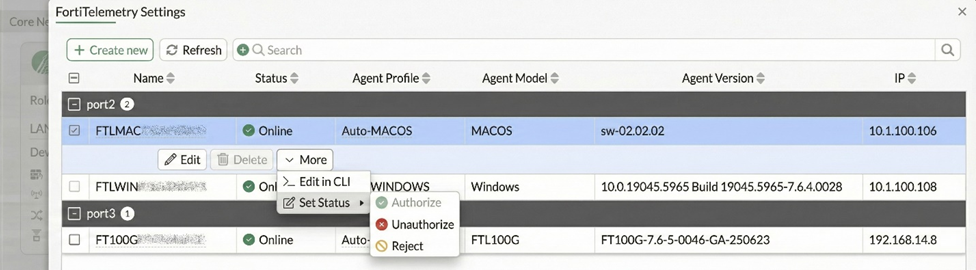
Change the status by hovering over the status to display the Edit icon. Click Edit to choose Authorize, Unauthorize, or Reject and click Apply.
Agent Profile
Profile assigned to the agent when FortiTelemetry Controller discovers the agent.
FortiTelemetry Controller automatically creates and assigns the following profiles when no pre-configured profiles exist:
-
The Auto-WINDOWS agent profile is assigned to software agents.
-
The Auto-FTL100G agent profile is assigned to hardware agents.
-
The Auto-MACOS agent profile is assigned to software agents.
Agent profile details can be viewed in the CLI using the
config telemetry-controller agent-profilecommand.Agent Model
Model of the agent: Windows for software agents and FTL100G for hardware agents.
Agent Version
Agent version.
IP
IP address of the FortiTelemetry agent.
-
-
Select an agent to access additional buttons, such as Edit, Delete, and More.
-
Select an agent and click Edit. The Telemetry Agent pane opens.
-
Click OK to close the Telemetry Agent pane.
-
Click Cancel to close the FortiTelemetry Settings pane.
Authorizing discovered FortiTelemetry agents
The FortiTelemetry Controller automatically discovers FortiTelemetry agents, displays them in the Telemetry connector, and assigns to each agent a profile.
You must manually authorize each discovered FortiTelemetry agent before the FortiTelemetry Controller can use it.
Some settings can be edited in the GUI or CLI, such as adding an alias or comment or changing the authorization status.
To authorize FortiTelemetry agents in the GUI:
-
Go to Security Fabric > Fabric Connectors.
-
Click the Telemetry connector, and click Edit. The FortiTelemetry Settings pane opens.
-
Select an agent, and click More > Set Status > Authorize.
To authorize FortiTelemetry agents in the CLI:
-
By default, automatically discovered telemetry agents are unauthorized, but you can authorize each agent after it connects to FortiGate.
config telemetry-controller agent
  edit "FT100GTK24000002"
    set authz authorize
  next
end
To edit FortiTelemetry agent settings in the GUI:
-
Go to Security Fabric > Fabric Connectors.
-
Click the Telemetry connector, and click Edit. The FortiTelemetry Settings pane opens.
-
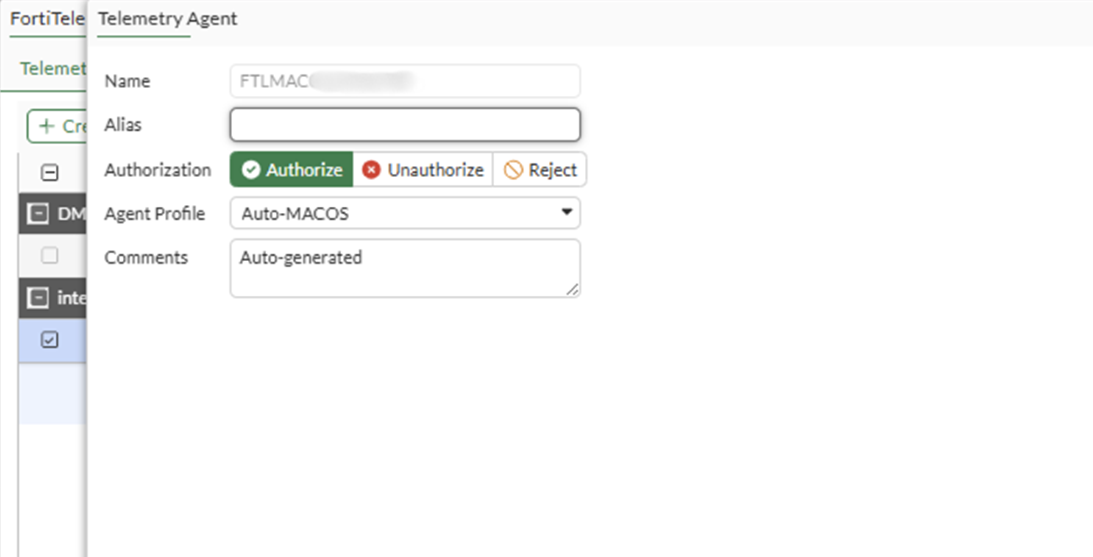
Select an agent, and click Edit to view or edit the following options on the Telemetry Agent pane:
Name
Displays the name of the FortiTelemetry agent. You cannot change the name.
Alias
Enter an alias for the FortiTelemetry agent.
Authorization
Change the authorization status to Authorize, Unauthorize, or Reject.
Agent Profile
Displays the assigned agent profile. You cannot change the profile.
Comments
Enter optional comments to help identify the agent.
-
Click OK to save changes.
Configuring pre-authorized telemetry connectors
You can configure telemetry connectors to automatically authorize agents after they connect to the FortiTelemetry Controller. You must know the agent name to configure pre-authorized telemetry connectors. The agent name is used to match the discovered agent to the corresponding telemetry connector.
You can create and use a custom agent profile, or you can use a default agent profile (Auto-WINDOWS and Auto-MACOS for software agents, and Auto-FTL100G for hardware agents) if the FortiTelemetry Controller has created a default agent profile.
If you create an agent profile, ensure that the model in the agent profile matches the type of agent used.
To create agent profiles in the CLI:
-
Create an agent profile for the type of agent you are using.
A profile for hardware agents should use the ftl-100g model, and a profile for software agents should use the windows or macos model.
config telemetry-controller agent-profile
    edit "WINDOWS-pre-auth"
        set comment dev win devices
        set model windows
    next
    edit "FTL100G-pre-auth"
        set comment hardware
        set model ftl-100g
    next
    edit "MACOS-pre-auth"
        set comment dev macos devices
        set model macos
    next
end
To create pre-authorized telemetry connectors in the GUI:
-
Go to Security Fabric > Fabric Connectors.
-
Click the Telemetry connector, and click Edit. The FortiTelemetry Settings pane opens.
-
Click Create New, and set the following options on the Telemetry Agent pane:
Name
Enter the agent name.
The name starts with
FTLWINfor Windows agents,FTLMACfor macOS agents andFT100Gfor hardware agents.Alias
(Optional) Enter an alias for the FortiTelemetry agent.
Authorization
Select Authorize.
Agent Profile
Select an agent profile. Ensure the model configured in the profile matches the type of agent.
Comments
(Optional) Enter optional comments to help identify the agent.
-
Click OK. The telemetry connector is displayed in the uncategorized list until the FortiTelemetry Controller discovers the corresponding telemetry agent and uses the connector to automatically authorize the agent and assign a status of Online.
To create pre-authorized telemetry connectors in the CLI:
-
Create a pre-authorized telemetry connector for each agent to specify the agent name, authorization, and agent profile.
The name starts with
FTLWINfor Windows agents,FTLMACfor macOS agents andFT100Gfor hardware agents.config telemetry-controller agent edit "FT100GTK24000007" set alias "FTL100G" set authz authorized set agent-profile "FTL100G-pre-auth" next edit "FTLWIN8662451639" set alias "WINDOWS-108" set authz authorized set agent-profile "WINDOWS-pre-auth" next edit "FTLMAC0123456789" set alias "macOS" set authz authorized set agent-profile "MACOS-pre-auth " next end