


Creating ClearPass connector
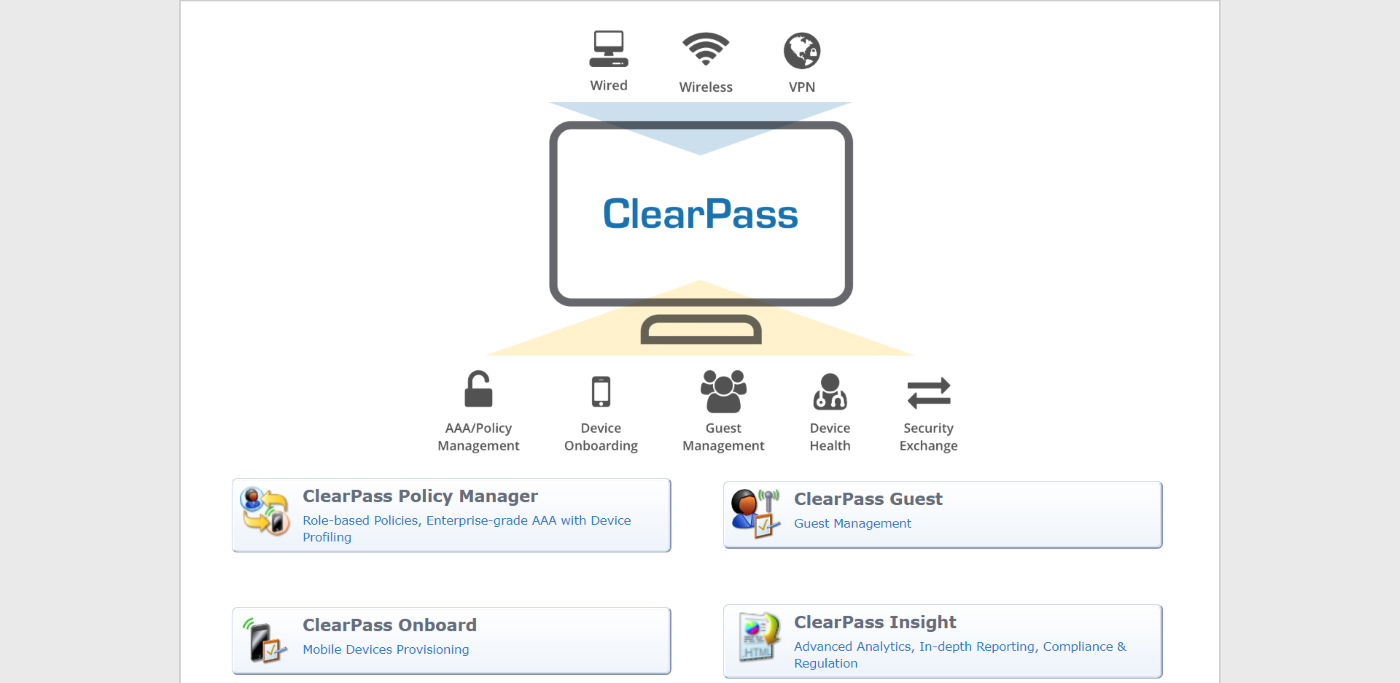
ClearPass Policy Manager (CCPM) is a network access system that can send information about authenticated users to third party systems, such as a FortiGate or FortiManager. ClearPass connector for FortiManager centralizes updates from ClearPass for all FortiGate devices and leverages the efficient FSSO protocol to apply dynamic policy updates to FortiGate.
You can create multiple ClearPass connectors per ADOM.
Requirements:
-
FortiManager version 5.6 or later ADOM
This example applies to version 6.0 or later ADOMs.
- FortiGate is managed by FortiManager and configured to work with ClearPass
- JSON API is exposed, allowing ClearPass to call it
To configure ClearPass:
- Log in to ClearPass Policy Manager..
- Create roles:
- Go to Configuration > Identity > Roles.
- Click Add.
- For the name, enter mytest1.
FortiManager will get this group as an Active Directory group.
The Description field is optional.

- Click Save.
- Create local users:
- Go to Configuration > Identity > Local Users.
- Click Add.
- Configure the following:
- Set User ID to test1.
- Set Name to testUser1.
- Set Password to qa1234.
- Select Enable.
- Set Role to mytest1.

- Click Add.
- Add an Ubuntu simulator:
- Go to Configuration > Network > Devices.
- Click Add.
- Configure the following settings:
- Set Name to Ubuntu_test.
- Set IP or Subnet Address to 10.3.113.61.
- Set RADIUS Shared Secret to qa1234.
- Set Vendor Name to Unix.
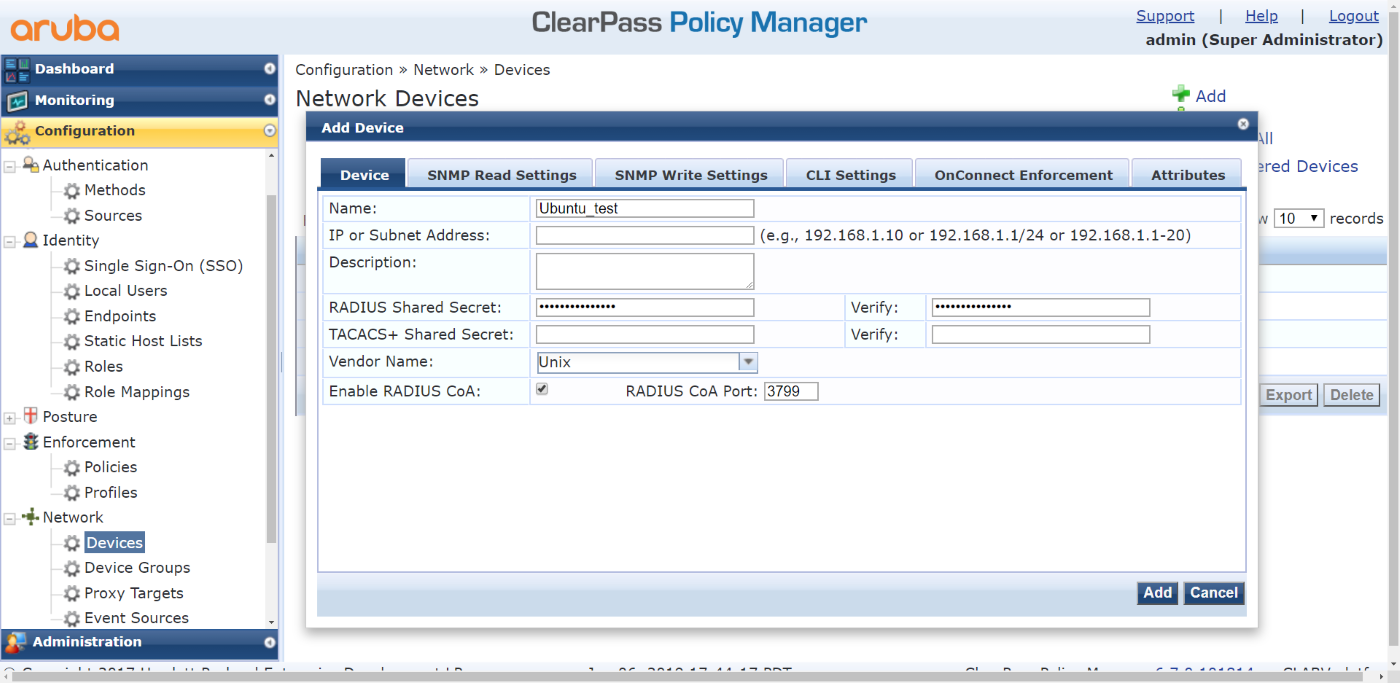
- Click Add.
- Configure FortiManager to get packets from ClearPass:
- Add FortiManager as the Endpoint Context Server:
- Go to Administration > External Servers > Endpoint Context Servers.
- Click Add.
- Configure the following:
- Set Server Type to Generic HTTP.
- Set Server Name to 10.3.113.57 (the FortiManager IP address).
- Set Authentication Method to Basic.
- Set Username to admin (the administrator on FortiManager).
- Create Endpoint Context Server Login action for FortiManager:
- Go to Administration > Dictionaries > Context Server Actions
- Click Add.
- On the Action tab, configure the following:
- Set Server Type to Generic HTTP.
- Set Server Name to 10.3.113.57 (the FortiManager IP address).
- Set Action Name to Frank-FMG-login.
- Set Description to Inform FortiManager that the user logged on.
- Set HTTP Method to POST.
- Set Authentication Method to Basic.
- Set URL to /jsonrpc/connector/user/login

- On the Header tab, configure the following:
- Set Header Name to Content-Type.
- Set Header Value to application/json.

-
On the Content tab, configure the following:
- Set Content-Type to JSON.
- Set Content to:
{


    "adom": "root",
    "connector": "test", <--------the connector name created on FortiManager
    "user": "%{Authentication:Username}",
    "role": "%{Tips:Role}",
    "ip-addr": "%{ip}"
}
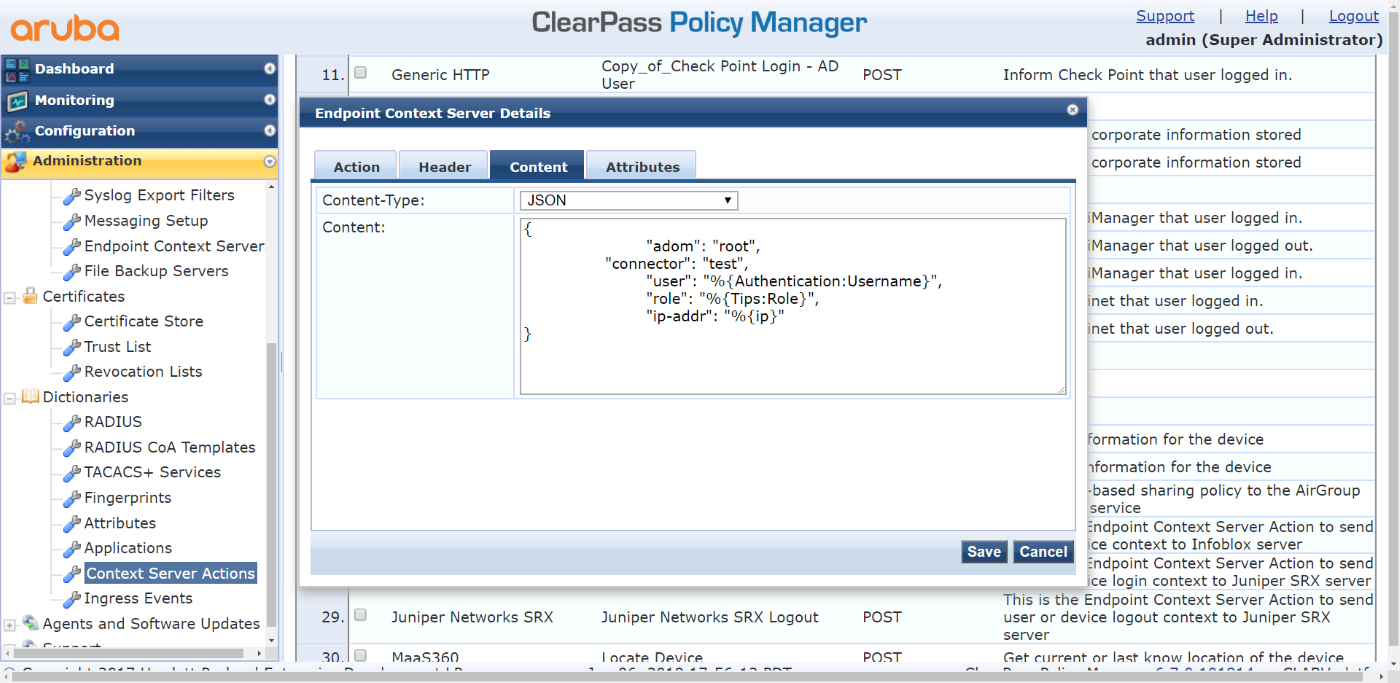
- Click Save.
- Create Endpoint Context Server Logout action for FortiManager:
- Go to Administration > Dictionaries > Context Server Actions
- Click Add.
- On the Action tab, configure the following:
- Set Server Type to Generic HTTP.
- Set Server Name to 10.3.113.57 (the FortiManager IP address).
- Set Action Name to Frank-FMG-logout.
- Set Description to Inform FortiManager that the user logged out.
- Set HTTP Method to POST.
- Set Authentication Method to Basic.
- Set URL to /jsonrpc/connector/user/logout

- On the Header tab, configure the following:
- Set Header Name to Content-Type.
- Set Header Value to application/json.
- On the Content tab, configure the following:
- Set Content-Type to JSON.
- Set Content to:
{


    "adom": "root",
    "connector": "test",
    "user": "%{Authentication:Username}",
    "role": "%{Tips:Role}",
    "ip-addr": "%{ip}"


}
- Click Save.
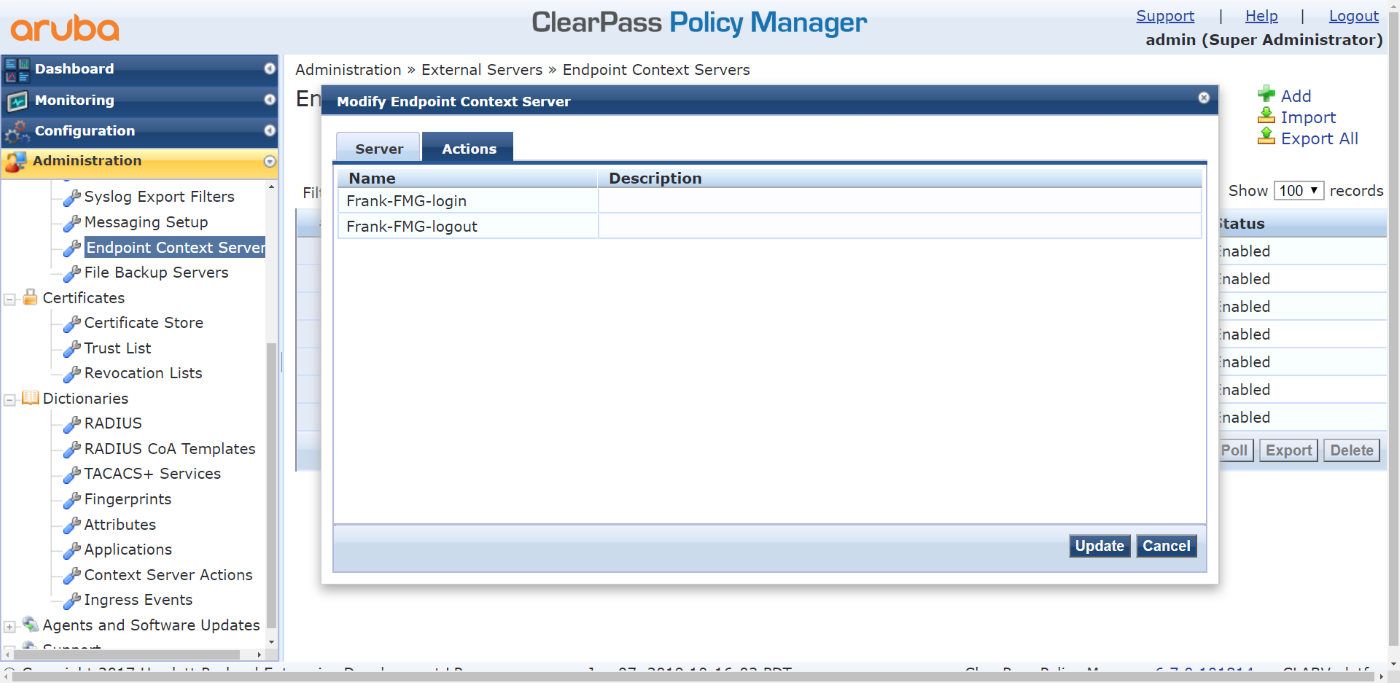
- Check that the actions are added to the server:
- Go to Administration > External Servers > Endpoint Context Servers > 10.3.113.57 > Actions.
- Locate the two just created actions.
- Add FortiManager as the Endpoint Context Server:
- Create a profile:
- Go to Configuration > Enforcement > Profiles.
- Click Add.
- On the Profile tab, configure the following:
- Set Template to Session Notification Management.
- Set Name to FortiManager Login and Logout.
- Set Description to FortiManager - Initial SSO integration testing.
- Set Type to Post_Authentication.

- On the Attributes tab, configure the following attributes:
Type
Name
Value
Session-Notify
Server Type
Generic HTTP
Session-Notify
Login Action
Frank-FMG-login
Session-Notify
Logout Action
Frank-FMG-logout
Session-Notify
Server IP
10.3.113.57

- Click Save.
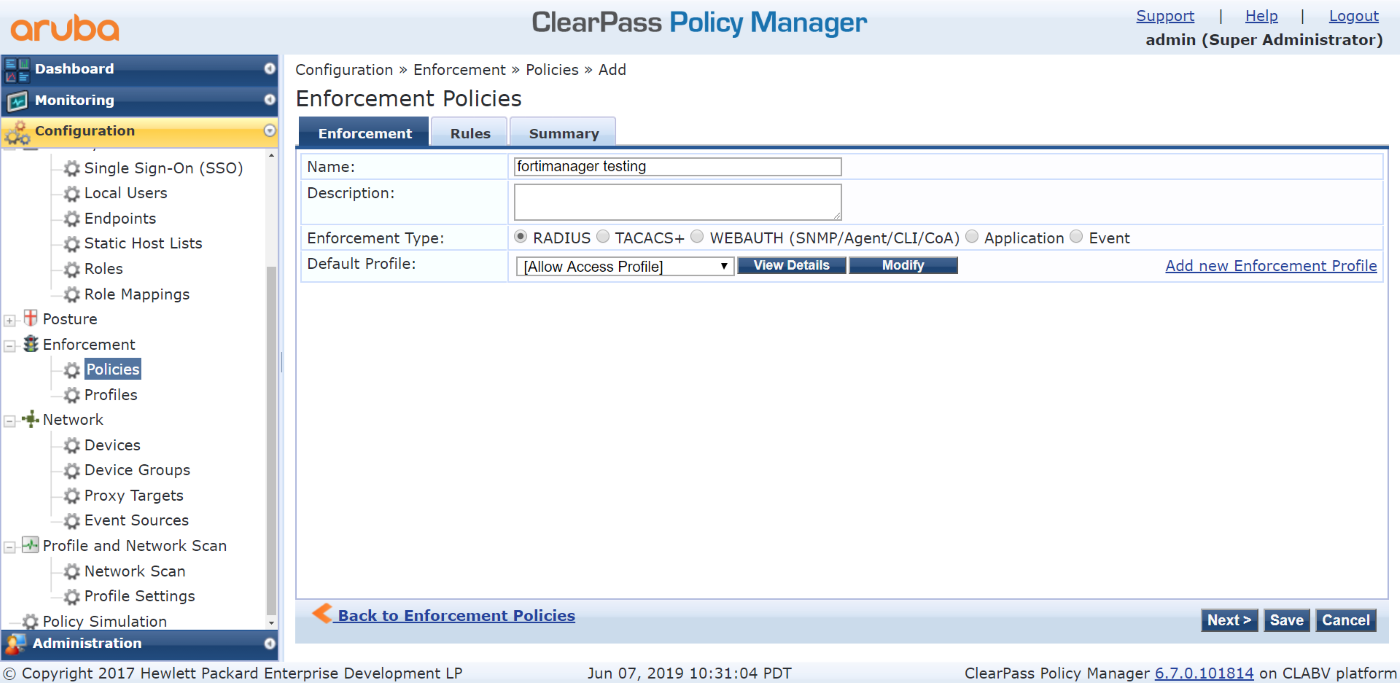
- Create a policy:
- Go to Configuration > Enforcement > Policies.
- Click Add.
- On the Enforcement tab, configure the following:
- Set Name to FortiManager testing.
- Set Enforcement Type to RADIUS.
- Set Default Profile to Allow Access Profile.
- On the Rules tab, configure the following:
- Set Type to Date.
- Set Name to Date-Time.
- Set Operation to EXISTS.
- Set Profile Names to [Post Authentication][FortiManager - Login and Logout].

- Click Save.
- Create services:
- Go to Configuration > Services.
- Click Add.
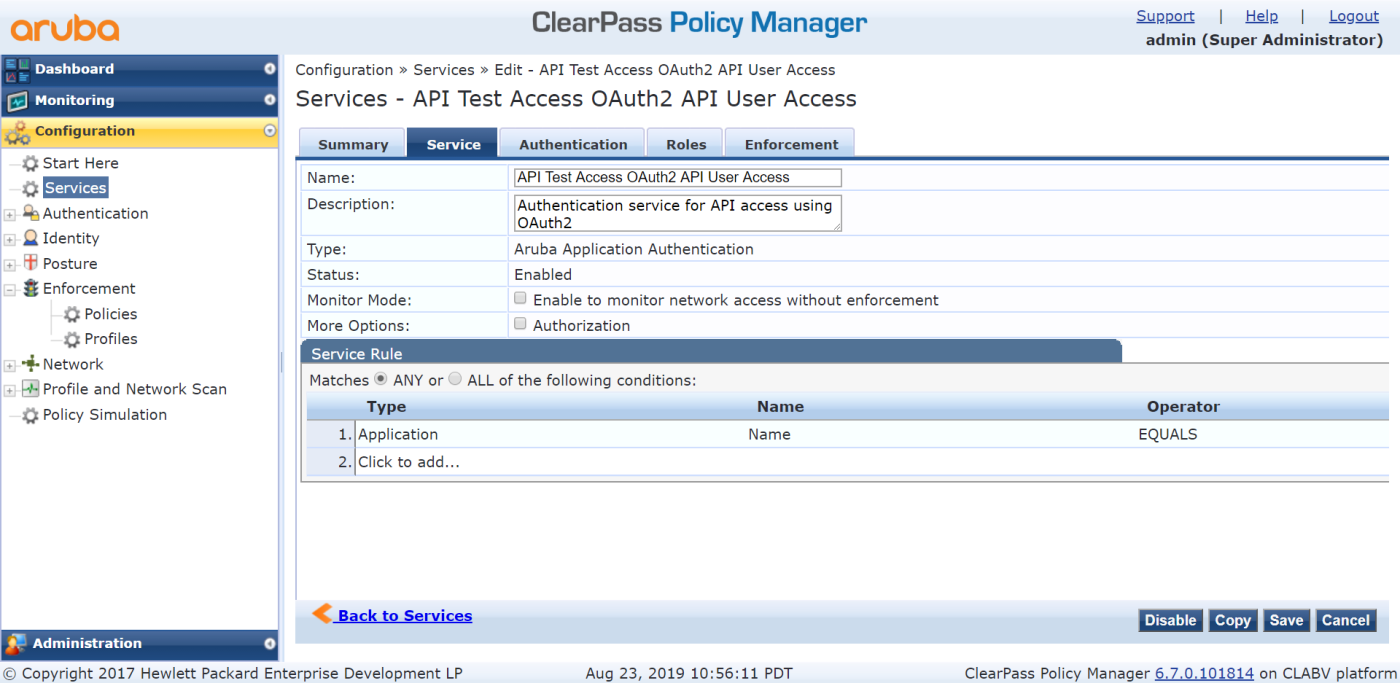
- On the Service tab, configure the following:
- Set Name to API Test Access OAuth2 API User Access.
- Set Description to Authentication service for API access using OAuth2.
- Set Type to Aruba Application Authentication.
- Set Status to Enabled.
- On the Authentication tab, set Authentication Sources to:
[Local User Repository] [Local SQL DB]
[Admin User Repository] [Local SQL DB]
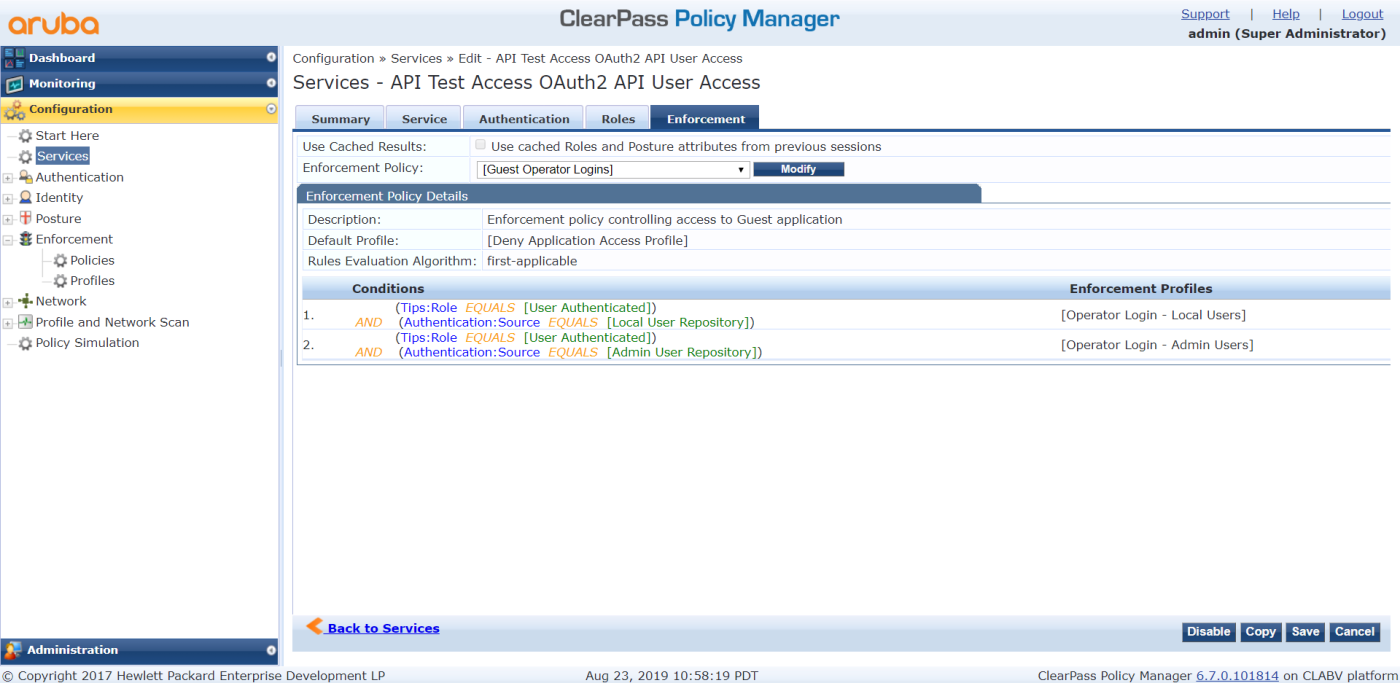
- On the Enforcement tab, configure the following:
- Set Enforcement Policy to [Guest Operator Logins].
- Set Description to Enforcement policy controlling access to Guest application.
- Set Default Profile to [Deny Application Access Profile].
- Set Rules Evaluation Algorithm to first-applicable.
- Create the following two conditions:
Conditions
Enforcement Profiles
1.
(Tips:Role EQUALS [User Authenticated])
AND (Authentication:Source EQUALS [Local User Repository])
[Operator Login - Local Users]
2.
(Tips:Role EQUALS [User Authenticated])
AND (Authentication:Source EQUALS [Admin User Repository])
[Operator Login - Admin Users]
- Click Save.
- Click Add again to add another service.
- On the Service tab, configure the following:
- Set Name to AuthN user for Fortimanager Testing.
- Set Description to Authorization service for AirGroup device access.
- Set Type to RADIUS Enforcement ( Generic ).
- Set Status to Enabled.
- Create the following service rule:
Type
Name
Operator
Value
Radius:IEFT
NAS-IP-Address
EQUALS
10.0.0.1
- On the Authentication tab, configure the following:
- Set Authentication Methods to [PAP].
- Set Authentication Sources to [Local User Repository] [Local SQL DB].
- On the Enforcement tab, configure the following:
- Set Enforcement Policy to fortimanager testing .
- Set Default Profile to [AllowAccess Profile].
- Set Rules Evaluation Algorithm to evaluate-all.
- Create the following condition:
Conditions
Enforcement Profiles
1.
(GuestUser:Company Name NOT_EQUALS ABCDE)
[FortiManager-login and Logout]

- Click Save.
- Configure the administrator the FortiManager fabric connector uses to access CPPM APIs:
- Go to Administration > Admin Users.
- Click Add.
- Configure the following:
- Set User ID to admin.
- Set Name to admin.
- Set Password to qa987654.
- In Verify Password enter the password again.
- Select Enable User.
- Set Privilege Level to API Administrator.
- Click Save.
- Create an API Client:
- Log in to ClearPass Guest.
- Go to Administration > API Services > API Clients.
- Click Create API Client.
- Configure the following:
- Set Client ID to test.
- Set Desciption to FMG login from it.
- Select Enable API client.
- Set Operator Profile to Super Administrator.
- Set Grand Type to Username and password credentials (grant_type=password).
- In Public Client select This client is public (trusted) client.
- In Refresh Token select Allow the use of refresh tokens for this client.
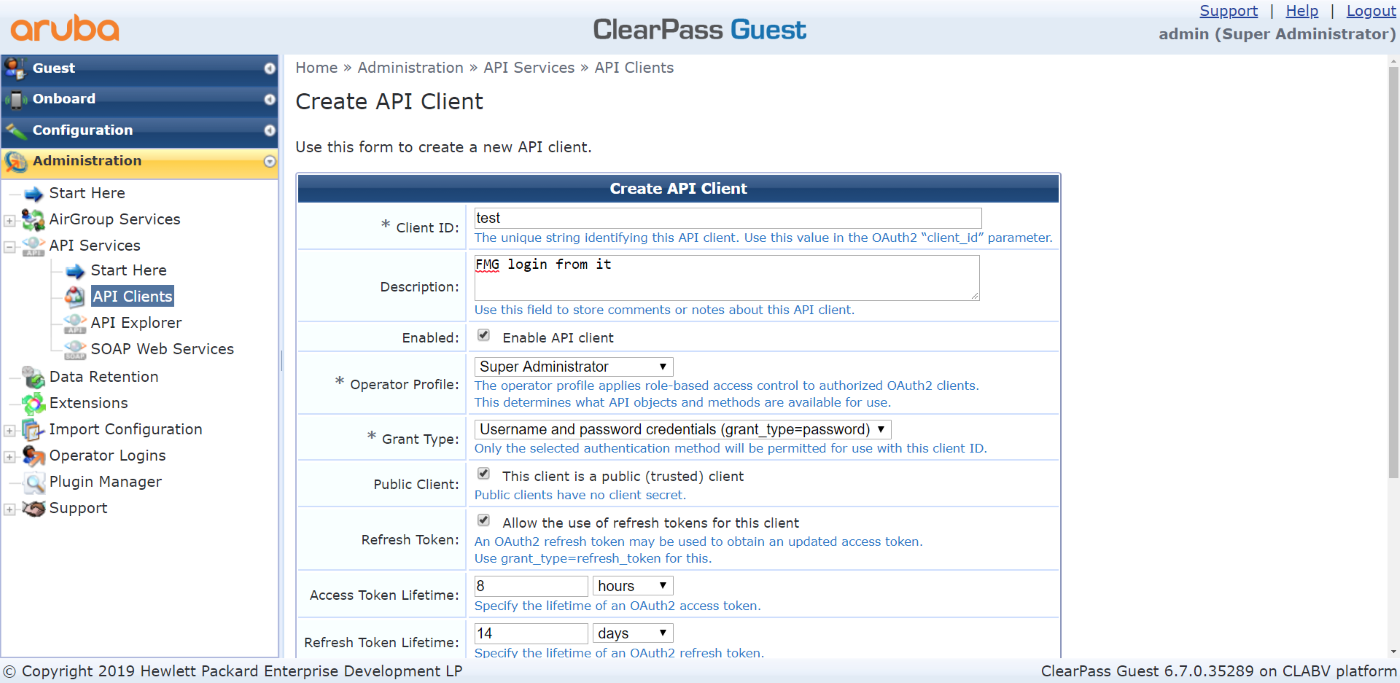
- Click Save.
- Log in to ClearPass Guest.
To configure FortiManager:
- Log in to FortiManager.
- Run the following CLI command:
config system admin user edit admin set rpc-permit read-write next end - Go to Fabric View > Fabric Connectors.
- Click Create New.

- Select ClearPass, then click Next.
- Configure the following:
- Set Name to test. This name must be same as the one used in the ClearPass actions.
- Set Status to On.
- Set Server to 10.3.113.102 (the ClearPass IP address).
- Set Client to test (the previously created ClearPass API client).
- Set User to admin (the ClearPass login name).
- Set Password to qa1234 (the ClearPass login password).
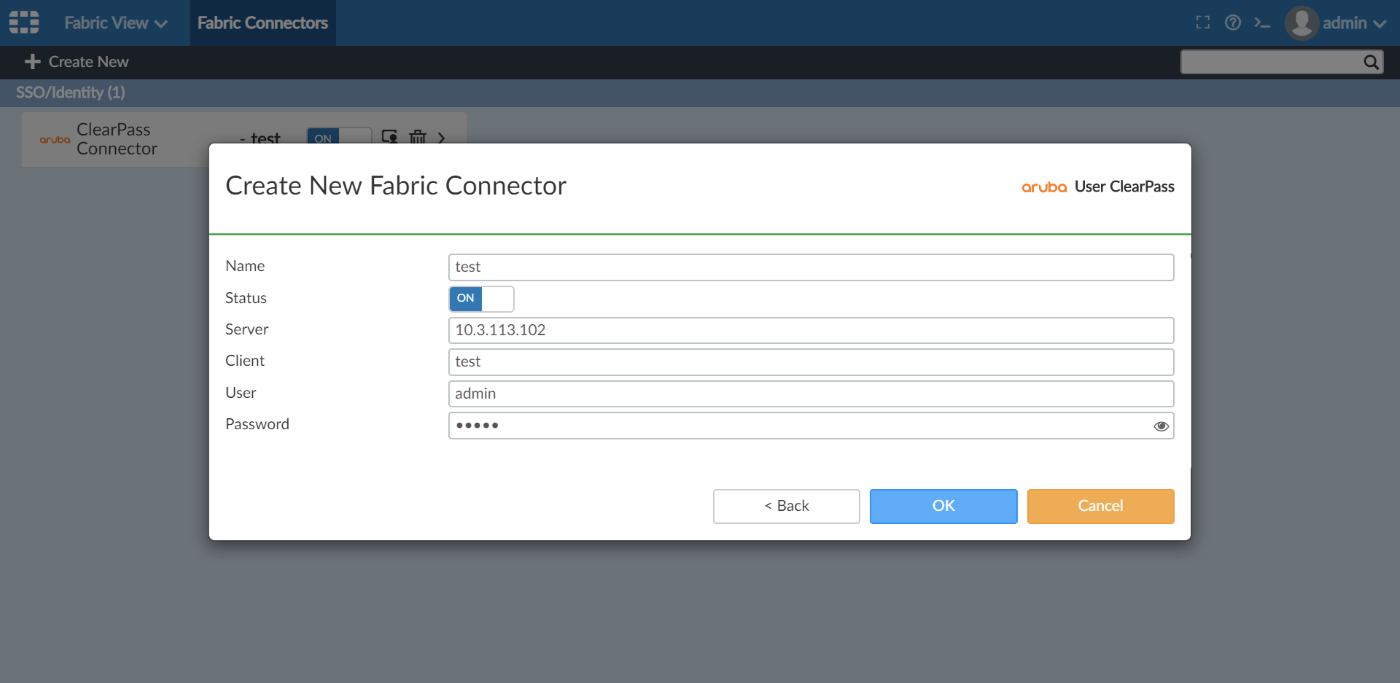
- Click OK.
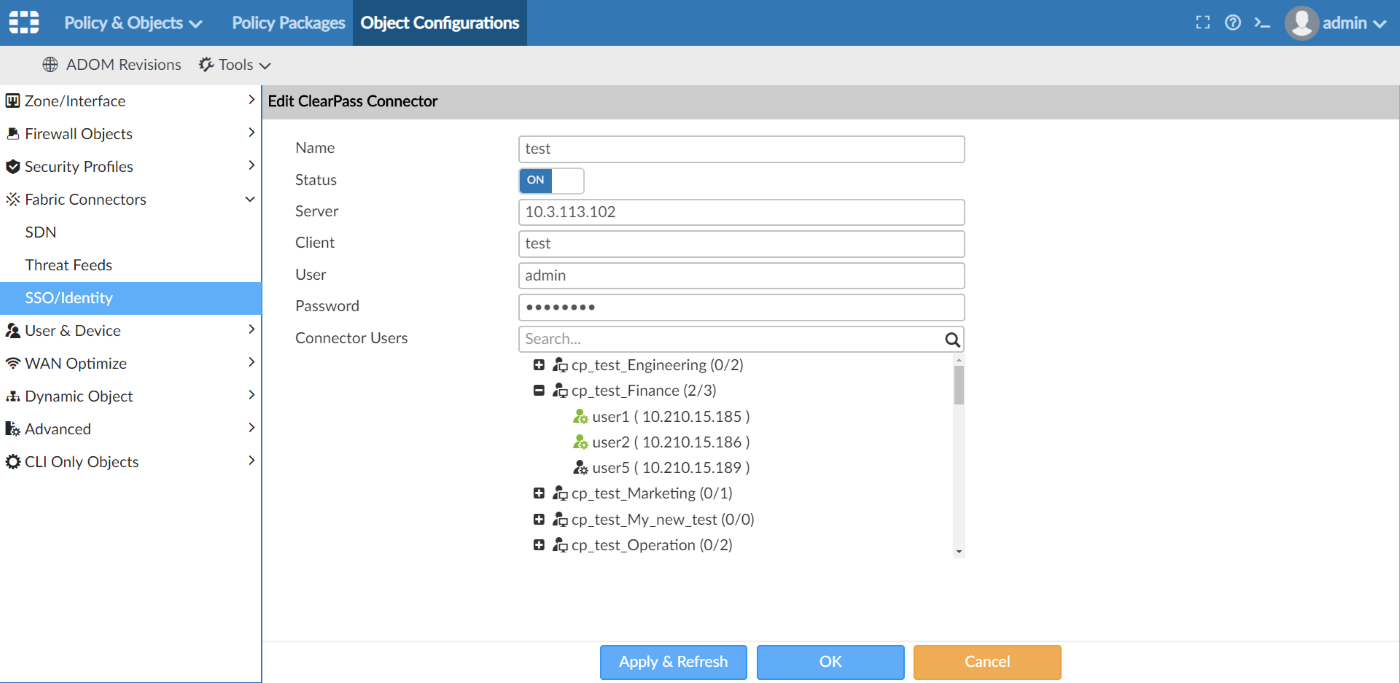
- Get the role and user from ClearPass:
- Go to Policy & Objects > Object Configurations > Fabric Connectors >SSO/Identity.
- Edit the ClearPass connector and click Apply & Refresh.
FortiManager retrieves the roles and users from ClearPass. Users with green icons are currently logged in.
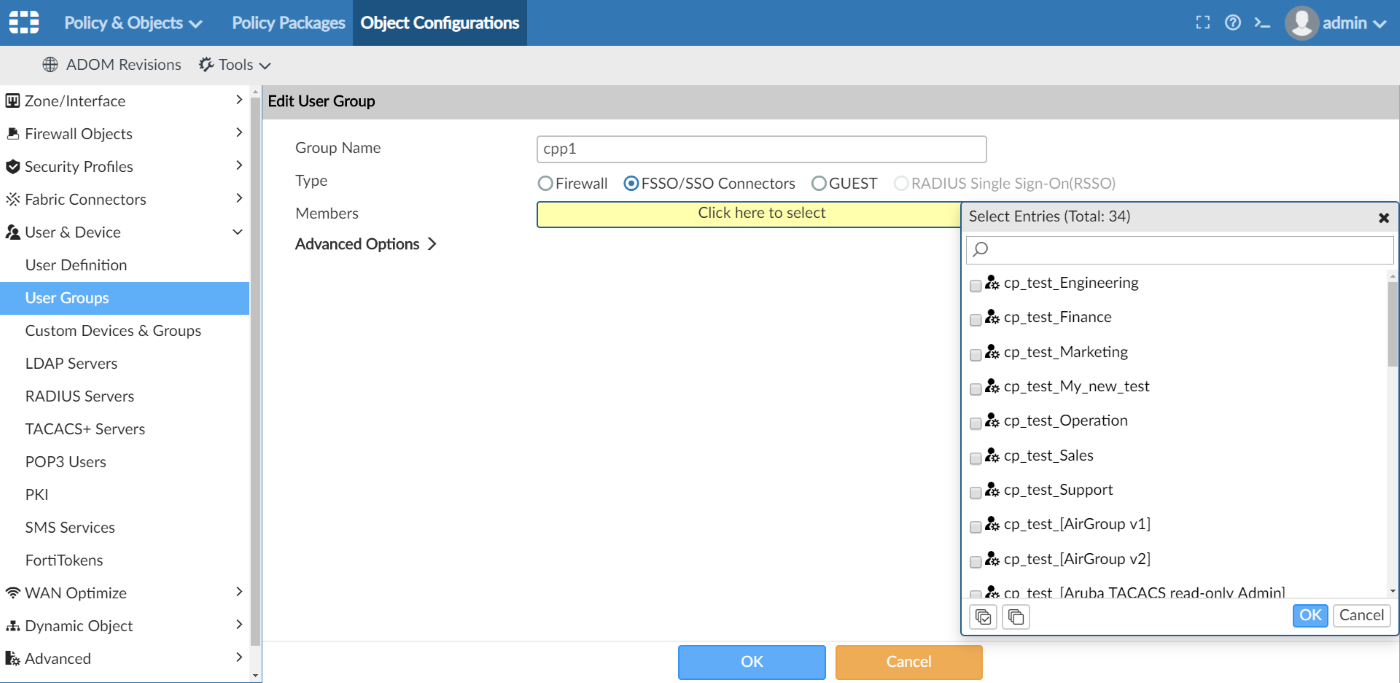
- Install the address group from ClearPass to FortiGate:
- On the FortiManager, go to Policy & Objects > Object Configurations > User & Devices > User Groups.
- Click Create New.
- Configure the following:
- Set Group Name to cpp1.
- Set Type to FSSO/SSO Connectors.
- Select Members as ClearPass adgrp.
- Use the new user group in a policy to install it to FortiGate.
- To check that the group was installed on the FortiGate:
- On the FortiGate, go to User & Device > User Groups. The group will be in the user group list.
- Edit the group to view its members.
- In the CLI console, enter the following:
# diagnose debug authd fsso list
----FSSO logons----
IP: 10.210.15.185  User: user1  Groups: cp_test_Finance  Workstation:  MemberOf: cpp1
Total number of logons listed: 1, filtered: 0
----end of FSSO logons----