

Adding FortiSASE
FortiSASE can be added to FortiManager for central management.
When central management is enabled on FortiSASE, a FortiManager Key can be generated. The FortiManager Key is a non-expiring token which can be used when adding FortiSASE to FortiManager, establishing a connection and allowing FortiManager to be used for central management of FortiSASE. When the FortiManager and FortiSASE are under the same FortiCloud account, you do not need to specify this key when adding the FortiSASE device.
When adding a FortiSASE to FortiManager, users can configure which FortiManager objects are synchronized to the FortiSASE. Currently, central management supports only one-way synchronization of configurations from FortiManager to FortiSASE. Therefore, administrators should avoid deleting objects from FortiManager to prevent any conflicts.
Multiple FortiSASE devices can be added to the FortiManager when they are in the same FortiCloud OU or sub OU; they can be added to the same or different ADOMs as needed for management according to your environment.
Supported FortiSASE configurations
Only select FortiSASE configuration settings are supported for central management using FortiManager.
For full configuration steps, supported objects, and information about what FortiManager versions are supported for central management of FortiSASE, see the FortiSASE documentation on the Fortinet Documentation Library.
Prerequisites
In order to add FortiSASE to FortiManager, the following prerequisite steps must be completed:
-
The FortiCloud account must include a valid FortiSASE entitlement.
-
Central management is enabled on the FortiSASE.
-
The FortiManager and FortiSASE must be under the same FortiCare account.
-
In MSSP environments with OU/Sub-OU/Sub-Sub-OU (etc.) hierarchies, FortiSASE can only be managed by a FortiManager instance located at a higher hierarchy level.
For example, a FortiManager under the parent OU can add and manage FortiSASE instances located in Sub-OU or Sub-Sub-OU (etc) levels. However, FortiManager cannot manage FortiSASE instances in different Sub-OUs at the same level as the FortiManager's Sub-OU unless they belong to the same FortiCare account.
To add FortiSASE to FortiManager:
-
Select the ADOM where the FortiSASE device will be added.
ADOM support
-
FortiSASE cannot be added to version 7.0 ADOMs or the Global Database ADOM.
-
FortiSASE cannot be added to ADOMs operating in Backup mode. Attempting to do so will present the user with the error message "An unexpected error has occurred".
-
Once added, FortiSASE devices cannot be moved to other ADOMs.
-
-
Go to Device Manager > Device & Groups.
-
Click the Add Device dropdown option and select Add FortiSASE Device.
-
Configure the FortiSASE settings.
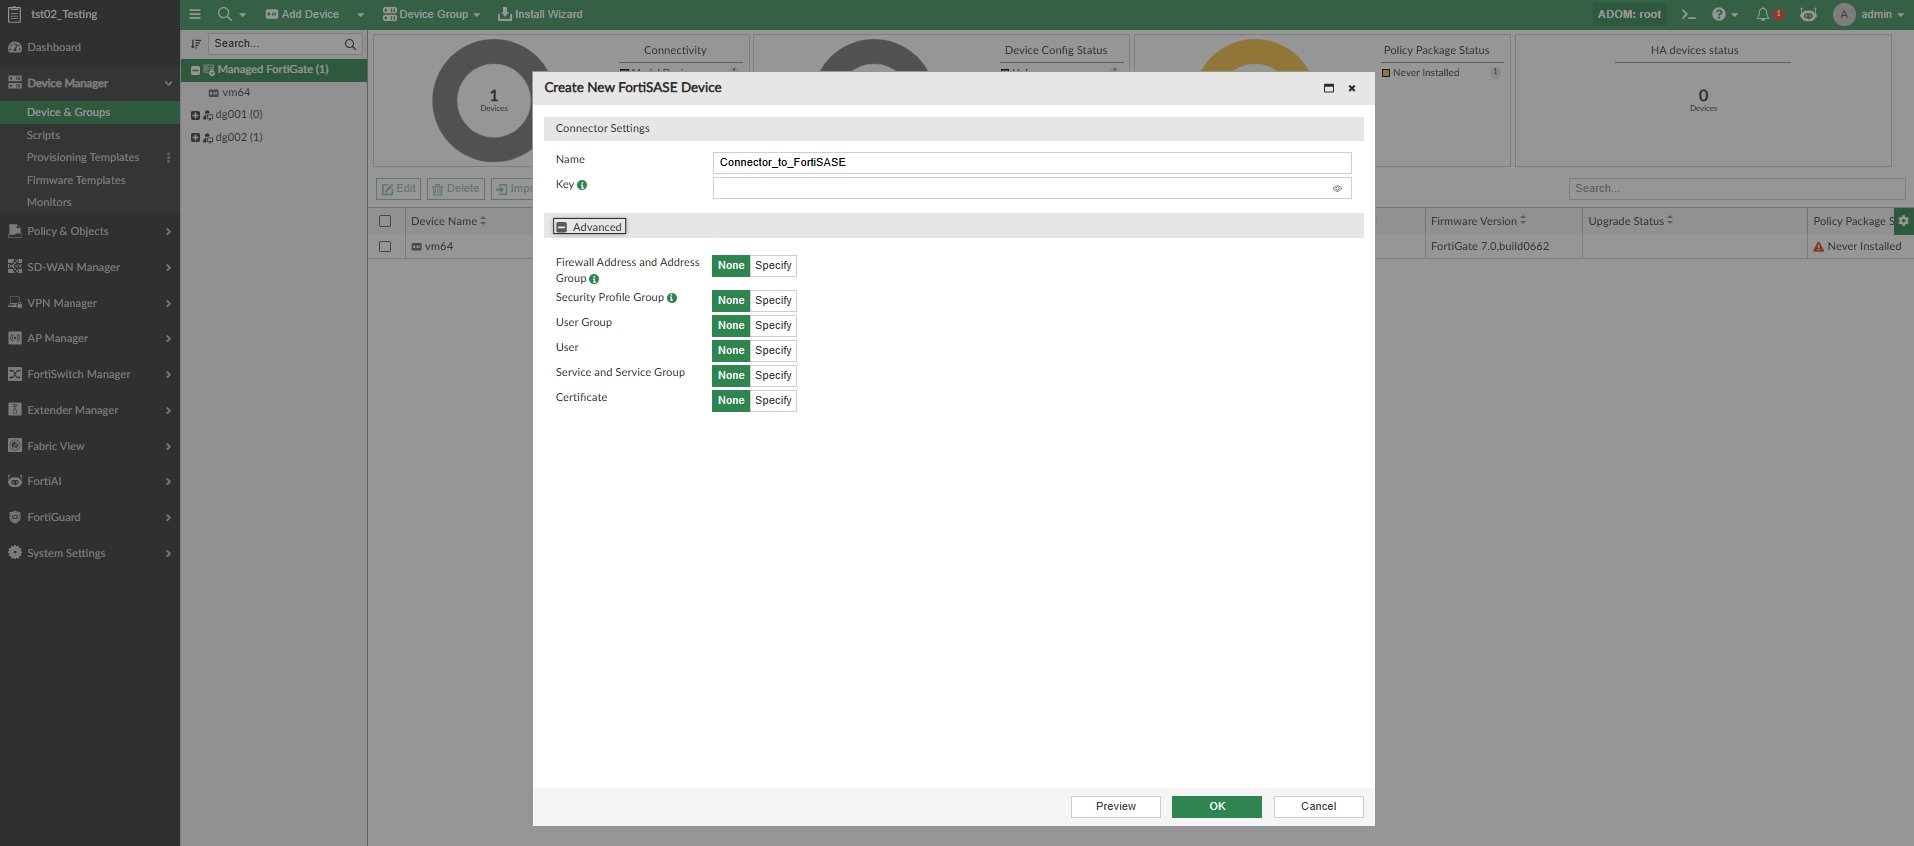
Connector Settings Configure the FortiSASE connector settings. Name
Enter a name for the FortiSASE device.
Use unique names
If you are configuring multiple FortiSASE devices, they must have unique names. If using the same name for multiple FortiSASE devices, even across different ADOMs, adding the FortiSASE device will fail.
Key
If the FortiManager and FortiSASE are under the same FortiCloud account, this field can be left blank.
If they are not, then you can paste the key copied from the FortiSASE portal. This key is generated when central management is enabled on FortiSASE. For more information, see the FortiSASE documentation on the Fortinet Documentation Library.
Advanced You can define the supported FortiManager objects to be synchronized to FortiSASE.
You can specify advanced settings or leave them as None according to your needs.
To specify an advanced setting, click Specify and Click to select to see a list of existing FortiManager objects. Click +v or + to create new objects from the dialog.
Firewall Address and Address Group
Select or create Firewall Address and Firewall Address Groups. Security Profile Group
Select or create Security Profile Group and Security Profiles (selected types are supported only)
User Group
Select or create User Groups.
User
Select or create Users.
Service and Service Group
Select or create Service and Service Groups.
Certificate
Select or import Certificates.
-
Click OK to save the FortiSASE device.
-
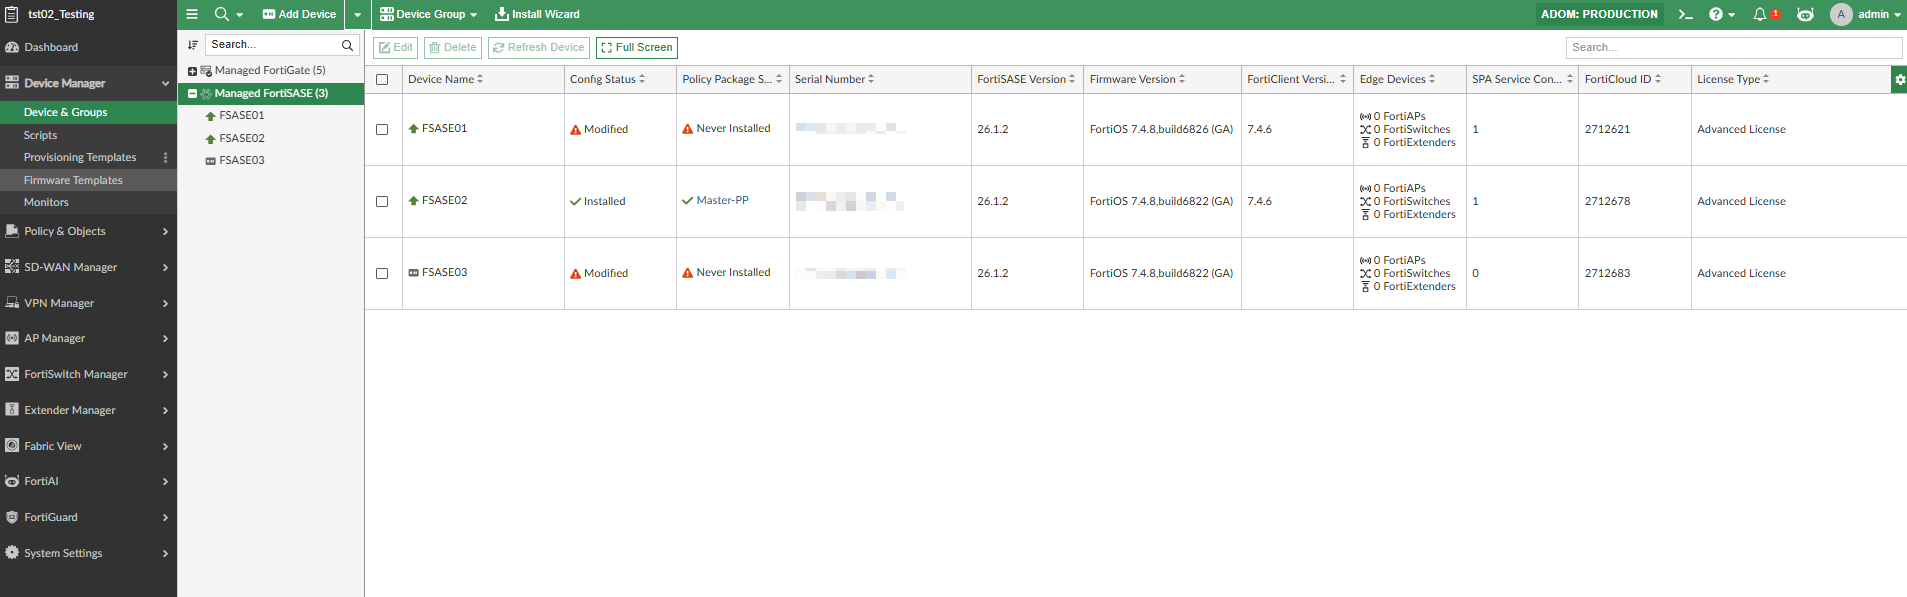
In the FortiManager Device Manager, you can see the FortiSASE device has been added.
-
Use the Install Wizard to Install Device Settings (only) to push the object configurations to FortiSASE. See Install device settings only.
To edit the FortiSASE device:
-
Go to Device Manager > Device & Groups.
-
Double-click the FortiSASE device tile, or right-click and select Edit.
-
Configure the settings as required, and click OK.
-
Use the Install Wizard to Install Device Settings (only) to push any object configuration changes to FortiSASE. See Install device settings only.
Installing policy packages to FortiSASE
Once the FortiSASE has been added to FortiManager, you can view the Policy Package Status column for the FortiSASE controller in Device Manager.
FortiManager automatically retrieves built-in FortiSASE interfaces/zones through the connector. These interfaces/zones and their mappings can be viewed in Policy & Objects > Normalized Interface:
-
SASE_ingress_zone
-
SASE_public_zone
-
SASE_secure_private_access_zone
The FortiSASE connector does not require any special configuration to install policy packages to FortiSASE. The objects used in policies are implicitly synced to FortiSASE during the policy package installation.
Firewall policies and proxy policies can be installed from FortiManager to FortiSASE. They are partially supported. See the tables below for requirements when installing to FortiSASE.
|
Firewall Policy requirements |
|
|---|---|
|
Action |
Must be set to ACCEPT or DENY only. |
|
Type |
Must be set to Standard. |
|
Incoming/Outgoing Interfaces |
Limited to the following normalized interfaces/zones:
|
|
Supported traffic directions |
|
|
Inspection Mode |
Must be set to Proxy-based. |
|
Security Profile |
Status must be enabled, and Profile Type set to Use Security Profile Group. |
For more information about creating firewall policies, see Create a new firewall policy.
|
Proxy Policy requirements |
|
|---|---|
|
Explicit Proxy Type |
Must be set to Explicit Web. |
|
Outgoing Interface |
Must be either SASE_public_zone or SASE_secure_private_access_zone. |
|
Action |
Must be set to ACCEPT or DENY only. |
|
Service |
Must be explicitly defined. |
For more information about creating proxy policies, see Create a new proxy policy.
Interface settings for objects created on FortiManager
Objects created on FortiManager have the option to specify an Interface, however, this is not supported by FortiSASE. Objects bound to SASE interfaces or kept as Any will be treated as Any.
Enable Proxy and Secure Private Access Network configuration
Proxy policies must be enabled on FortiSASE before attempting any configuration installation from FortiManager. See Proxy policies in the FortiSASE administration guide for more information.
Secure Private Access also must be enabled in order to install policies using the "SASE_secure_private_access_zone" in FortiSASE. See SPA in the FortiSASE administration guide for more information.