


Network Share
Network File Share (or Network Share) allows FortiNDR to scan remote file locations via SMB and NFS protocol. Central quarantine with either Move or Copy of files is supported.
Create a Network Share profile to configure a Network Share location for inspection by FortiNDR. After the profile is configured, FortiNDR will scan the registered network's share directories.

Creating a Network Share
To create a Network Share profile, go to Security Fabric > Network Share. Register a new Network Share by providing the mounting information. Configure the profile to quarantine files separately based on their detected risk level. You can also use the profile to schedule a scan cycle of the network share location.
To create a Network Share profile:
- Go to Security Fabric > Network Share.
- In the toolbar, click Create New. The New Network Share page opens.
- Enter the Network Share mounting information.
Status Enable or Disable. Enable is the default. Mount Type Select a Network Share protocol from the list. The following protocols are supported:
SMBv1.0
SMBv2.0
SMBv2.1
SMBv3.0
NFSv2.0
NFSv3.0
NFS v4.0
Network Share Name Enter a name for the Network Share. Server IP Enter the IP address for the Network Share.
Share Path Enter the path for the Network Share. Username Enter the username for the Network Share. Password Enter the password for the Network Share and then confirm the password. - Configure the Quarantine Confidence level equal and above.
- (Optional) Customize the quarantine and sanitize behaviors.
Enable Quarantine Password Protected Files
Moves password protected files to a designated quarantine location.

FortiNDR does not process password protected files.
Enable Quarantine Critical Risk Files
Moves detected files with critical risk to a designated quarantine location. This includes:
Fileless
Industroyer
Ransomware
Wiper
Worm
Enable Quarantine - High Risk Files
Moves detected files with high risk to a designated quarantine location. This includes:
Backdoor
Banking Trojan
Exploit
Infostealer
Proxy
PWS
Rootkit
Trojan
Enable Quarantine - Medium Risk Files
Moves detected files with medium risk to a designated quarantine location. This includes:
Clicker
DDoS
Downloader
Dropper
Phishing
Redirector
Virus
Enable Quarantine - Low Risk Files
Moves detected files with low risk to a designated quarantine location. This includes:
Application
CoinMiner
Generic Attack
Generic Trojan
SEP
WebShell
Enable Quarantine of Others
Moves other unprocessed files to a designated quarantine location. File types that falls under this category includes:
Files with unsupported file type
Files with Over size Limit
Empty/Irregular files
Enable Copying or Moving clean files to sanitized location
Moves or copies clean files to a location specified in the Network Share Quarantine profile. See, Network Share Quarantine.
The Moving operation is only allowed for the quarantine location when Keep Original File at Source Location disabled.
The Copying operation is only allowed for the quarantine location when Keep Original File at Source Location enabled.
For information about combing Network Share and Quarantine profiles, see Network Share Quarantine > Combining network share and quarantine profiles.
Create a copy of clean files for every scheduled scan at the sanitized location
When enabled, FortiNDR will create a new folder <Network Share Profile Name>_<Scan Task ID> in the sanitized location for each scheduled scan.
When disabled, FortiNDR will overwrite the sanitized location with the clean files from the latest scan.
Enabling this option will increase the size of the Network Share location.
Create placeholder files for malicious/Suspicious/Other files at sanitized location
Adds a placeholder file in the sanitized location. The filename pattern of the placeholder file will be <filename>.<severity>.txt. This helps maintain the file structure of the original network in the share folder.
Enable Force Rescan
When enabled, FortiNDR will not use cache detection even if the files are previously scanned.

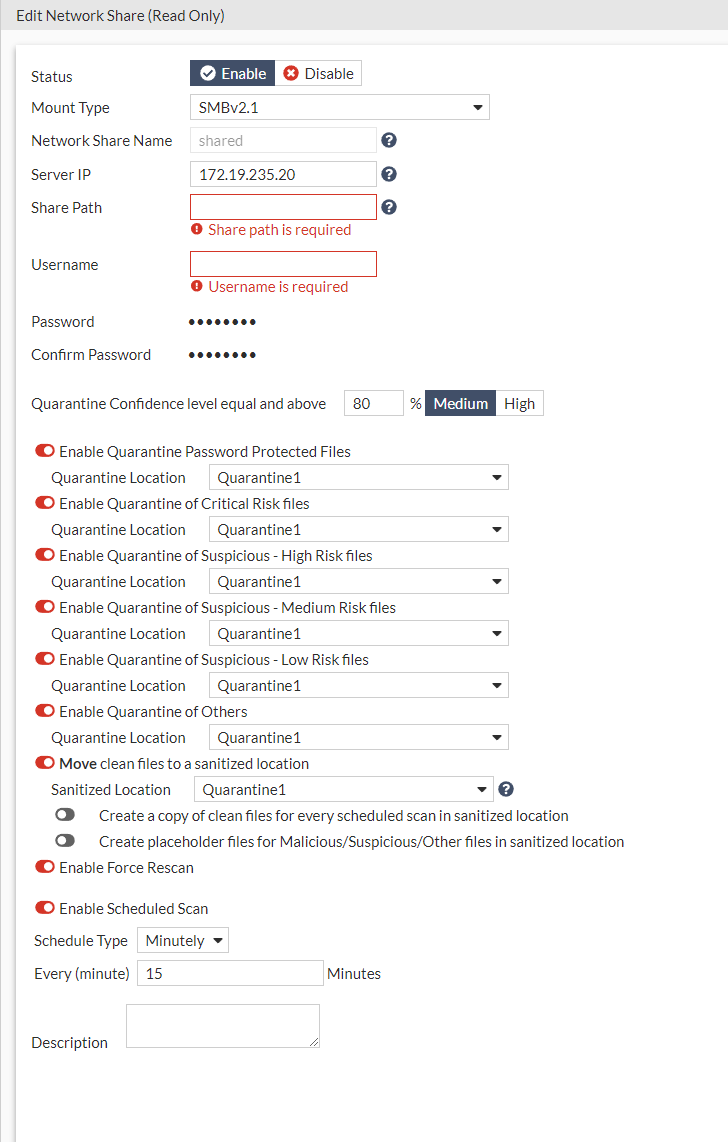
In the image below Edit Network Share Read Only indicates the current network share is being scanned. Editing is not allowed.
- Click OK.
Testing connectivity
To validate the Network Share configuration:
- Go to Security Fabric > Network Share and select a profile.
- In the toolbar, click Test Connection to validate the Network Share configuration.

A green checkmark appears in the Status next to a valid connection.

Testing the connection will work when Network File Share is enabled. The test will fail if NFS is disabled.
Scanning a network location
To trigger a scan:
- Go to Security Fabric > Network Share and select a profile.
- In the toolbar, click Scan Now.
|
|
The Scan Now button will not create a new task when the Network Drive is:
|
Scheduling a scan
You can schedule routine scanning for a Network Share location on an hourly, daily, or monthly basis. The minimum time interval for each scan is 15 minutes.
|
|
A new scan task will not be added if the network location has a scan task in process. |
To schedule a scan:
- Go to Security Fabric > Network Share and select a profile.
- In the toolbar, click Edit. The New Network Share window opens.
- Select Enable Scheduled Scan.
- Configure the Schedule Type and the correspodning time interval.
- Click OK.
Viewing scan results
View the scan history of the Network Share directories.
To view the scan results:
- Go to Security Fabric > Network Share and select a profile.
- In the toolbar, click Scan Details. The scan history is displayed.
For columns with numbers:
The first number represents the total number of files that belong to that category.
The second number indicates the successful quarantine counts of that category.

- Click the numbers to view the detection information for the samples that belong to the category.

- Click Back to return to the Network Share pane.
Scanning Zip files
FortiNDR can extract and process Zip files up to 10 levels. When any of the files inside the Zip file is detected, the whole zip file will be marked as malicious.
|
|
FortiNDR does not process password-protected zip files. |