
OIDC
OpenID Connect (OIDC) is a widely adopted JSON-based identity layer built on top of the OAuth 2.0 protocol. If you have an Identity Provider (IdP) like FortiAuthenticator, Azure AD, Google Identity, or any other service that supports OIDC, you can use it to authenticate users seamlessly across your FortiProxy instance and other integrated systems.
Like SAML, OIDC facilitates secure transfer of user authentication and authorization data between an Identity Provider (IdP) and a Relying Party (RP)—in this case, the FortiProxy unit. In OIDC-based authentication, the FortiProxy unit redirects unauthenticated users to the IdP (such as Azure Active Directory, Okta, Google, or other OIDC-compliant providers) for authentication. After the user is verified by the IdP, the user is redirected back to the FortiProxy with an ID token and possibly additional tokens in a JSON-based format. These tokens carry essential information about the user’s identity, group memberships, and authorization claims.
FortiProxy uses these claims to perform both authentication and authorization steps. Depending on your IdP’s configuration, group information can be included as claims in the ID token or fetched from an external directory service. This streamlined approach reduces infrastructure overhead, accelerates user login, and leverages existing IdP services without requiring additional on-premises components.
OIDC has the following advantages over other similar authentication schemes:
-
OIDC builds on OAuth 2.0, which means it uses tokens for both authentication and authorization (access tokens and ID tokens), which is a more flexible and modern approach compared to traditional username/password methods, enhancing security using robust cryptographic methods and proven standards to reduce exposure of credentials.
-
It improves user experience by allowing for single sign-on (SSO) across a wide range of applications and services, both on-premises and in the cloud, which simplifies deployment and scales efficiently across diverse IT ecosystems.
-
OIDC is generally simpler to implement and use than SAML (Security Assertion Markup Language). While SAML is more widely used in enterprise contexts, it involves heavier XML-based messaging, which can be harder to integrate and troubleshoot.
-
OIDC uses JSON Web Tokens (JWT), which are lightweight, easy to parse, and widely supported in modern web applications.
FortiProxy configuration
To configure an OIDC server in the FortiProxy GUI:
-
In the User & Authentication > OIDC tab, click Create New or select an existing OIDC server from the list and click Edit.
-
Configure the following options:
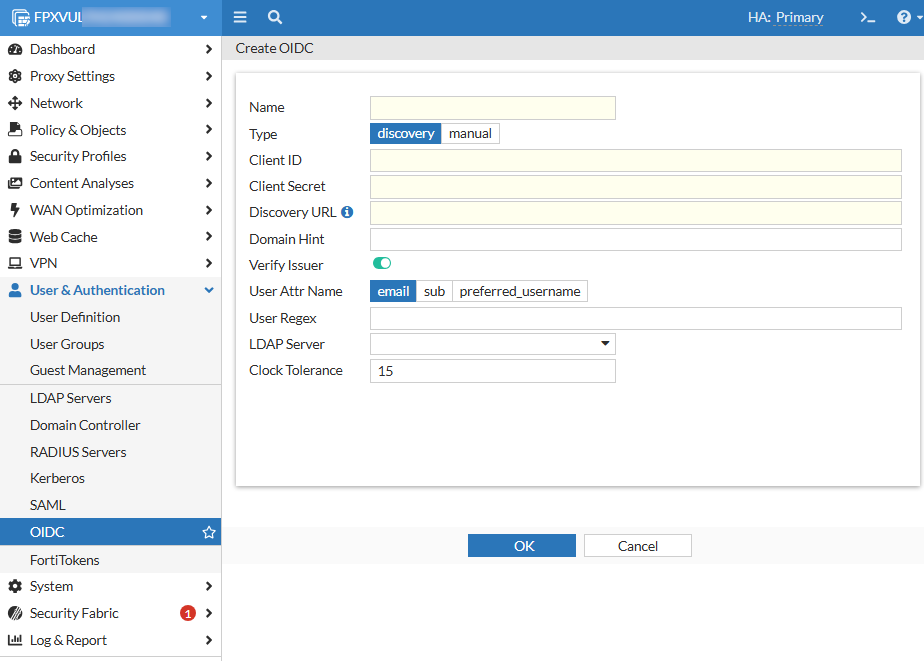
Name
Name that identifies the OIDC server on the FortiProxy unit.
Type
Select the type of OpenID Connect configuration that meets your automation and security needs.
Option
Description
Required parameters
Use case
discovery
Use an OIDC discovery URL to automatically retrieve endpoint configurations from the IdP.
discovery-url, client-id, client-secret, private-key (optional), verify-issuer (optional)
Recommended when the IdP supports the discovery mechanism, reducing manual configuration overhead.
manual
Use manual configuration, which requires manual input of all OIDC-related endpoints and configurations.
authorization-url, token-url, jwks-uri, client-id, client-secret
Useful when the IdP does not support discovery or when a more customized setup is required.
Client ID
OpenID Connect server client ID.
Client Secret
OpenID Connect server client secret.
Discovery URL
OpenID Connect server discovery URL.
This option is available only if you selected discovery in Type.
Authorization URL
OpenID Connect server authorization URL.
This option is available only if you selected manual in Type.
Token URL
OpenID Connect server token URL.
This option is available only if you selected manual in Type.
JWKS URI
URL of the OP's JWK Set document.
This option is available only if you selected manual in Type.
Domain Hint Domain Hint. Verify Issuer
Specifies whether to verify OpenID Connect server issuer.
This option is available only if you selected discovery in Type.
Issuer
OpenID Connect server issuer.
This option is available only if you selected manual in Type.
User Attr Name Field in ID token to use as username.
Option
Description
email
Use email in ID token as username.
sub
Use sub in ID token as username.
preferred_username
Use preferred_username in ID token as username.
User Regex Regular expressions that the username must match. This field is case insensitive. LDAP Server Select the LDAP server(s). Clock Tolerance Clock skew tolerance in seconds. The default is 15. -
Click OK.
To configure an OIDC server in the FortiProxy CLI:
Use the config user oidc command. See an example below:
config user oidc
edit "oidc-discovery"
set client-id "********-****-****-****-************"
set client-secret "****************************"
set discovery-url "https://login.microsoftonline.com/common/v2.0/.well-known/openid-configuration"
set verify-issuer disable
next
edit "oidc-1"
set type manual
set client-id "********-****-****-****-************"
set client-secret "****************************"
set authorization-url "https://login.microsoftonline.com/common/oauth2/v2.0/authorize"
set token-url "https://login.microsoftonline.com/common/oauth2/v2.0/token"
set ldap-server "AD1"
next
edit "oidc-google"
set type manual
set client-id "****************-************************.apps.googleusercontent.com"
set client-secret "GOCSPX-************************"
set authorization-url "https://accounts.google.com/o/oauth2/v2/auth"
set token-url "https://oauth2.googleapis.com/token"
set jwks-uri "https://www.googleapis.com/oauth2/v3/certs"
next
end
|
|
To avoid redirection errors during OIDC authentication, ensure that certain IdP resources are accessed directly by the application or user agent without going through any intermediary proxy. For example, when using Google as your IdP, you must configure Google resources served from the following domains to bypass the proxy:
|
Callback URL configuration in IdP
To fully integrate FortiProxy with an OIDC provider, you must configure the following callback URL (redirect URI) in your IdP (Azure AD, Google, Okta) and communicate the callback URL configuration to your IdP administrator:
https://<FortiProxy_FQDN_or_IP>:7831/XX/YY/ZZ/oidc/callback
where <FortiProxy_FQDN_or_IP> is the value of authentication.settings.captive-portal for transparent or explicit proxy deployments, or ztna.web-portal.auth-virtual-host for ZTNA web portal deployments.
Configuring multiple Identity Providers (IDP) NEW
FortiProxy supports multiple OIDC identity providers (IdPs) in one authentication scheme. When multiple IdPs are configured, users can select which IdP to use in the OIDC landing page, allowing for flexible authentication across different user groups. This is useful in the following scenarios:
-
The organization manages multiple IdPs for different user sets (e.g., Azure AD for employees, Google Identity for contractors).
-
A transition between identity providers is required (e.g., migrating from Okta to Azure AD).
-
Users need to choose their preferred IdP for authentication.
To configure multiple IdPs with a custom IdP selection page:
config user oidc
edit "oidc-azure"
set display-name "Login with Microsoft"
set icon-url "xxxxxxxxxxxx"
set client-id "xxxxxxxx-xxxx-xxxx-xxxx-xxxxxxxxxxxx"
set auth_type private-key
set private-key "oidc-key"
set discovery-url "https://login.microsoftonline.com/tenant_id/v2.0/.well-known/openid-configuration"
next
edit "oidc-google"
set display-name "Login with Google"
set icon-url "xxxxxxxxxxxx"
set type manual
set client-id "yyyyyyyy-yyyy-yyyy-yyyy-yyyyyyyyyyyy"
set client-secret "GOCSPX-************************"
set authorization-url "https://accounts.google.com/o/oauth2/v2/auth"
set token-url "https://oauth2.googleapis.com/token"
set jwks-uri "https://www.googleapis.com/oauth2/v3/certs"
next
end
config user group
edit "group-all"
set member "oidc-azure" "oidc-google"
next
end
config authentication scheme
edit "oidc-auth-scheme"
set method oidc
set oidc-server "oidc-azure" "oidc-google"
next
end
With this configuration, users are presented with a custom IdP selection page and can choose which provider they want to authenticate with.
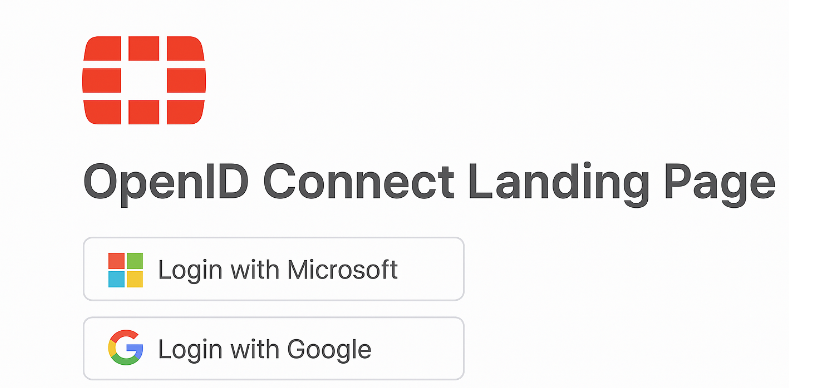
They are then redirected to the selected IdP's authentication portal and then redirected back to FortiProxy with an OIDC token to complete the authentication process after successful authentication.