


FortiWeb configuration
Step 1 - LDAP query
Go to User > Remote Server > LDAP Server and create a new entry.

In this example, users log in using their full mail address. Therefore, the Common Name Identifier value is the Active Directory field userPrincipalName.
(Other applications or configurations may require different login information.)
To obtain the Distinguished Name field:
- On the domain controller, start the adsiedit.msc tool.
- Click Action > Connect to.
- Click OK.
- Browse to the CN=Users folder.
- Select a user (for example, CN=Administrator) and then select its properties.
- Scroll down to Distinguished Name field to view the value to use in FortiWeb.
For more information on creating the LDAP query, see LDAP query best practices and tips.
Step 2 - Authentication server pool
Go to Application Delivery > Site Publish > Authentication Server Pool.

Create a new server pool and add the LDAP server in the pool.
Step 3 - Site publish rule
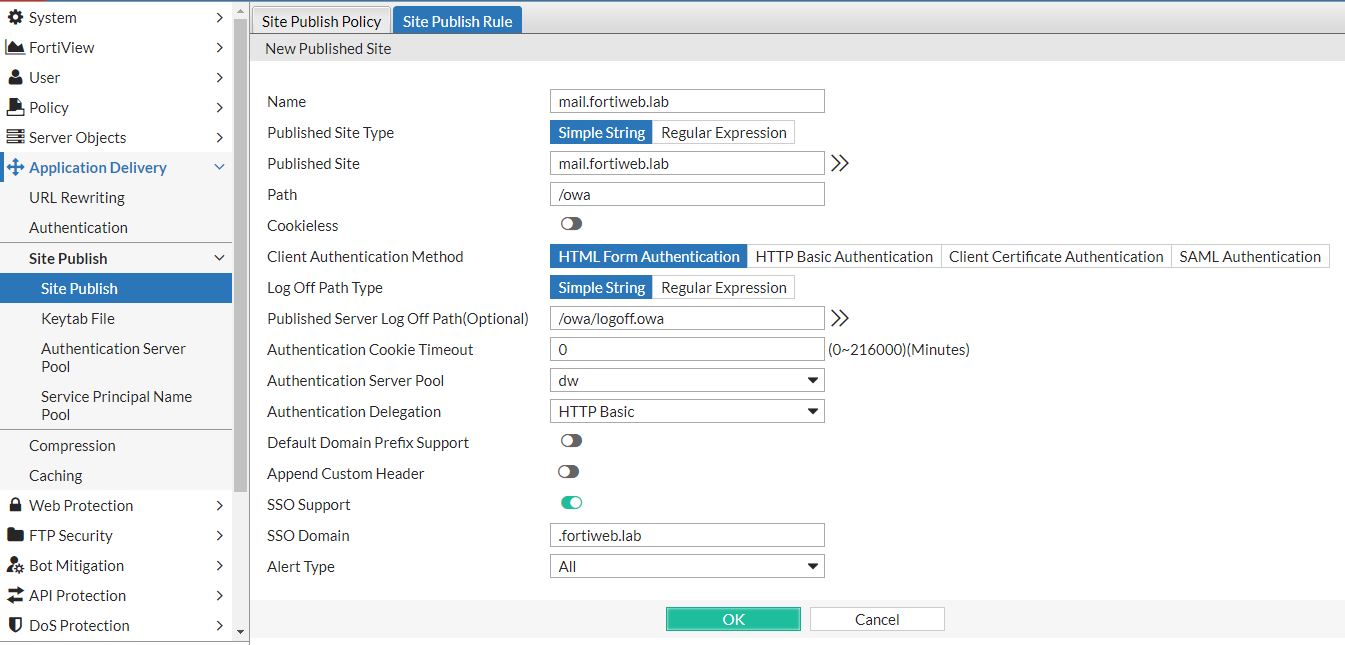
Name is a unique identifier for the rule.
Published Site and Path specify the URL the client uses to access OWA. FortiWeb intercepts requests for this URL and forces the clients to pre-authenticate.
Because the path for OWA starts with /owa, the URL is:
https://mail.fortiweb.lab/owa
Published Server Log Off Path specifies the path FortiWeb uses to log off a user. For OWA, it is /owa/logoff.owa.
Please note, for Exchange 2016 CU1 and later, the logoff path is no longer supported by Microsoft. A community-provided workaround is available: https://social.technet.microsoft.com/Forums/en-US/71462d67-f05b-4d74-af63-b22f3dea35d7/exchange-2016-logoff-does-not-generate-logoff-request.
Without applying this community-provided workaround, FortiWeb will be unable to identify logoff requests, which means the session cookie will only expire once a user closes their browser and does not use the "Restore previous session" option when opening the browser again.
Client Authentication Method specifies how FortiWeb prompts the client to enter the authentication credentials. For example, via HTTP Basic Authentication or a predefined form (shown at right).
LDAP Server is the LDAP configuration you created earlier.
Authentication Delegation specifies whether FortiWeb sends the credentials the client enters to the back-end server.
For example, select No Delegation when the web application has no authentication of its own or uses HTML form-based authentication. Select HTTP Basic Authentication to use HTTP Authorization: headers with Base64 encoding to forward the client’s credentials to the web application.
Because FortiWeb stores the credentials for the length of the session, it can forward the credentials to other application servers without requiring the client to re-enter the password. To enable this functionality, select SSO Support and specify an SSO Domain value.
Alert Type specifies which login events FortiWeb writes to event log (none, failed only, successful only, or all).
Step 4 - Site publish policy
Use a site publish policy to add site publish rules to a web protection profile. The site publish policy allows you to add multiple site publish rules to a policy.
To create a new policy, go to Application Delivery > Site Publish > Site Publish Policy. Create a new entry, enter the policy name, and then click OK. Then, you can add one or more site publish rules to the policy.
Step 5 - X-Forwarded-For rule
Because the operating mode is reverse proxy, the source address of all connections from the FortiWeb to the back-end server is the IP address of one of the FortiWeb interfaces.
To provide the client IP address in the log of the back-end server, you can forward the IP address of the client in the request in a X-Forwarded-For: header.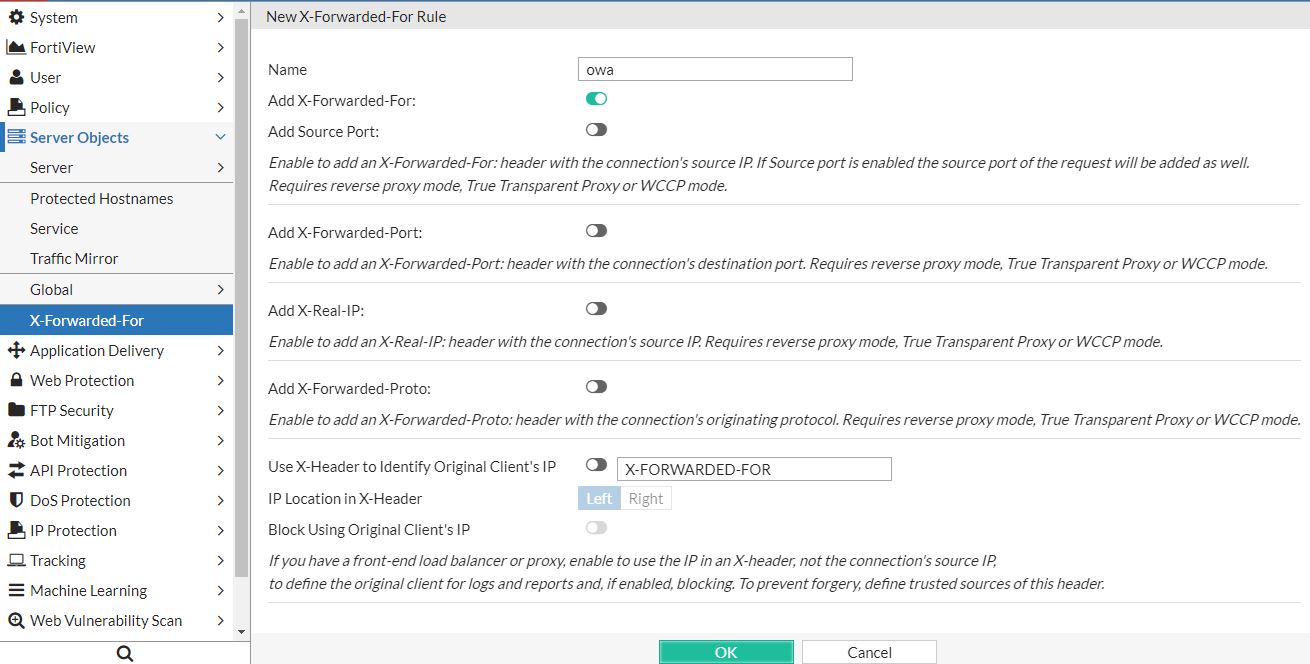
Go to Server Objects > X-Forwarded-For > X-Forwarded-For and create a new entry. Enter a name and select Add X-Forwarded-For.
(These settings also provide alternative methods to include this information in requests.)
Step 6 - Web protection profile
Go to Policy > Web Protection Profile > Inline Protection Profile.
Instead of creating a new profile, you can clone the predefined profile for Exchange 2013, and then configure the cloned profile to suit your environment.
Enter a name, enable Session Management and select the X-Forwarded-For profile you created earlier.
At the bottom of the profile configuration, under Application Delivery, for Site Publish, select the site publish policy that you created earlier.


Step 7 - Virtual server
Go to Server Objects > Server > Virtual Server and create a new entry that specifies the IP address that FortiWeb listens to for connections from the Internet.
Step 8 - Server pool
Go to Server Objects > Server > Server Pool. Create a new pool that is a single server pool (the default). Then, add a new pool member by specifying the IP address of the server that runs the published application.
Step 9 - Certificates
To upload certificates or generate certificate signing requests, go to System > Certificates > Local.
If you have an official, signed certificate, upload the certificate of the signing authority (CA). Depending on your authority, you also upload the Intermediate CAs.
The FortiWeb Administration Guide includes detailed information about uploading certificates. For example, see “How to offload or inspect HTTPS”.
Step 10 - Server policy
Go to Policy > Server Policy > Server Policy and create a new entry.
Select the configuration objects that you created earlier:
- Virtual server
- Server pool
- Certificate
- Web protection profile (inline)
FortiWeb is now listens on the specified IP address and intercepts connections destined for the URL defined in the site publishing rule (in this example, https://mail.fortiweb.lab/owa). The client must successfully complete authentication before it can send any further requests to the application server.
You can configure additional security features, but these are outside the scope of this guide.
LDAP query best practices and tips

In most cases, the AD attribute sAMAccountName is the container used for authentication and the appropriate value for Common Name Identifier.
However, in some environments, the userPrincipalName (email address) is the required or preferred container (for example, for networks that use a domain forest).
For Server Port:
- To search for AD objects more efficiently, specify 3268 instead of the default LDAP port 389.
- Fortinet recommends that you transmit user credentials securely by specifying 3269 (for more efficient searching) or the LDAP port 636.
Distinguished Name specifies the Base DN from which to start the LDAP query.
Filter allows you to improve the speed and efficiency of the queries. If Common Name Identifier is userPrincipalName, use that attribute in the Filter value.
If the query does not work when you specify the LDAP Distinguished Name for User DN, use the UPN (User Principle Name) instead.
In most cases, the UPN (Email Address) format produces the best results.
Search Filter – (&(objectCategory=person)(objectClass=user)(sAMAccountName=*))
For Windows 2003 SP2 and later, the filter can use the string identifier LDAP_MATCHING_RULE_IN_CHAIN (Matching rule OID 1.2.840.113556.1.4.1941). For example:
(memberOf:1.2.840.113556.1.4.1941=(CN=Users*))
The following example filter matches multiple groups:
(&(objectCategory=group)(|(cn=Test*)(cn=Admin*)))
The example filters that follow are based on the following example environment:
Directory: DC=domain,DC=com
+ Test_Users
—–internet_group
——–Matthew Vassallo (user)
—–normal_group
——–Kenneth Grech (user)
|
Query multiple groups (method 1) |
(&(memberOf=CN=*,OU=Test_Users,DC=domain,DC=com)(sAMAccountName=*))
|
| Query multiple groups (method 2) |
|
| Query all users by sAMAccount type |
|
| Exclude users in a specific group from the query |
(!(memberOf=cn=TestGroup,OU=Groups,DC=DOMAIN,DC=com))
|
| Query for non-disabled users in a group |
|