


Creating Campaigns
Before launching a new campaign, you must first decide if you will:
-
Create a new campaign from an existing template.
-
Create a new campaign from scratch. This allows you to choose the modules you wish to include in this new campaign. You can select the content, module by module, and in the order you wish it to be delivered. If you choose this method, you must also give your new template a name. This will allow you use this new custom template again in the future.
You should always schedule your campaign for the future so that you can create the necessary phishing, remediation, and reporting requirements before launching a campaign.
Creating a new campaign from an existing template
To create a new campaign from an existing template:
-
Go to Campaigns, then select New Training Campaign.

-
Give the new Campaign a meaningful name.

For clarity, it is recommended you include a descriptive name and possibly a data stamp (month and year or quarter and year) in the name as well as a high-level description of the content or purpose.
You can use a name of up to 256 characters.
-
Choose a Template from the drop down list of existing entries.

-
Enter a Start Date, Due Date, and End Date for the campaign and click Begin Set up.

If you select a template that contains modules that overlap with existing active campaigns, you will receive a warning message highlighting the overlap. Students who have already completed the modules will not have to take these modules again.

-
Complete the remaining fields in the Campaign Details page and select Save for later.
-
Enter a Welcome/Introduction Message that will be presented to the users.
-
Add a group: Assign users by Department or Position.
-
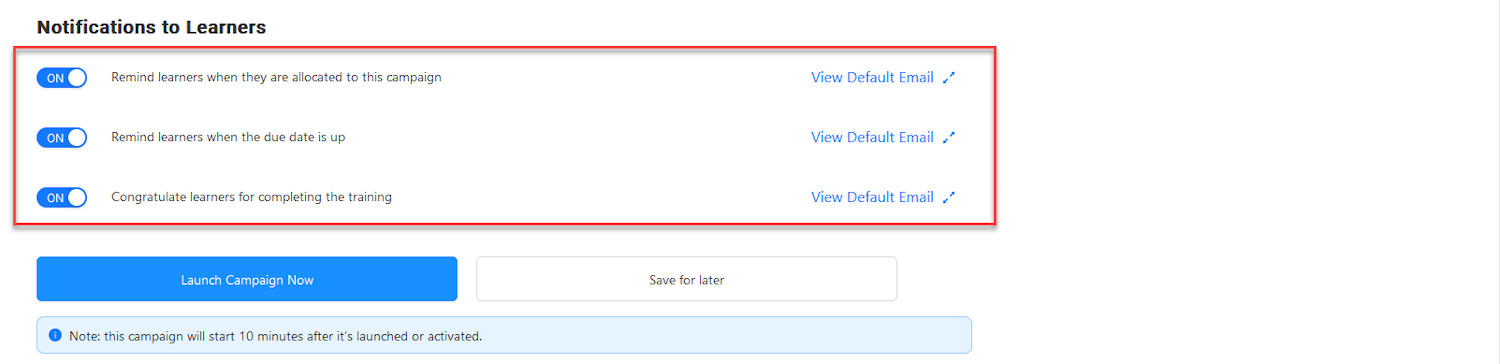
Choose which Notifications students should receive:
-
Remind students when they are allocated to this campaign
-
Remind students when the due date is up
-
Congratulate students for completing the training
-

You do not have to use the canned emails which cannot be edited. You can create your own custom emails using the Remediation navigation menu item. See Remediation.
If you want students to be able to print, save, or view their certificate of completion, you must leave the Congratulate learners for completing the training option button enabled.
-
-
Select the Reports Setup tab.

-
Turn on Schedule a report and select the Schedule to use the canned report.

-
Choose the Audience for the report by typing the names in the Choose the user(s) that you want to receive the report and selecting them.

You cannot change the Report format of canned reports. If you wish to receive the report in a different format, you must create a custom report using the Reports navigation menu item. See Reports.
-
Select the Remediation Setup tab. This requires that you included the manager email field when you imported your users using a .csv file or that your manager attribute has been populated in the LDAP server.

-
Disable either or both of the switches to enable the Remediation Rules (email manager and email student) and click Save.

-
If you are ready to launch the campaign immediately:
-
Return to the Campaign Setup tab.

-
Select Launch Campaign Now.

-
Creating a new template from the module list
You can create your own Template (program) by choosing only the modules you wish to include.
To create a new template:
-
Go to Campaigns, then select New Training Campaign.
-
Click Create a New Template.

-
Select each of the modules you wish to include in the new Template.

-
Give your template a meaningful name. This is the name that the tenant administrator will see when they next choose to run a campaign from the new template. It should be descriptive and meaningful to the administrator.

-
Give the new campaign a meaningful name. This is the name the learners will see in the Learner App.

-
Enter the Campaign Start Date, the Training Due Date for Learners, and the Campaign End Date, then select the Begin Set up button.

The wizard will then show the Campaign Details page that allows you to complete the configuration of the campaign. This includes canned emails, reports and remediation events. If you choose, you do not need to enable the canned options if you wish to create your own email notification templates, assign custom or additional custom reports, and use the default canned remediation rules.
If there is any overlap of the assigned modules in the campaign, with another campaign during the same dates, a warning will be displayed. Users who have already completed the overlapping modules will not have to complete them again. When they access the training campaign via the Learner App, these modules will already be marked as complete.
-
Enter a Welcome/Introduction Message. This message will be displayed to the user when they access the training campaign.

-
Assign the learners for the campaign by selecting Choose department(s) or Choose positions(s) from the Add a group dropdown.

-
Enable the use of canned emails (you can view samples of the emails by clicking the View Default Email link next to each canned notification remediation event) or leave the option disabled for any events you wish to create a custom remediation email notification for.

-
Select Reports Setup tab at the top of the screen.

-
To use the canned report, turn on Schedule a report and select the schedule.

-
Choose the Audience for the report by entering the names in the Choose the user(s) that you want to receive the report field and selecting them.

You cannot change the Report format of canned reports. If you wish to receive the report in a different format, you must create a custom report using the Reports navigation menu item. We will cover this functionality later in the guide.
-
Select the Remediation Setup tab. This requires that you included the manager email field when you imported your users using a .csv file or that your manager attribute has been populated in the LDAP server.

-
If you wish to use the canned remediation rules, enable either or both of the Remediation Rules (email manager and email student) and click Save.

-
If you are ready to launch the campaign immediately:
-
Return to the Campaign Setup tab.

-
Select Launch Campaign Now.

-