
ZTNA IPv6 examples
IPv6 can be configured in ZTNA in several scenarios:
-
IPv6 Client — IPv6 Access Proxy — IPv6 Server
-
IPv6 Client — IPv6 Access Proxy — IPv4 Server
-
IPv4 Client — IPv4 Access Proxy — IPv6 Server
-
IPv6 EMS tags in dual stack firewall policies
These examples show the basic configuration for each scenario. It is assumed that the EMS fabric connector is already successfully connected.
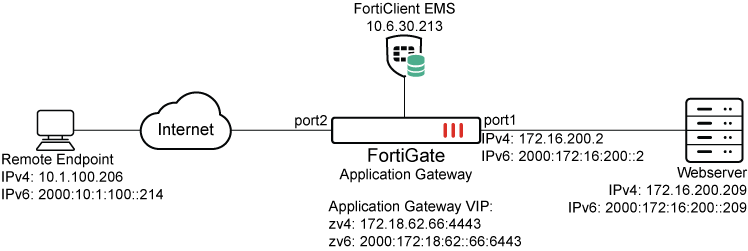
Example 1: IPv6 Client — IPv6 Access Proxy — IPv6 Server
To configure the FortiGate:
-
Configure the IPv6 access proxy VIP:
config firewall vip6 edit "zv6" set type access-proxy set extip 2000:172:18:62::66 set server-type https set extport 6443 set ssl-certificate "cert" next end -
Configure a virtual host:
config firewall access-proxy-virtual-host
    edit "vhost_ipv6"
        set ssl-certificate "cert"
        set host "webserver.test.com"
    next
end
The client uses this address to connect to the access proxy.
-
Configure an IPv6 web proxy and IPv6 api-gateway, apply the VIP6 and virtual host to it, and assign an IPv6 address to the realserver:
config ztna web-proxy edit "zs6" set vip "zv6" set host "vhost_ipv6" config api-gateway6 edit 1 config realservers edit 1 set ip 2000:172:16:200::209 next end next end next end -
Configure a ZTNA policy:
config firewall policy
    edit 1
        set name "ztna_rule"
        set srcintf "port2"
        set dstintf "any"
        set action accept
        set srcaddr6 "all"
        set dstaddr6 "zs6"
        set schedule "always"
        set logtraffic all
    next
end
To test the configuration:
-
On an IPv6 client, ensure that the address webserver.test.com resolves to the IPv6 VIP address of 2000:172:18:62::66.
-
In a browser, connect to https://webserver.test.com:6443.
-
After device certificate verification, the browser will open up the webpage on the IPv6 real server.
-
In the Forward Traffic Log, the following log is available:
1: date=2026-03-03 time=14:46:14 eventtime=1772577974130406404 tz="-0800" logid="0005000024" type="traffic" subtype="ztna" level="notice" vd="root" srcip=2000:10:1:100::214 srcport=55957 srcintf="port2" srcintfrole="undefined" dstcountry="Reserved" srccountry="Reserved" dstip=2000:172:16:200::209 dstport=443 dstintf="port1" dstintfrole="undefined" sessionid=9174 srcuuid="b458a65a-f759-51ea-d7df-ef2e750026d1" dstuuid="01b612e6-174a-51f1-1a3d-b3293e8efa12" service="HTTPS" proxyapptype="ztna-proxy" proto=6 action="accept" policyid=1 policytype="policy" poluuid="693c3e3e-174c-51f1-3e13-715130a1a107" policyname="ztna_rule" appcat="unscanned" duration=129 gatewayid=1 realserverid=1 vip="zv6" vipincomingip=2000:172:18:62::66 accessproxy="zs6" clientdeviceid="9A016B5A6E914B42AD4168C066EB04CA" clientdevicemanageable="manageable" clientdeviceems="FCTEMS8825007166" clientdevicetags="CLASS_Low/ all_registered_clients" clientcert="yes" emsconnection="online" wanin=303009 rcvdbyte=303009 wanout=4424 lanin=4220 sentbyte=4220 lanout=305716 fctuid="9A016B5A6E914B42AD4168C066EB04CA"
Example 2: IPv6 Client — IPv6 Access Proxy — IPv4 Server
To configure the FortiGate:
-
Configure the IPv6 access proxy VIP:
config firewall vip6 edit "zv6" set type access-proxy set extip 2000:172:18:62::66 set server-type https set extport 6443 set ssl-certificate "cert" next end -
Configure a virtual host:
config firewall access-proxy-virtual-host
    edit "vhost_ipv6"
        set ssl-certificate "cert"
        set host "webserver.test.com"
    next
end
The client uses this address to connect to the access proxy.
-
Configure an IPv6 web proxy and api-gateway, apply the VIP6 and virtual host to it, and assign an IPv4 address to the realserver:
config ztna web-proxy edit "zs6" set vip "zv6" set host "vhost_ipv6" config api-gateway edit 1 config realservers edit 1 set ip 172.16.200.209 next end next end next end -
Configure a ZTNA policy:
config firewall policy
    edit 1
        set name "ztna_rule"
        set srcintf "port2"
        set dstintf "any"
        set action accept
        set srcaddr6 "all"
        set dstaddr6 "zs6"
        set schedule "always"
        set logtraffic all
    next
end
To test the configuration:
-
On an IPv6 client, ensure that the address webserver.test.com resolves to the IPv6 VIP address of 2000:172:18:62::66.
-
In a browser, connect to https://webserver.test.com:6443.
-
After device certificate verification, the browser will open up the webpage on the IPv4 real server.
-
In the Forward Traffic Log, the following log is available:
1: date=2026-03-03 time=14:46:14 eventtime=1772577974130406404 tz="-0800" logid="0005000024" type="traffic" subtype="ztna" level="notice" vd="root" srcip=2000:10:1:100::214 srcport=55957 srcintf="port2" srcintfrole="undefined" dstcountry="Reserved" srccountry="Reserved" dstip=172.16.200.209 dstport=443 dstintf="port1" dstintfrole="undefined" sessionid=9174 srcuuid="b458a65a-f759-51ea-d7df-ef2e750026d1" dstuuid="01b612e6-174a-51f1-1a3d-b3293e8efa12" service="HTTPS" proxyapptype="ztna-proxy" proto=6 action="accept" policyid=1 policytype="policy" poluuid="693c3e3e-174c-51f1-3e13-715130a1a107" policyname="ztna_rule" appcat="unscanned" duration=129 gatewayid=1 realserverid=1 vip="zv6" vipincomingip=2000:172:18:62::66 accessproxy="zs6" clientdeviceid="9A016B5A6E914B42AD4168C066EB04CA" clientdevicemanageable="manageable" clientdeviceems="FCTEMS8825007166" clientdevicetags="CLASS_Low/ all_registered_clients" clientcert="yes" emsconnection="online" wanin=303009 rcvdbyte=303009 wanout=4424 lanin=4220 sentbyte=4220 lanout=305716 fctuid="9A016B5A6E914B42AD4168C066EB04CA"
Example 3: IPv4 Client — IPv4 Access Proxy — IPv6 Server
To configure the FortiGate:
-
Configure the IPv4 access proxy VIP:
config firewall vip edit "zv4" set type access-proxy set extip 172.18.62.66 set extintf "port2" set server-type https set extport 4443 set ssl-certificate "cert" next end -
Configure a virtual host:
config firewall access-proxy-virtual-host
    edit "vhost_ipv4"
        set ssl-certificate "cert"
        set host "qa.test.com"
    next
end
The client uses this address to connect to the access proxy.
-
Configure an IPv4 web proxy and IPv6 api-gateway, apply the VIP and virtual host to it, and assign an IPv6 address to the realserver:
config ztna web-proxy edit "zs4" set vip "zv4" set host "vhost_ipv4" config api-gateway6 edit 1 config realservers edit 1 set ip 2000:172:16:200::209 next end next end next end -
Configure a ZTNA policy:
config firewall policy
    edit 1
        set name "ztna_rule"
        set srcintf "port2"
        set dstintf "any"
        set action accept
        set srcaddr "all"
        set dstaddr "zs4"
        set schedule "always"
        set logtraffic all
    next
end
To test the configuration:
-
On an IPv4 client, ensure that the address webserver.test.com resolves to the IPv4 VIP address of 172.18.62.66.
-
In a browser, connect to https://webserver.test.com:6443.
-
After device certificate verification, the browser will open up the webpage on the IPv6 real server.
-
In the Forward Traffic Log, the following log is available:
1: date=2026-03-03 time=14:46:14 eventtime=1772577974130406404 tz="-0800" logid="0005000024" type="traffic" subtype="ztna" level="notice" vd="root" srcip=10.1.100.206 srcport=55957 srcintf="port2" srcintfrole="undefined" dstcountry="Reserved" srccountry="Reserved" dstip=2000:172:16:200::209 dstport=443 dstintf="port1" dstintfrole="undefined" sessionid=9174 srcuuid="b458a65a-f759-51ea-d7df-ef2e750026d1" dstuuid="01b612e6-174a-51f1-1a3d-b3293e8efa12" service="HTTPS" proxyapptype="ztna-proxy" proto=6 action="accept" policyid=1 policytype="policy" poluuid="693c3e3e-174c-51f1-3e13-715130a1a107" policyname="ztna_rule" appcat="unscanned" duration=129 gatewayid=1 realserverid=1 vip="zv4" vipincomingip=172.18.62.66 accessproxy="zs4" clientdeviceid="9A016B5A6E914B42AD4168C066EB04CA" clientdevicemanageable="manageable" clientdeviceems="FCTEMS8825007166" clientdevicetags="CLASS_Low/ all_registered_clients" clientcert="yes" emsconnection="online" wanin=303009 rcvdbyte=303009 wanout=4424 lanin=4220 sentbyte=4220 lanout=305716 fctuid="9A016B5A6E914B42AD4168C066EB04CA"
Example 4: IPv6 EMS tags in dual stack firewall policies
To configure the FortiGate:
-
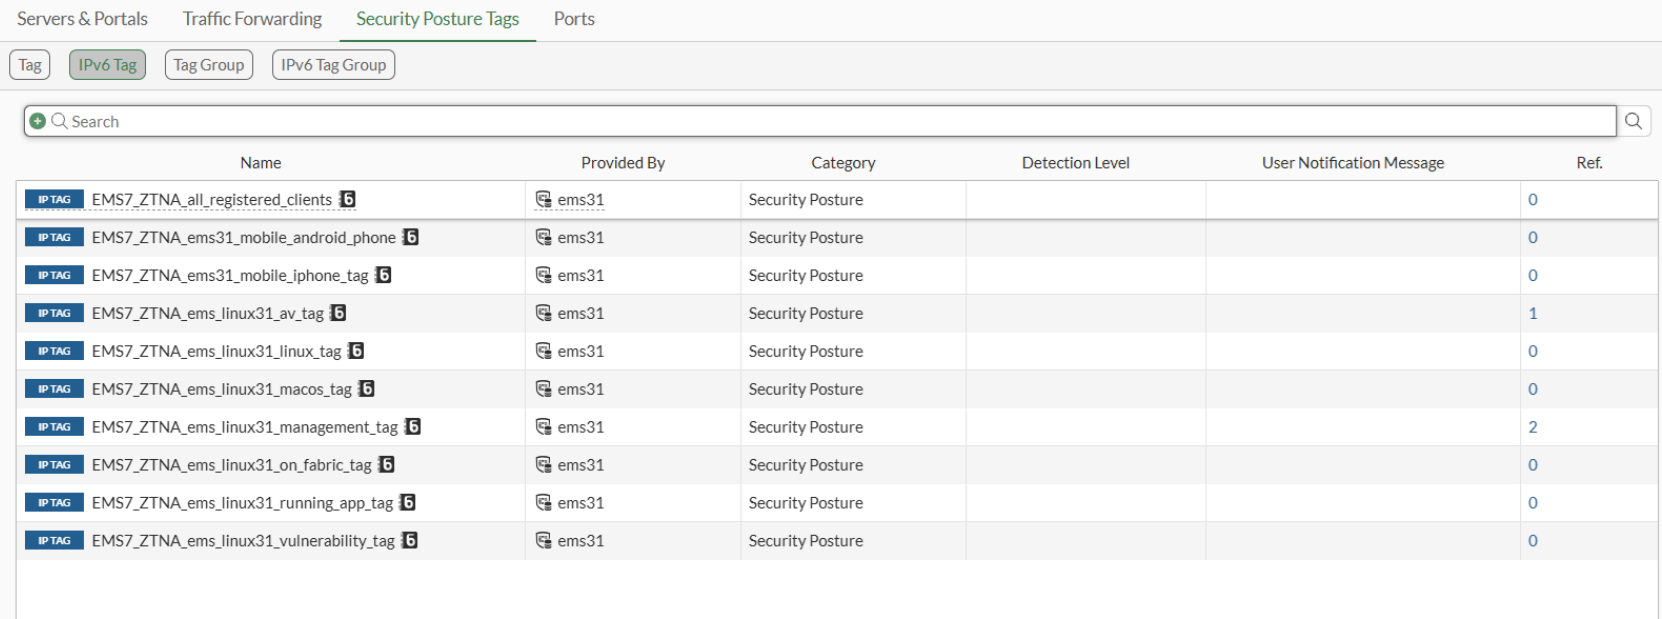
Go to Policy & Objects > ZTNA > Security Posture Tags > IPv6 Tag to verify that FortiGate has IPv6 tags from FortiClient EMS:
-
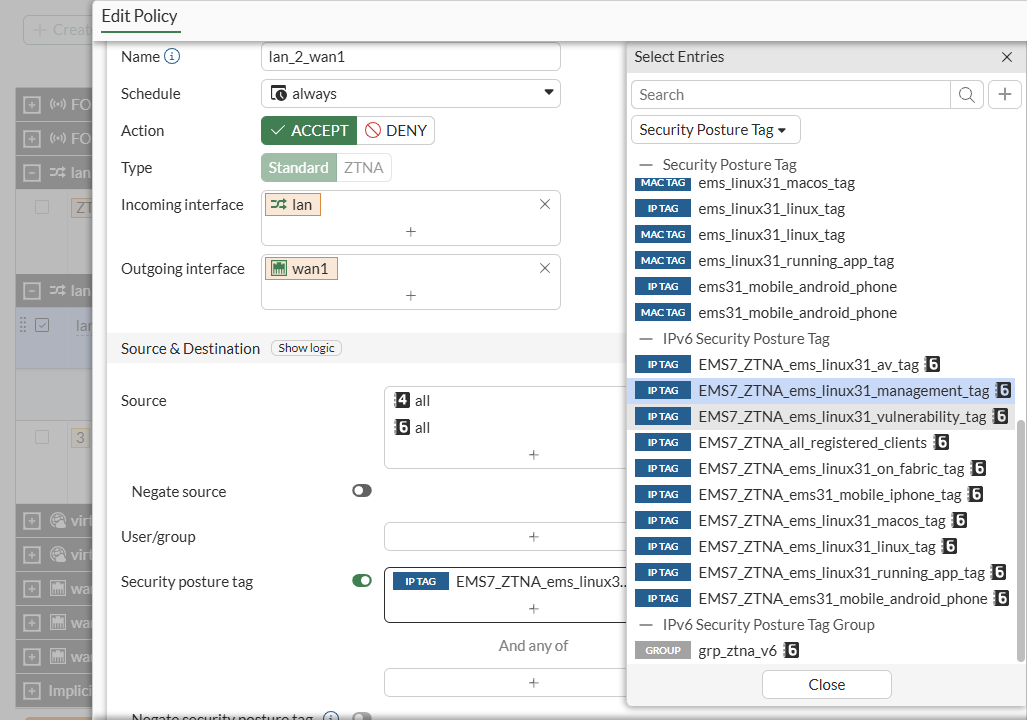
Go to Policy & Objects > Firewall Policy, create or edit a firewall policy with IPv4 and IPv6 source addresses, and add IPv6 EMS security posture tag:
To configure the FortiGate in the CLI:
-
Verify the EMS tag in the CLI:
# show firewall address6 config firewall address6 ... edit "EMS7_ZTNA_ems_linux31_management_tag" set uuid 880ef31c-fcba-51f0-e348-1f01acd82c22 set type dynamic set sub-type ems-tag set dirty clean set obj-tag "ems_linux31_management_tag" set tag-type "zero_trust" next ... end -
Apply the tag in a firewall policy:
config firewall policy
    edit 1
        set name "lan_2_wan1"
        set srcintf "lan"
        set dstintf "wan1"
        set action accept
        set ztna-status enable
        set srcaddr "all"
        set dstaddr "all"
        set srcaddr6 "all"
        set dstaddr6 "all"
        set ztna-ems-tag6 "EMS7_ZTNA_ems_linux31_management_tag"
        set schedule "always"
        set service "ALL"
        set logtraffic all
        set nat enable
    next
end