


FortiNDR and FortiGate ICAP configuration example
The following is an example of setting up FortiNDR and FortiGate ICAP integration including client experience. This example requires FortiNDR(formerly FortiAI) 1.4 or higher and FortiOS 6.2 or higher.
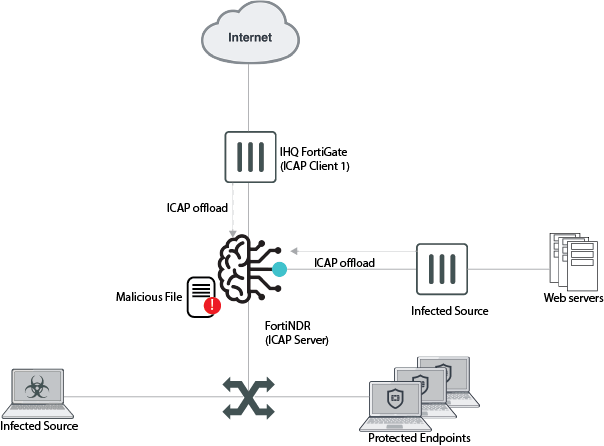
Topology
In this example, the ICAP server performs malware scanning on HTTP and HTTPS requests. If the ICAP server is unable to process a request, then the request is blocked. Streaming media is not considered by the filter so it is allowed through and is not processed.
FortiNDR and FortiGate ICAP integration works with SSL deep inspection.
To add the ICAP server to the FortiGate in the GUI:
- Go to Security Profiles > ICAP Servers and click Create New. If you do not see ICAP in the navigation menu, enable the feature with the GUI. See Feature visibility.

- For Name, enter a name for the ICAP server, such as icap-server.
- Enter the IP address of the ICAP server.
- If required, enter a new Port number. The default is 1344.
- Click OK.
The default maximum number of concurrent connections to ICAP server is 512 connections. You can change this default using the CLI.
To create an ICAP profile in the FortiGate GUI:
- Go to Security Profiles > ICAP and click Create New.

- For Name, enter a name for the ICAP profile, such as FAI-ICAP.
- Enable Request processing and set the following.
Server Select the ICAP server. In this example, select icap-server. Path Enter the path to the processing component on the server. For FortiNDR, enter reqmod. On failure Select Error to block the request. If the message cannot be processed, it is blocked. - Enable Response processing and set the following.
Server Select the ICAP server. In this example, select icap-server. Path Enter the path to the processing component on the server. For FortiNDR, enter respmod. On failure Select Error to block the request. If the message cannot be processed, it is blocked. - We recommend you enable Streaming media bypass to not offload streaming media to the ICAP server.

For optimal performance, disable this option only when traffic is low and all files must be inspected.
- Click OK.
To add the ICAP profile to a policy in the FortiGate GUI:
- Go to Policy & Objects > FireWall Policy and click Create New.

- Configure the policy to apply to the required traffic.
- Set Inspection Mode to Proxy-based.
- In the Security Profiles section, enable ICAP and select the ICAP server. In this example, select FAI-ICAP.
- Click OK.
To add the ICAP server via the CLI:
config icap server
    edit "icap-server"
        set ip-address 172.19.235.238
        set port 1344
        set max-connections 512
    next
end
To create an ICAP profile via the CLI:
config icap profile
    edit "FAI-ICAP"
        set request enable
        set response enable
        set streaming-content-bypass enable
        set request-server "icap-server"
        set response-server "icap-server"
        set request-failure error
        set response-failure error
        set request-path "reqmod"
        set response-path "respmod"
        set methods delete get head options post put trace other
    next
end
To add the ICAP profile to a policy via the CLI:
config firewall policy
    edit 5
        set name "fai"
        set srcintf "virtual-wan-link"
        set dstintf "virtual-wan-link"
        set srcaddr "FABRIC_DEVICE"
        set dstaddr "FABRIC_DEVICE"
        set dstaddr-negate enable
        set action accept
        set schedule "always"
        set service "ALL"
        set utm-status enable
        set inspection-mode proxy
        set ssl-ssh-profile "certificate-inspection"
        set icap-profile "FAI-ICAP"
        set logtraffic disable
        set fsso disable
        set nat enable
    next
end
FortiNDR ICAP configuration
Use the GUI to configure the ICAP server. Configuration via CLI is not currently supported.
To configure the ICAP server:
- Go to Security Fabric > Fabric Connectors.
- In the ICAP connector tile, click the settings icon at the top right.

- Turn on Enable ICAP Connector.

- In the Connection section, configure the following.
Interface Select the interface from the dropdown menu. Default is port1. Port Enter the port number. Default is 1344. SSL Support Enable. SSL Port Enter the SSL Port number. Default is 11344. - In the Configuration section, configure the following.
Realtime FAI Scan Enable.
This setting allows FortiNDR to complete new file scanning and obtain the verdict result before sending back the ICAP response.
Realtime FAI Scan Timeout Enter the value for the ICAP server to wait for the verdict result. Default is 30 seconds. - In the Confidence Level section, select or enter the Quarantine Confidence level. Default is 80%.
Files verdict results with confidence level equal to or higher than this setting are treated as bad and block code is returned.
- Click OK.
Client experience
On client PCs’ web traffic, if the FortiNDR ICAP server returns a malicious verdict, the client PC gets a message in its browser. See the following example.
