Deploying FortiADC HA resources from the ARM template
To deploy VRRP HA using Azure Load Balancer, the FortiADC HA resources need to be created through the ARM template. Follow the steps below to deploy the FortiADC HA resources from the ARM template.
Accessing the ARM template
You can access the ARM template through the following 2 options:
-
Launching the prepared ARM template from the Fortinet GitHub to deploy directly to Azure.
-
Building a custom template in Azure using the code for the ARM template as the base.
To launch the ARM template directly from the Fortinet GitHub:
- Go to the Fortinet GitHub: https://github.com/fortinet/fortiadc-azure-ha.
- Click Deploy to Azure.
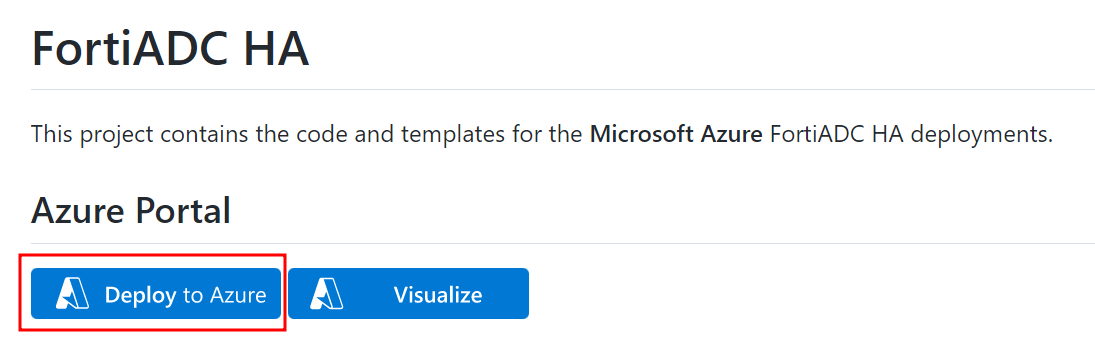
The ARM template is launched directly to Azure as a Custom deployment.
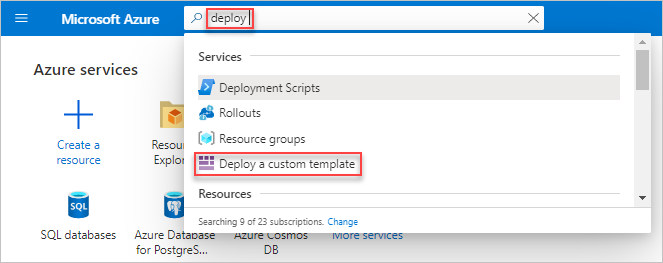
To build a custom template using the ARM template code:
- Sign in to your Azure Account through the Azure portal.
- Select Deploy a custom template.
- Click Build your own template in the editor.

- Delete the content in the default template.
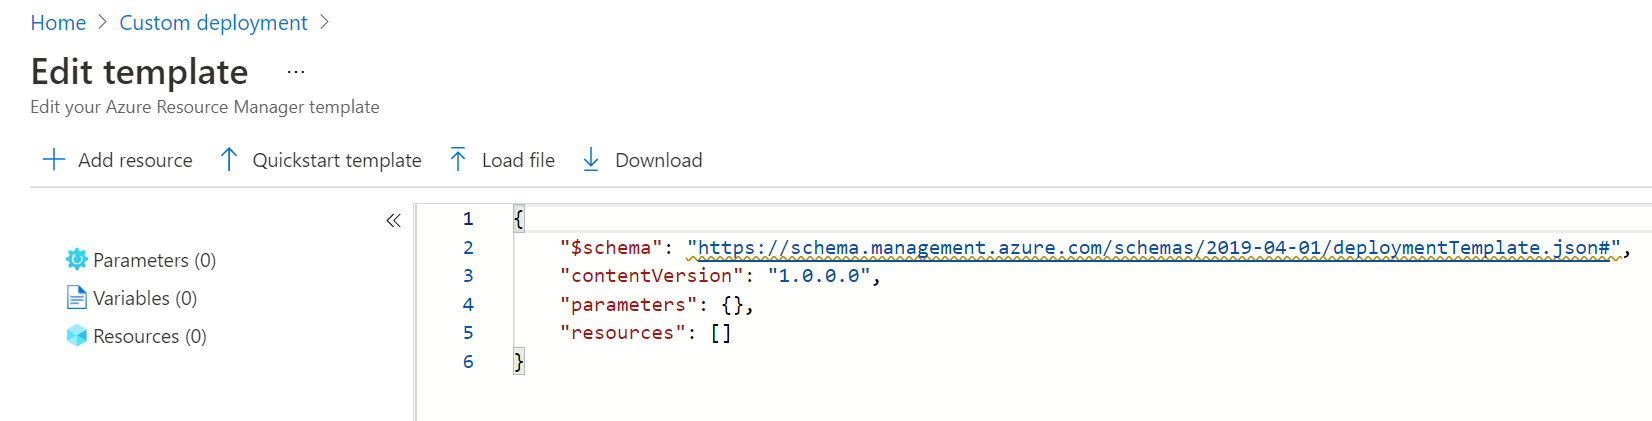
- Go to the Fortinet GitHub: https://github.com/fortinet/fortiadc-azure-ha/blob/main/templates/deploy_fadc_ha.json.
- Copy the text from deploy_fadc_ha.json.
- In the Azure template editor, paste the copied text. You may modify the ARM template as needed from here.
- Click Save.
Configuring the ARM template deployment parameters
After you have successfully launched your ARM template, configure the following parameters to complete the ARM template deployment.
- In the Azure Custom deployment where you have launched your ARM template, select the Basics tab.
- Under the Project details, select the applicable Subscription and Resource group.
Note: The Subscription and Resource group should be the same as the ones where your license files are stored. For more information, refer to Uploading license files to Azure storage container. - Under the Instance details, configure the following settings:
Parameter Name
Description
Region Select the region according to the Subscription and Resource group. Subscription Id Apply the subscription ID in previous steps. For details, refer to Getting the subscription ID and tenant ID. Tenant Id Apply the tenant ID in previous steps. For details, refer to Getting the subscription ID and tenant ID. Restapp Id Apply the restapp ID in previous steps. For details, refer to the steps on how to get the Application ID and authentication key in Creating an Azure Active Directory application Restapp Secret Apply the restapp secret in previous steps. For details, refer to the steps on how to get the Application ID and authentication key in Creating an Azure Active Directory application Region Select the Azure server region. Resource Name Prefix Specify a prefix for the resources to be deployed. The names of the resources will contain the specified prefix. Vm Sku Specify the FortiADC-VM instance types.
Select from the following instance types:
Standard_F2s_v2
Standard_F4s_v2
Standard_F8s_v2
Standard_F16s_v2
Standard_F32s_v2
To ensure high performance, it is recommended to deploy a VM instance with at least 2 vCPUs and 8 GB memory.
If you are using BYOL licensing type, specify an instance type that matches your FortiADC-VM licenses. For example, if your FortiADC-VM license supports 4 vCPUs, you can choose from the instance types that have 4 vCPUs.
FAD Admin Username
Enter an administrator username for the FortiADC instances.
Note: The username cannot be "admin" or "root".
FAD Admin Password
Enter a password for the administrator account if you have chosen password for Authentication Type.
The Azure password policy requires the password to include at least 3 of the 4 from the following:
Lowercase characters
Uppercase characters
Numerical digits
Special characters (Regex match [\W_])
FAD Image Type
Select BYOL or PAYG.
FAD Image Version
Select the image version of FortiADC-VMs. It is recommended to deploy the latest version.
FAD Count
Specify the number of virtual machines to be created in the HA group.
The minimum is 1 and maximum is 2; the default is 2.
Vnet New Or Existing
Select whether to use a new or existing virtual network.
Vnet Resource Group
If you selected existing for Vnet New Or Existing, then specify the resource group to which the existing virtual network belongs.
Vnet Name
Specify a name for the new virtual network or enter the name of the existing virtual network.
Vnet Address Prefix
Specify the virtual network address prefix. For example, 10.2.0.0/16.
Vnet Subnet1Name
Specify a name for the public-facing subnet.
Vnet Subnet1Prefix
Specify the prefix of the public-facing subnet. For example, 10.2.0.0/24.
Vnet Subnet2Name
Specify a name for the private subnet.
Vnet Subnet2Prefix
Specify the prefix of the private subnet. For example, 10.2.1.0/24.
Internal LB Frontend IP
Specify an internal load balancer front end IP. For example, 10.2.1.6.
FAD1HAPort2IP
Specify the FAD1 HA Port2 IP. For example, 10.2.1.4.
FAD2HAPort2IP
Specify the FAD2 HA Port2 IP. For example, 10.2.1.5.
FAD1internal LB backendip
Specify the FAD1 internal load balancer IP. For example, 10.2.1.8.
FAD2internal LB backendip
Specify the FAD2 internal load balancer IP. For example, 10.2.1.9.
Fortiadc Ha Group Name
Specify a name for the FortiADC HA group.
Fortiadc Ha Group Id
Specify an ID for the FortiADC HA group. All the members in the HA group will be marked with this group ID. The minimum is 0 and the maximum is 63.
Storage Account Name
Specify the name of the storage account.
Note: This is applicable for the serial console and if BYOL is selected as the FAD Image Type.
Storage License Container Name
Enter the name of the containers where the license files are stored.
Note: This is applicable only if BYOL is selected as the FAD Image Type.
Storage Licensefile1
Enter one of the names of the two licenses you have uploaded into the storage license container. For example, FADXXXlic.
Storage Licensefile2
Enter one of the names of the two licenses you have uploaded into the storage license container. For example, FADXXXlic.
- Click Review + create.
- Check the resource group with all the deployment resources. The following lists the major deployed resources with the resource prefix "FAD-HA-example".
Deployed Resource Description FAD-HA-example-vm1 FortiADC in the HA group. FAD-HA-example-vm2 FortiADC in the HA group. FAD-HA-example-external-nic1 External interface of the FAD-HA-example-vm1 for external access. FAD-HA-example-internal-nic1 Internal interface of the FAD-HA-example-vm1 for internal access to the protected server. The primary IP of this network interface is also used as the HA VRRP unicast IP. FAD-HA-example-external-nic2 External interface of the FAD-HA-example-vm2 for external access. FAD-HA-example-internal-nic2 Internal interface of the FAD-HA-example-vm2 for internal access to the protected server. The primary IP of this network interface is also used as the HA VRRP unicast IP. FAD-HA-example-loadbalance-internal Internal Azure Load Balancer. This is used in the FortiADC L4 virtual server topology. For more information, see Example: FortiADC L4 Virtual Server with HA VRRP mode using Azure Load Balancer Topology. FAD-HA-example-loadbalance-external External Azure Load Balancer. FAD-HA-example-nicPublic-IP1 Provides public access to the FAD-HA-example-vm1. FAD-HA-example-nicPublic-IP2 Provides public access to the FAD-HA-example-vm2. FAD-HA-example-loadbalance-IP External access to the ALB FAD-HA-example-loadbalance-external. This provides the single access endpoint for the FortiADC virtual servers. FAD-HA-exampleRouteTable-FadcHAInsideSubnet Routing table for L4 virtual server topology. For more information, see Example: FortiADC L4 Virtual Server with HA VRRP mode using Azure Load Balancer Topology. FAD-HA-example-availabilitySet Provided for redundancy and availability. FAD-HA-example-securityGroup
Access rules for the external subnet.
FAD-HA-example-securityGroup2
Access rules for the internal subnet.
FortiADC-vnet-example Virtual network where the FortiADCs are located. - If you are using an existing virtual network, you will need to manually associate the subnet2 to the route table for the FAD-HA-exampleRouteTable-FadcHAInsideSubnet.
- From the list of deployed resources in the existing virtual network, select FAD-HA-exampleRouteTable-FadcHAInsideSubnet.
- In the Settings section, select Subnets.
- Click +Associate.
- Select the Subnet to associate.
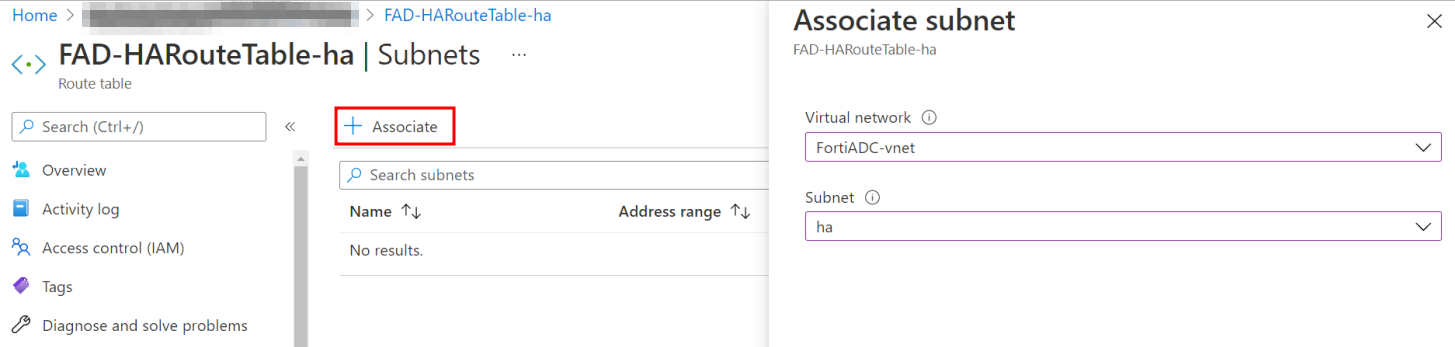
- Click OK.
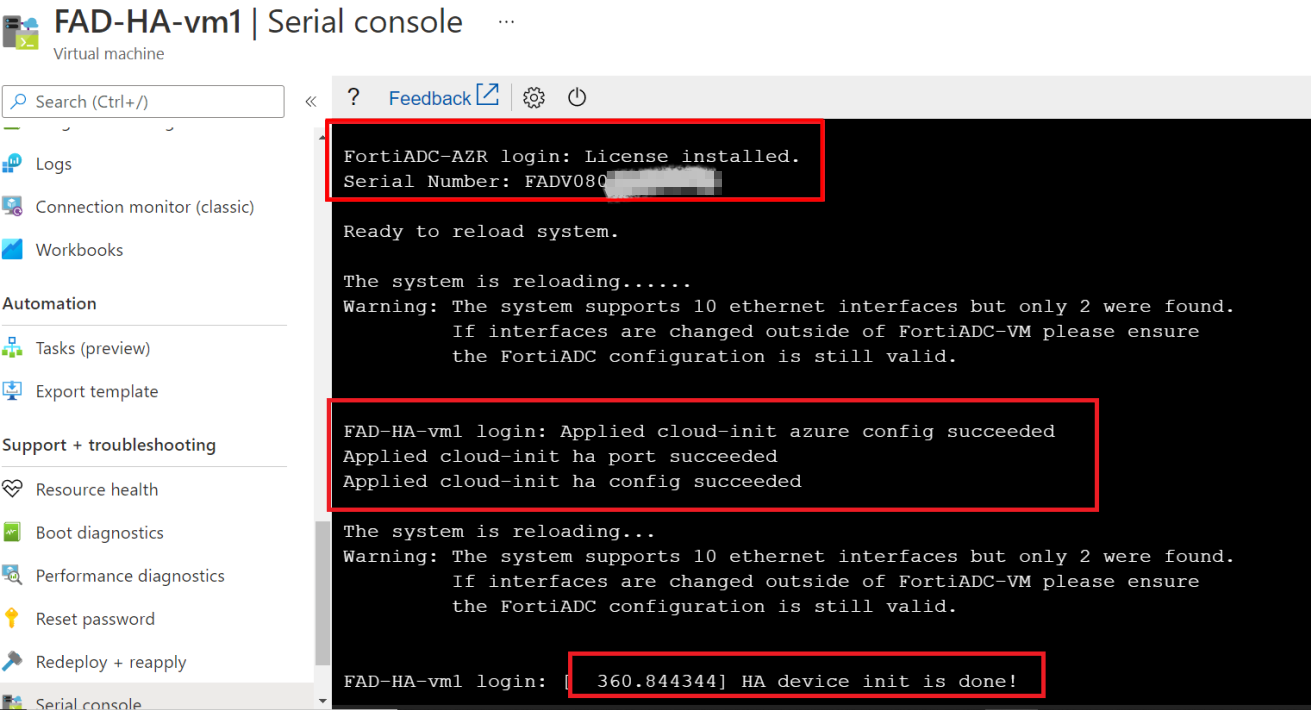
- Check the FortiADC console to ensure the license (BYOL) is installed and the ha init is done.
- Select the FortiADC-VM in the HA group. For example, the FAD-HA-example-vm1.
- In the Support + troubleshooting section, select Serial console.