
ZTNA SSH traffic forwarding proxy example
ZTNA can be configured with SSH traffic forwarding proxy to provide a seamless SSH connection to the server.
Advantages of using an SSH access proxy instead of a TCP forwarding access proxy include:
-
Establishing device trust context with user identity and device identity checks.
-
Applying SSH deep inspection to the traffic through the SSH related profile.
-
Performing optional SSH host-key validation of the server.
-
Using one-time user authentication to authenticate the ZTNA SSH access proxy connection and the SSH server connection.
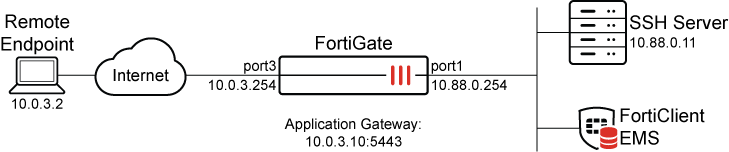
This example assumes that the FortiGate EMS fabric connector is already successfully connected.
Perform SSH host-key validation of the server
To act as a reverse proxy for the SSH server, the FortiGate must perform SSH host-key validation to verify the identity of the SSH server. The FortiGate does this by storing the public key of the SSH server in its SSH host-key configurations. When a connection is made to the SSH server, if the public key matches one that is used by the server, then the connection is established. If there is no match, then the connection fails.
One-time user authentication
SSH access proxy allows user authentication to occur between the client and the access proxy, while using the same user credentials to authenticate with the SSH server. The following illustrates how this works:

-
The remote endpoint registers to FortiClient EMS and receives the client certificate.
-
The remote endpoint tries to connect to the SSH access proxy. It must use the same username that is later used for access proxy authentication.
-
The FortiGate challenges the endpoint with device identity validation.
-
The remote endpoint provides the EMS issued certificate for device identification.
-
The FortiGate challenges the endpoint with user authentication. This example uses an LDAP group to control access.
-
The users enters their credentials on the remote endpoint.
-
The FortiGate authenticates the user and collects the username.
-
Using the FortiGate's CA or the customer's CA certificate, the FortiGate signs an SSH certificate and embeds the username in its principal.
-
The FortiGate attempts to connect to the SSH server using the certificate authentication.
-
The SSH server verifies the authenticity of the certificate, and matches the username principal against its authorized_keys file.
-
If the username matches a record in the file, then the SSH connection is established. If no match is found, then the SSH connection fails.
Example
In this example, an SSH connection is established using SSH access proxy with host-key validation and one-time authentication.
-
The SSH server is a Linux based server that uses sshd to provide remote access.
-
For SSH host-key validation, the public key of the SSH server has been imported into the FortiGate.
-
For one-time authentication using certificate authentication:
-
The SSH server must allow certificate authentication.
-
The SSH server must have the proper entry in its authorized_keys file that contains the user principal and the FortiGate CA's public key.
-
The entry is present in the user directory corresponding to the user that is trying to log in.
-
To pre-configure the Linux SSH server:
-
Retrieve the public key used for host-key validation:
-
Locate the public key files in the SSH server:
$ ls -la /etc/ssh/*.pub
-rw-r--r-- 1 root root 186 Mar 29  2020 /etc/ssh/ssh_host_ecdsa_key.pub
-rw-r--r-- 1 root root 106 Mar 29  2020 /etc/ssh/ssh_host_ed25519_key.pub
-rw-r--r-- 1 root root 406 Mar 29  2020 /etc/ssh/ssh_host_rsa_key.pub2
-
Choose the public key file based on the hash type (in this case, ECDSA), and show it's content:
$ cat /etc/ssh/ssh_host_ecdsa_key.pub
ecdsa-sha2-nistp256 AAAAE2*********IpEik=
This key will be used when configuring the FortiGate.
-
-
Retrieve the FortiGate CA’s public key from the FortiGate:
# show full firewall ssh local-ca Fortinet_SSH_CA config firewall ssh local-ca edit "Fortinet_SSH_CA" set password <hidden password> set private-key "-----BEGIN OPENSSH PRIVATE KEY----- <hidden private key> -----END OPENSSH PRIVATE KEY-----" set public-key "ssh-rsa AAAAB3**********JLXlxj3” set source built-in next end -
On the Linux server, enable the SSH service to use the authorized_keys file:
-
Locate and edit the /etc/ssh/sshd_config file.
-
Ensure that the AuthorizedKeysFile line is uncommented, for example:
AuthorizedKeysFile .ssh/authorized_keys .ssh/authorized_keys2
-
-
Allow remote SSH log in with certificate authentication and principal name:
-
Log in to the SSH server using the account that will be granted remote SSH access (in this example: tsmith):
-
Locate the account's authorized_keys file in the ~/.ssh directory:
$ ls -la ~/.ssh
 total 12
 drwxrwxr-x 2 tsmith tsmith 4096 Aug 10 19:14 .
 drwxr-xr-x 5 tsmith tsmith 4096 Aug 10 19:13 ..
 -rw-rw-r-- 1 tsmith tsmith 419 Aug 10 19:14 authorized_keys
-
If the directory and file do not exist, create the directory:
$ mkdir ~/.ssh
-
Create an entry containing the following keywords and add them to the authorized_keys file:
echo 'cert-authority,principals="tsmith" ssh-rsa AAAAB3**********JLXlxj3' >> authorized_keys
Where:
-
cert-authority- indicates that this entry is used in certificate authentication by validating the certificate using the public key provided in this entry. -
principals="tsmith"- indicates the user that must match with the username embedded in the SSH certificate. -
ssh-rsa AAAAB3**********JLXlxj3- indicates the FortiGate CA’s public key that is used to validate the SSH certificate.
-
-
-
Restart the sshd service:
$ sudo systemctl stop sshd
$ sudo systemctl start sshd
The SSH server can now accept SSH connection from tsmith@<server IP>, where the SSH certificate used by the FortiGate to log in contains tsmith embedded as a principal.
When a user connects from a SSH client using <username>@<server IP>, sshd will locate the authorized_keys file in the directory /home/<username>/.ssh/authorized_keys. If the authorized_keys is not in that directory, authentication will fail on the SSH server side.
If you suspect that authentication is failing on the SSH server, use the following commands to manually start sshd in debug mode to troubleshoot:
$ sudo systemctl stop sshd
$ /usr/sbin/sshd -ddd -p 22
To configure the FortiGate :
-
Configure a new VIP to allow access to the SSH access proxy over 10.0.3.10:5443:
config firewall vip edit "ZTNA_SSH" set type access-proxy set server-type https set extip 10.0.3.10 set extintf "port3" set extport 5443 set ssl-certificate "Fortinet_SSL" next end -
Configure the address object for the SSH server:
config firewall address edit "SSH_server" set subnet 10.88.0.11 255.255.255.255 next end -
Configure the host-key that will be used to authenticate the SSH server. The public-key was retrieved during pre-configure the Linux SSH server (step 1b).
config firewall ssh host-key edit "ed25519" set type ECDSA set usage access-proxy set public-key "AAAAE2**********IpEik=" next end -
Configure the access proxy SSH client certificate:
A CA certificate is assigned to sign the SSH certificate that will be used in the SSH authentication. The SSH certificate will have the username embedded in the certificate principal.
config firewall access-proxy-ssh-client-cert edit "ssh-access-proxy" set source-address enable set auth-ca "Fortinet_SSH_CA" next end -
Configure the traffic forward proxy virtual host settings:
config firewall access-proxy-virtual-host
    edit "10.0.3.10_host"
        set ssl-certificate “ztna-wildcard”
        set host “10.0.3.10”
    next
end
The virtual host is configured automatically when specifying the Host field during the Traffic Forwarding Server creation in the GUI.
-
Configure the traffic forward proxy:
config ztna traffic-forward-proxy edit "ZTNA_SSH" set vip "ZTNA_SSH" set host "10.0.3.10_host" next end -
Configure the destination:
config ztna destination edit "SSH_Server" set address "SSH_server" set mappedport 22 set protocol TCP set conn-type ssh set ssh-client-cert "ssh-access-proxy" set ssh-host-key-validation enable set ssh-host-key "ed25519" next end -
Configure the LDAP setting, user setting, and user group to apply user authentication to the access proxy connection using LDAP:
config user ldap
    edit "LDAP-fortiad"
        set server "10.88.0.1"
        set cnid "sAMAccountName"
        set dn "dc=fortiad,dc=info"
        set type regular
        set username "fortiad\\Administrator"
        set password *
        set secure ldaps
        set port 636
    next
end
config user group edit "LDAP-Remote-Allowed-Group" set member "LDAP-fortiad" config match edit 1 set server-name "LDAP-fortiad" set group-name "CN=Remote-Allowed,CN=Users,DC=fortiad,DC=info" next end next end -
Create the authentication scheme and rule to perform the authentication:
config authentication scheme
    edit "basic_auth"
        set method basic
        set user-database "LDAP-fortiad"
    next
end
config authentication rule edit "ztna_basic" set srcintf "port3" set srcaddr "all" set ip-based disable set active-auth-method "basic_auth" set web-auth-cookie enable next end -
Configure the full ZTNA policy to allow traffic to the SSH server, and apply user authentication, posture check, and a security profile where necessary:
config firewall policy
    edit 18
        set name "SSH-proxy"
        set srcintf "port3"
        set dstintf "any"
        set action accept
        set srcaddr "all"
        set dstaddr "ZTNA_SSH"
        set ztna-destination "SSH_Server"
        set schedule "always"
        set ssl-ssh-profile "custom-deep-inspection"
        set logtraffic all
        set nat enable
        set groups "LDAP-Remote-Allowed-Group"
    next
end
Results
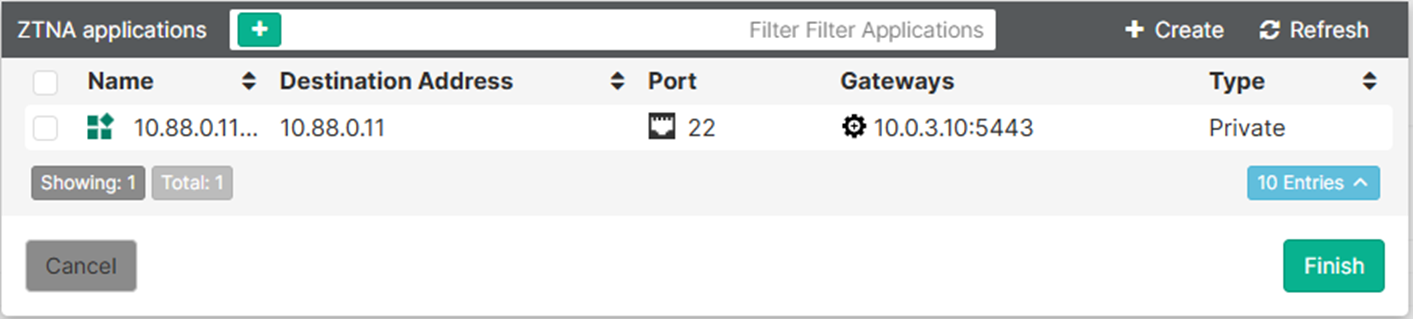
Before connecting, users must have a ZTNA Destination in FortiClient.
To create the ZTNA rules in EMS:
-
Go to Endpoint Profiles > ZTNA Destinations.
-
Select the required profile, or create a new one.
-
Set Name to the desired name.
-
In the Rules section click Add.
The ZTNA destination appears as learned from the FortiGate through the fabric connector.
-
Select the entry and click Finish.
The destination now appears as a rule entry.
-
Click Save to save the ZTNA Destinations profile.
-
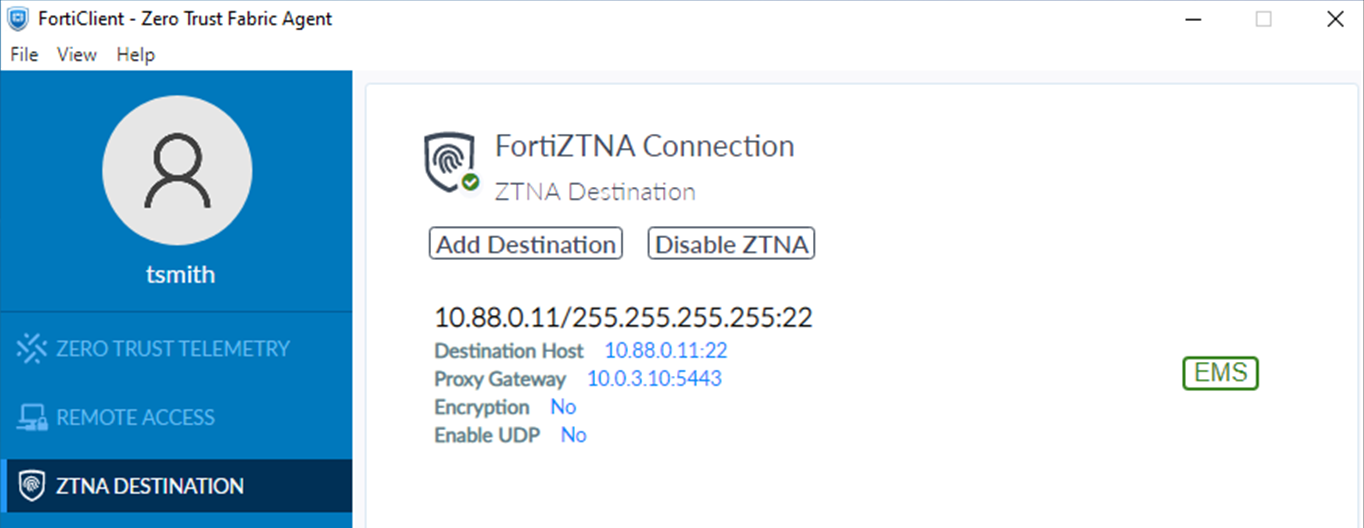
Ensure that this profile is applied to the endpoint policy that is assigned to the user's endpoint.
After some time, the FortiClient will receive the profile update and the configuration will appear under the ZTNA DESTINATION tab on FortiClient.
To test the access proxy:
-
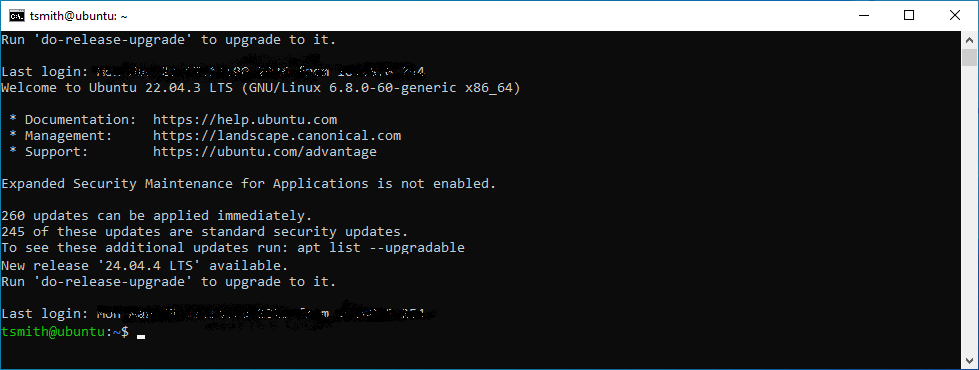
Open an SSH client, such as Windows command prompt, and make an SSH connection to tsmith@10.88.0.11. SSH uses port 22 by default.
ssh tsmith@10.88.0.11
-
After device authentication is performed and passes in the background, FortiClient prompts the user to sign in.
Enter the username, tsmith, and password, then click Sign in.
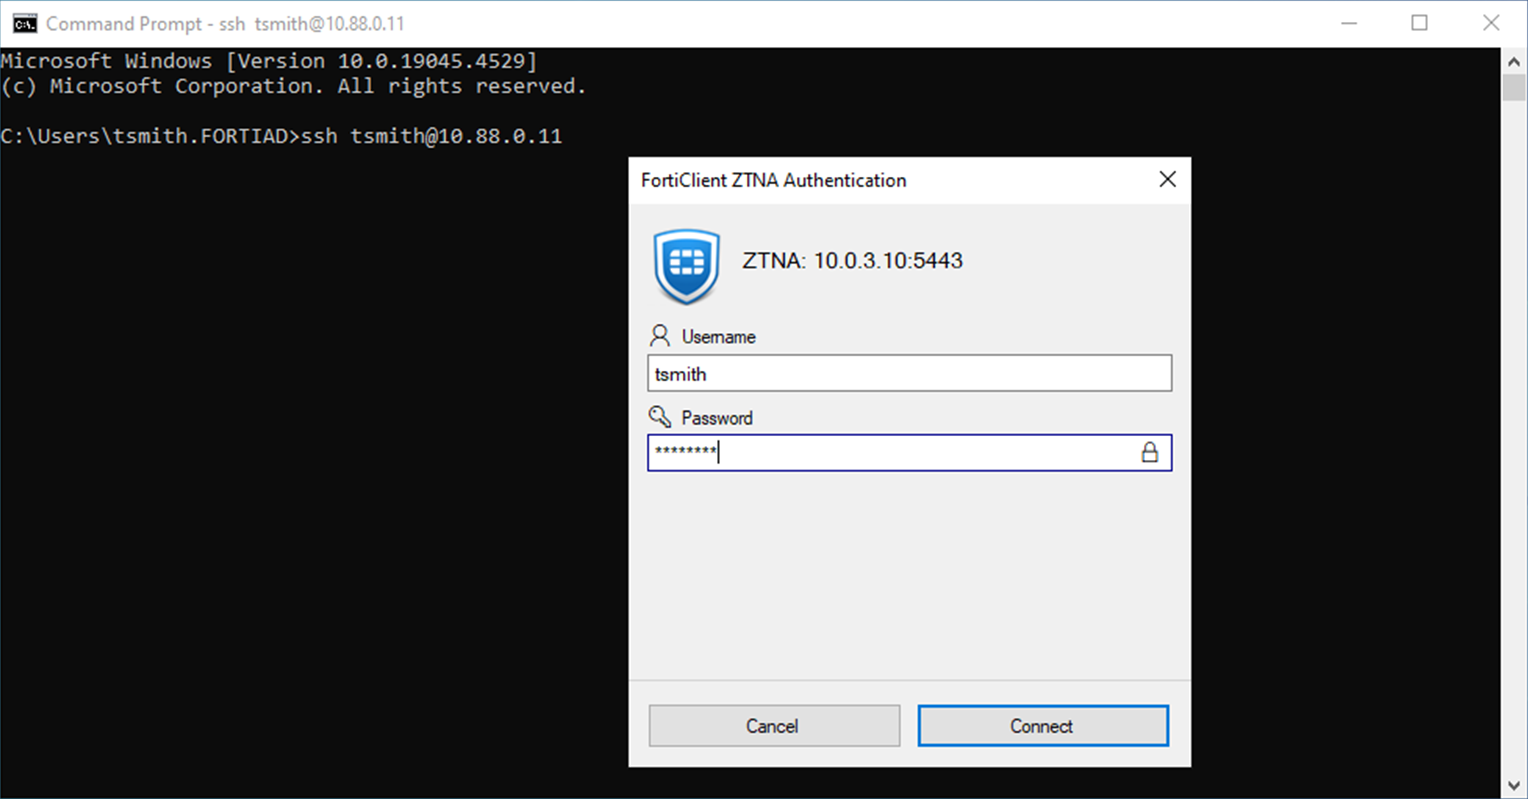
After successful user authentication, the SSH connection is established without an additional log in.
-
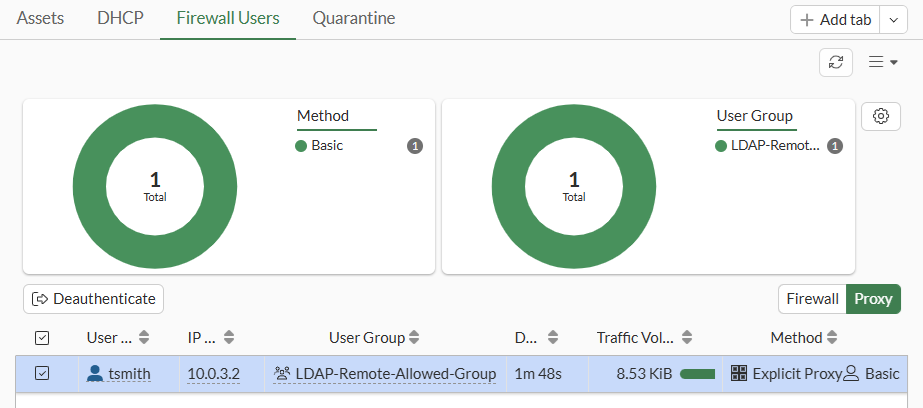
On the FortiGate, check the logged in user:
-
Go to Dashboard > Assets & Identities > Firewall Users and select the Proxy table.
-
Check the WAD proxy user list:
# diagnose wad user list
 ID: 1, VDOM: root, IPv4: 10.0.3.2
  user name   : tsmith
  worker      : 0
  duration    : 200
  auth_type   : Session
  auth_method : Basic
  pol_id      : 18
  g_id        : 3
  user_based  : 0
  expire      : no
  LAN:
    bytes_in=4727 bytes_out=7494
  WAN:
    bytes_in=4586 bytes_out=4149
-
-
The successful connection is logged in the forward traffic logs after the SSH connection has disconnected. There are two logs as there is a pause for the user to authenticate.
# execute log filter category 0
# execute log filter field subtype ztna
# execute log display

1: date=2026-03-23 time=10:27:44 eventtime=1774286864266735556 tz="-0700" logid="0005000024" type="traffic" subtype="ztna" level="notice" vd="root" srcip=10.0.3.2 srcport=4568 srcintf="port3" srcintfrole="wan" dstcountry="Reserved" srccountry="Reserved" dstip=10.88.0.11 dstport=22 dstintf="port2" dstintfrole="dmz" sessionid=477 srcuuid="b458a65a-f759-51ea-d7df-ef2e750026d1" service="SSH" proxyapptype="ztna-proxy" proto=6 action="accept" policyid=18 policytype="policy" poluuid="97082ece-2483-51f1-df8b-f33fd5ffae6d" policyname="SSH-proxy" appcat="unscanned" duration=1 user="tsmith" group="LDAP-Remote-Allowed-Group" authserver="LDAP-fortiad" vip="ZTNA_SSH" vipincomingip=10.0.3.10 accessproxy="ZTNA_SSH" ztnadestination="SSH_Server" clientdevicemanageable="manageable" clientcert="yes" wanin=0 rcvdbyte=0 wanout=0 lanin=2094 sentbyte=2094 lanout=3328

2: date=2026-03-23 time=10:27:43 eventtime=1774286863705959985 tz="-0700" logid="0005000024" type="traffic" subtype="ztna" level="notice" vd="root" srcip=10.0.3.2 srcport=4567 srcintf="port3" srcintfrole="wan" dstcountry="Reserved" srccountry="Reserved" dstip=10.0.3.10 dstport=5443 dstintf="root" dstintfrole="undefined" sessionid=472 srcuuid="b458a65a-f759-51ea-d7df-ef2e750026d1" service="tcp/5443" proxyapptype="ztna-proxy" proto=6 action="pending" policyid=18 policytype="policy" poluuid="97082ece-2483-51f1-df8b-f33fd5ffae6d" policyname="SSH-proxy" appcat="unscanned" duration=17 vip="ZTNA_SSH" vipincomingip=10.0.3.10 clientdevicemanageable="manageable" clientcert="yes" wanin=0 rcvdbyte=0 wanout=0 lanin=2083 sentbyte=2083 lanout=38001
-
Review the SSH login attempt on the Linux server by reviewing the auth.log file:
root:~$ cat /var/log/auth.log
Mar 23 18:27:44 ubuntu sshd[3345190]: Accepted publickey for tsmith from 10.88.0.254 port 15910 ssh2: RSA-CERT SHA256:6aIamnV…7SY ID tsmith (serial 0) CA RSA SHA256:DD/As8Y…k3animbo
Mar 23 18:27:44 ubuntu sshd[3345190]: pam_unix(sshd:session): session opened for user tsmith(uid=1001) by (uid=0)
Mar 23 18:27:44 ubuntu systemd-logind[630]: New session 1475 of user tsmith.
Mar 23 18:31:22 ubuntu sshd[3345268]: Received disconnect from 10.88.0.254 port 15910:11: disconnected by user
Mar 23 18:31:22 ubuntu sshd[3345268]: Disconnected from user tsmith 10.88.0.254 port 15910
Mar 23 18:31:22 ubuntu sshd[3345190]: pam_unix(sshd:session): session closed for user tsmith
Mar 23 18:31:22 ubuntu systemd-logind[630]: Session 1475 logged out. Waiting for processes to exit.
Mar 23 18:31:22 ubuntu systemd-logind[630]: Removed session 1475.