


RADIUS Clients
FortiGuest uses the RADIUS protocol to authenticate and audit users who log in through RADIUS capable network enforcement devices, such as FortiGate controllers/generic RADIUSclients. When a user authenticates against a RADIUS client, then that client performs an authentication check with FortiGuest, to validate whether the credentials supplied by the user/device are valid. If the authentication is successful, FortiGuest returns a message stating that the user is valid and the duration of time remaining before the user session expires. The RADIUS client must honour the session-timeout attribute to remove the user when the account time expires (unless the account is unlimited).
Notes:
- Ensure that the FortiGate controller is specifically configured to allow AAA override. This enables it to honour the session-timeout attribute returned to it by FortiGuest.
-
If there is a firewall between FortiGuest and the RADIUS client , then allow traffic to pass from the UDP port 1812 or 1645 (RADIUS authentication) and UDP port 1813 or 1646 (RADIUS accounting).
In addition to authentication, the RADIUS client device reports details to FortiGuest, such as the time the session started, time session ended, user IP address, and so on. This information is transported over the RADIUS accounting protocol.

The RADIUS Debug option turns the RADIUS server on in debugging mode, enabling detailed debug information to be viewed in System Logs.
Perform the following steps to add a RADIUS client.
- Navigate to Devices > RADIUS Clients and click New in the RADIUS Clients section.
- Update the Client tab with the following configurations.
- Name - Enter a unique name of the RADIUS client.
- Device IP Address / Prefix Length - Type the IP address / prefix length of the RADIUS client, if you do not know the prefix length, then FortiGuest automatically selects this. This needs to match the IP address from which the RADIUS request originates.
- Secret - A shared secret for the RADIUS client. Re-type the shared secret in the Confirm field.
- Type - Select the type or vendor of the RADIUS client. The supported vendor types are FortiGate and Generic RADIUS Device. See Adding FortiGate as a RADIUS Client.
- Description - Enter a description of the client and any other information needed.
- Change-of-Authorization - Enable this field to use CoA and enter the port to use. Enable proxy CoA if required.
Update the following subsequent tabs to complete the configuration of a RADIUS client.
Update the Attributes tab to enable the RADIUS client to send any additional attributes upon successful authentication.
- Vendors - Select from the list of pre-defined vendors.
- Attributes - Select from the list of pre-defined attributes based on the selected vendor.
- Value - Enter the appropriate value for the selected attribute.
- Add AV Pair - Click to add the specified attribute-value pair.
MAC Authentication
Update the MAC Authentication tab to setup and enable MAC address based authentication for user devices. Enable MAC authorization and configure the following parameters.

- User-Name attribute contains - Select whether the user name attribute contains the Client MAC Address, Shared Secret, whether it is Not Present, or Don’t Check.
- User-Password attribute contains - Select whether the password attribute contains the Client MAC Address, Shared Secret, whether it is Not Present, or Don’t Check.
- Service-Type attribute contains - Select whether the service type attribute contains the Login-User, Framed-User, Call-Check, whether it is Not Present, or Don’t Check.
RadSec Authentication
Update RadSec Authentication to secure communication between RADIUS/TCP peers on the transport layer. This is particularly useful in roaming environments where RADIUS packets are transferred through different administrative domains and untrusted, potentially hostile networks.
- Select the RadSec Type, TLS or DTLS.
- To enable verification, select Verify SSL Certificate Common Name.
- Enter the RADIUS client Hostname.
Guest Portal
Update the Guest Portal tab to allow a generic RADIUS client to interface with a portal by providing login/logout parameters and request keys.

- Method - Select the HTTP method with which forms are submitted to the generic RADIUS device.
- Login URL - Enter the URL used to login users to the device.
- Username request key - Enter the username key, this normally corresponds to the name of the HTML element that takes the username.
- Password request key - Enter the password key.
- Redirection request key - Enter the redirect key.
- Custom Login Parameters - Enter any custom login parameters the device may require.
- Logout URL - Enter the URL used to log out users on the device.
- Custom Logout Parameters - Enter any custom logout parameters the device may require.
Note: FortiGuestsupports TLS, PAP, CHAP, PEAP-MSCHAPv2 and PEAP-GTC in RADIUS Authentication.
Adding FortiGate as a RADIUS Client
You can add Fortigate as a RADIUS client with the following limitations.
- Device authentication feature does not work as FortiGate does not send the NAS IP address/Called-Station-Id parameters.
- OAuth feature is supported if the required host names are in the allowed list on FortiGate. This enables client redirection to the OAuth provider site for authentication.
- As FortiGate does not send the AP name and AP ID, some guest reports and accounting logs have empty fields against them.
- Redirection URL after successful guest authentication must be set in FortiGate configuration.
In the Attributes tab (Attributes), add the Acct-Interim-Interval = <nnn> (between 600 - 86400 seconds) entry.
Perform the following steps in the FortiGate GUI to complete RADIUS client configurations.
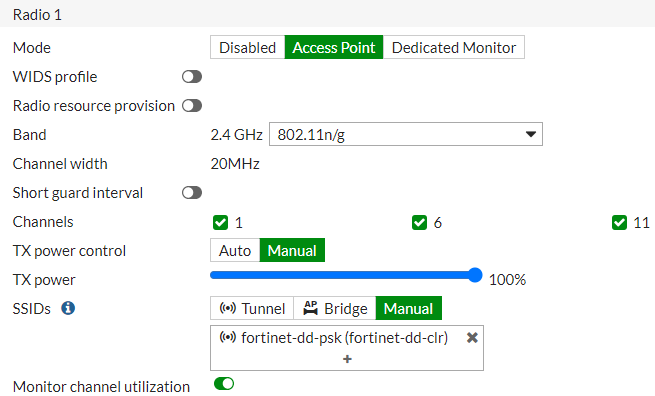
- Navigate to WiFi and Switch Controller > SSIDs and click Create New. Ensure the following configurations.

- Security mode is Captive Portal.
- Portal type is Authentication.
- Enter the Authentication portal address in this format, <FortiGuestserverIP>/portal/FortiGate-serverIP>.
- Provide a destination URL (
{FortiGuest_IP or FQDN}/cp/portal/v1/cp/success) to Redirect after Captive Portal authentication.
- Allow external web access -
# set captive portal exempt enable - Configure accounting time interval -
# set acct-interim-interval [duration] (between 600 - 86400 seconds] - Configure FortiGuest as the RADIUS accounting server.
# config accounting-server# edit 1# set status enable# set server <IP Address of FortiGuest># Set secret <Secret>