


Smart Connect Profiles
Create a Smart Connect profile defining your network type and authentication settings for client in your network.
- Navigate to Smart Connect > Smart Connect Profiles and click New.
- In the Network Settings, enter a unique Network Name (for your network) and select the Network Type (only Wireless is supported in this release).
- Enter the SSID name and enable SSID is Broadcast as per requirement.
- Optionally, you can specify the SSIDs you wish to remove from the client. This is required for any open network where client access is restricted.

- In the Authentication tab, you are provided the authentication methods based on the network type that you specify.
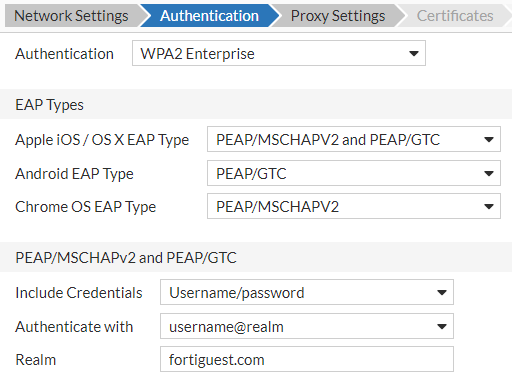
Note: In this release of FortiGuest, only MacOS and iOS support the Enterprise authentication methods. For the Pre-Shared Key authentication methods, enter the Pre-Shared Key.
For the Enterprise authentication methods, enter the following.
- EAP Types - Select an EAP type for authentication for different client devices, Apple, Android, and Chrome.
- PEAP/MSCHAPv2 and PEAP/GTC - Determine in the Include Credentials field whether you want to include or not include the user name and password in the profile sent to the user. Select a specific user name format for the client to Authenticate with. If you select realm, then define the Realm.

- Disabled - To disable the proxy mode for clients.
- Auto Discovery - To enable the automatic discovery of proxy settings.
- Manual Settings - Update the following proxy server settings.
- Server - Enter your server’s hostname or IP address.
- Port - Enter the appropriate port number.
- Authentication - Select whether no authentication is needed or whether a login is required. If a login is required then update the following.
- Username - Enter the username for authentication.
- Password - Enter and confirm the authentication password.
- Username Format - Select a format to use for the authentication username.
- PAC URL - Update the following proxy auto-config (PAC) settings.
- PAC URL - The URL of the PAC file that defines the proxy configuration.
- PAC Fallback Allowed - When disabled the device is prevented from connecting directly to the destination if the PAC file is unreachable. This is enabled by default.


Note: This does not apply to Apple devices configured using an Apple configuration profile.
