


Managing APs
FortiAP devices can be managed from the content pane below the quick status bar on the AP Manager > Managed APs pane.
The following options are available from the toolbar and right-click menu:
|
Create New |
Add an AP. |
|
Edit |
Edit the selected AP. |
|
Delete |
Delete the selected AP. |
|
Assigned Profile |
Assign a profile from the list to the AP. Only applicable profiles will be listed. See Assigning profiles to FortiAP devices. |
|
Column Settings |
Click to select which columns to display or select Reset to Default to display the default columns. |
|
Authorize |
Authorize an unregistered AP. See Authorizing and deauthorizing FortiAP devices. This option is also available in the toolbar by selecting More. |
|
Deauthorize |
Deauthorize a registered AP. See Authorizing and deauthorizing FortiAP devices. This option is also available in the toolbar by selecting More. |
|
Grouping |
Move the selected FortiAP devices into a new group. The APs must be the same model to be grouped. See FortiAP groups. This option is only available in the right-click menu. |
|
Upgrade |
Upgrade the AP. The AP must already be authorized. You can also select two or more AP devices of the same model and upgrade the devices at the same time. |
|
Restart |
Restart the AP. This option is only available in the toolbar, by selecting More. |
|
Refresh |
Refresh the AP list, or refresh the selected FortiAP devices. |
|
View Clients |
View the clients connected to the AP. See Connected clients. |
|
View Rogue APs |
View the Rogue APs. See Rogue APs. This option is only available in the toolbar, by selecting More. |
|
Show on Google Map |
Show the selected AP on Google Map. See Google map. This option is only available in the right-click menu. |
|
Show on Floor Map |
Show the selected AP on the floor map. See Floor map. This option is only available in the right-click menu. |
|
Search |
Enter a search string into the search field to search the AP list. This option is only available in the toolbar. |
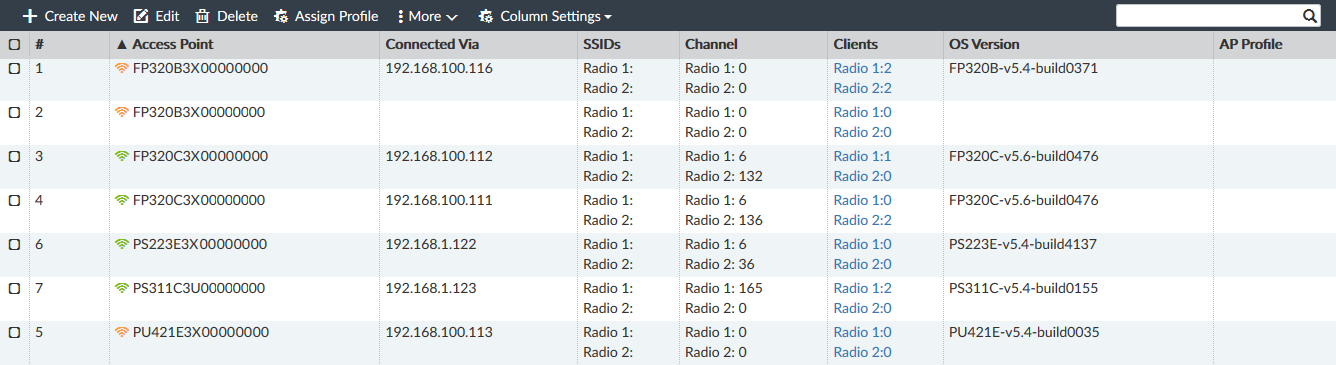
The following information is available in the content pane:
|
FortiGate |
The FortiGate unit that is managing the AP. |
|
Access Point |
The serial number of the AP. |
|
Connected Via |
The IP address of the AP. |
|
SSIDs |
The SSIDs associated with the AP. |
|
Channel |
The wireless radio channels that the access point uses. |
|
Clients |
The number of clients connected to the AP. Select a value to open the View WiFi Clients window to view more details about the clients connected to that radio. See Connected clients. |
|
OS Version |
The OS version on the FortiAP. |
|
AP Profile |
The AP Profile assigned to the device, if any. |
|
Comments |
User entered comments. |
|
Country |
The Country code that the FortiAP is using. |
|
Join Time |
The date and time that the FortiAP joined. |
|
LLDP |
The Link Layer Discovery Protocol |
|
Operating TX Power |
The transmit power of the wireless radios. |
|
Serials # |
The serial number of the device |
|
WTP Mode |
The Wireless Transaction Protocol (WTP) mode, or 0 if none. |
To add a FortiAP:
- Click Create New on the content pane toolbar. The Add FortiAP dialog box opens.

- Enter the following information, then click OK to add the device:
FortiGate
Select the FortiGate that the AP will be added to from the dropdown list. If you have already selected a FortiGate in the tree menu, this field will contain that FortiGate.
Serials Number
Enter the device's serial number.
Name
Enter a name for the device.
AP Profile
Select an AP profile to apply to the device from the dropdown list. See AP profiles.
To edit FortiAP devices:
- In the tree menu, select the group or FortiGate that contains the FortiAP device to be edited.
- Locate the FortiAP device in the list in the content pane, or refine the list by selecting an option from the quick status bar.
- Either select the FortiAP and click Edit from the toolbar, double-click on the FortiAP, or right-click on the FortiAP and select Edit. The Config FortiAP window opens.

- Edit the following options, then click Apply to apply your changes:
Serial Number
The device’s serial number. This field cannot be edited.
Name
The name of the AP.
Comments
Comments about the AP, such as its location or function.
Managed AP Status
Various information about the AP.
Status
The status of the AP, such as Connected, or Idle.
Click Retart to restart the AP.
Connected Via
The method by which the device is connected to the controller.
Base MAC Address
The MAC address of the device.
Join Time
The time that the AP joined.
Clients
The number of clients currently connected to the AP.
State
The state of the AP, such as Authorized, or Discovered.
Current
The AP's current firmware version. Select Upgrade to upgrade the firmware to a newer version if you have one available. See Firmware Management
FortiAP Profile
Select a profile from the dropdown list (see AP profiles)
Bonjour Profile
Select a profile from the dropdown list (see Bonjour profiles)
Override Radio
Override the selected profiles settings.
Band
If applicable, select the wireless band, and select the wireless protocol from the dropdown list. The available options depend on the selected platform.
In two radio devices, both radios cannot use the same band.
Channels
Select the channel or channels to include, or let them be automatically assigned. The available channels depend on the selected platform and band.
TX Power Control
Enable/disable automatic adjustment of transmit power.
- Auto: Enter the TX power low and high values, in dBm.
- Manual: Enter the TX power in the form of the percentage of the total available power.
SSIDs
Manually choose the SSIDs that APs using this profile will carry, or let them be selected automatically.
Override AP Login Password
Enable/disable overriding the login password:
- Set: Set the AP login password.
- Leave Unchanged: Leave the password unchanged.
- Set Empty: Remove the password.
Advanced Options
Configure advanced options. For information, see the FortiOS CLI Reference: http://help.fortinet.com/cli/fos60hlp/60/index.htm.
To delete FortiAP devices:
- In the tree menu, select the group or FortiGate that contains the FortiAP device to be deleted.
- Locate the FortiAP device in the list in the content pane, or refine the list by selecting an option from the quick status bar.
- Either select the FortiAP and click Delete from the toolbar, or right-click on the FortiAP and select Delete.
- Click OK in the confirmation dialog box to delete the AP.
|
|
A FortiAP device cannot be deleted if it is currently being used. For example, if a firewall profile has been assigned to it. |
To upgrade multiple FortiAP devices:
- In the tree menu, select the group or FortiGate that contains the FortiAP device to be upgraded.
- Select two or more FortiAP devices of the same model in the list in the content pane.
- Right-click on the selected FortiAP devices and select Upgrade.
The Upgrade Firmware dialog box is displayed.
- Select the firmware version for upgrade, and click Upgrade Now.