
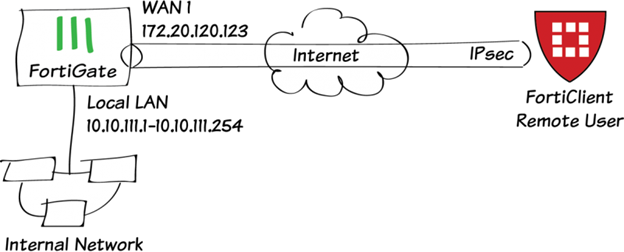
FortiClient as dialup client
This is a sample configuration of dialup IPsec VPN with FortiClient as the dialup client.
You can configure dialup IPsec VPN with FortiClient as the dialup client using the GUI or CLI.
To configure IPsec VPN with FortiClient as the dialup client on the GUI:
- Go to VPN > IPsec Wizard and configure the following settings for VPN Setup:
- Enter a VPN name.
- For Template Type, select Remote Access.
- For Remote Device Type, select Client-based > FortiClient.
- Click Next.
- Configure the following settings for Authentication:
- For Incoming Interface, select wan1.
- For Authentication Method, select Pre-shared Key.
- In the Pre-shared Key field, enter your-psk as the key.
- From the User Group dropdown list, select vpngroup.
- Click Next.
- Configure the following settings for Policy & Routing:
- From the Local Interface dropdown menu, select lan.
- Configure the Local Address as local_network.
- Configure the Client Address Range as 10.10.2.1-10.10.2.200.
- Keep the default values for the Subnet Mask, DNS Server, Enable IPv4 Split tunnel, and Allow Endpoint Registration.
- Click Create.
To configure IPsec VPN with FortiClient as the dialup client using the CLI:
- In the CLI, configure the user and group.
config user local edit "vpnuser1" set type password set passwd your-password next end config user group edit "vpngroup" set member "vpnuser1" next end - Configure the internal interface. The LAN interface connects to the corporate internal network. Traffic from this interface routes out the IPsec VPN tunnel. Creating an address group for the protected network behind this FortiGate causes traffic to this network group to go through the IPsec tunnel.
config system interface edit "lan" set vdom "root" set ip 10.10.111.1 255.255.255.0 next end config firewall address edit "local_subnet_1" set ip 10.10.111.0 255.255.255.0 next end config firewall address edit "local_subnet_2" set ip 10.10.112.0 255.255.255.0 next end config firewall addrgrp edit "local_network" set member "local_subnet_1" "local_subnet_2" next end - Configure the WAN interface. The WAN interface is the interface connected to the ISP. It can work in static mode (as shown in this example), DHCP, or PPPoE mode. The IPsec tunnel is established over the WAN interface.
config system interface edit "wan1" set vdom "root" set ip 172.20.120.123 255.255.255.0 next end - Configure the client address pool. You must create a firewall address to assign an IP address to a client from the address pool.
config firewall address edit "client_range" set type iprange set comment "VPN client range" set start-ip 10.10.2.1 set end-ip 10.10.2.200 next end - Configure the IPsec phase1-interface. In this example, PSK is used as the authentication method. Signature authentication is also an option.
config vpn ipsec phase1-interface edit "for_client" set type dynamic set interface "wan1" set mode aggressive set peertype any set net-device enable set mode-cfg enable set proposal aes128-sha256 aes256-sha256 aes128-sha1 aes256-sha1 set dpd on-idle set xauthtype auto set authusrgrp "vpngroup" set assign-ip-from name set ipv4-name "client_range" set dns-mode auto set ipv4-split-include "local_network" set save-password enable set psksecret your-psk set dpd-retryinterval 60 next end - Configure the IPsec phase2-interface.
config vpn ipsec phase2-interface edit "for_client" set phase1name "for_client" set proposal aes128-sha1 aes256-sha1 aes128-sha256 aes256-sha256 aes128gcm aes256gcm chacha20poly1305 next end - Configure the firewall policy to allow client traffic flow over the IPsec VPN tunnel.
config firewall policy edit 1 set name "inbound" set srcintf "for_client" set dstintf "lan" set srcaddr "client_range" set dstaddr "local_network" set action accept set schedule "always" set service "ALL" next end - Configure FortiClient. This example uses FortiClient (Windows) 6.0.3 build 0155.
- In FortiClient, go to Remote Access and select Add a new connection.
- Set the Type to IPsec VPN and the Remote Gateway to the FortiGate IP address.
- Set the Authentication Method to Pre-Shared Key and enter the key. Click Save.
- Select the VPN, enter the username and password, then select Connect.
- Run
diagnosecommands to check the IPsec phase1/phase2 interface status. Thediagnose debug application ike -1command is the key to troubleshoot why the IPsec tunnel failed to establish.- Run the
diagnose vpn ike gateway listcommand. The system should return the following:vd: root/0 name: for_client_0 version: 1 interface: port1 15 addr: 172.20.120.123:4500 ->172.20.120.254:64916 created: 37s ago xauth-user: vpnuser1 assigned IPv4 address: 10.10.1.1/255.255.255.255 nat: me peer IKE SA: created 1/1 established 1/1 time 10/10/10 ms IPsec SA: created 1/1 established 1/1 time 0/0/0 ms id/spi: 1 b40a32d878d5e262/8bba553563a498f4 direction: responder status: established 37-37s ago = 10ms proposal: aes256-sha256 key: f4ad7ec3a4fcfd09-787e2e9b7bceb9a7-0dfa183240d838ba-41539863e5378381 lifetime/rekey: 86400/86092 DPD sent/recv: 00000000/00000a0e
- Run the
diagnose vpn tunnel listcommand. The system should return the following:list all ipsec tunnel in vd 0 = = name=for_client_0 ver=1 serial=3 172.20.120.123:4500->172.20.120.254:64916 bound_if=15 lgwy=static/1 tun=intf/0 mode=dial_inst/3 encap=none/984 options[03d8]=npucreate_dev no-sysctlrgwy-chgrport-chg frag-rfcaccept_traffic=1 parent=for_client index=0 proxyid_num=1 child_num=0 refcnt=12 ilast=3 olast=3 ad=/0 stat: rxp=1 txp=0 rxb=16402 txb=0 dpd: mode=on-idle on=1 idle=20000ms retry=3 count=0 seqno=0 natt: mode=keepalive draft=32 interval=10 remote_port=64916 proxyid=for_client proto=0 sa=1 ref=2 serial=1 add-route src: 0:0.0.0.0-255.255.255.255:0 dst: 0:10.10.1.1-10.10.1.1:0 SA: ref=4 options=2a6 type=00 soft=0 mtu=1422 expire=42867/0B replaywin=2048 seqno=1 esn=0 replaywin_lastseq=00000001 itn=0 life: type=01 bytes=0/0 timeout=43189/43200 dec: spi=36274d14 esp=aes key=16 e518b84b3c3b667b79f2e61c64a225a6 ah=sha1 key=20 9cceaa544ed042fda800c4fe5d3fd9d8b811984a enc: spi=8b154deb esp=aes key=16 9d50f004b45c122e4e9fb7af085c457c ah=sha1 key=20 f1d90b2a311049e23be34967008239637b50a328 dec:pkts/bytes=1/16330, enc:pkts/bytes=0/0 npu_flag=02 npu_rgwy=172.20.120.254 npu_lgwy=172.20.120.123npu_selid=0 dec_npuid=2 enc_npuid=0 name=for_clientver=1 serial=2 172.20.120.123:0->0.0.0.0:0 bound_if=15 lgwy=static/1 tun=intf/0 mode=dialup/2 encap=none/536 options[0218]=npucreate_dev frag-rfcaccept_traffic=1 proxyid_num=0 child_num=1 refcnt=11 ilast=350 olast=350 ad=/0 stat: rxp=0 txp=0 rxb=0 txb=0 dpd: mode=on-idle on=0 idle=20000ms retry=3 count=0 seqno=0 natt: mode=none draft=0 interval=0 remote_port=0
- Run the