


Creating a secret
To create a secret:
-
Go to Secrets > Secret List.
Alternatively, go to Personal Folder/Public Folder in Secrets, select Open Tree, locate the folder where you intend to add the secret, and click Open.
From the Create dropdown, select Secret, and skip to step 6.
- In Secret List, select Create.
The Create New Secret in: dialog appears.
- Select the folder where you intend to add the secret.

The folder is already selected if you are creating secret from inside a folder.
- Select Create.
The General tab opens.

-
To switch to either Service Setting or Secret Permission tab, select the tab.

- Enter the following information:
Name
Name of the secret.
Folder
The folder where the secret is added. See Personal/public folder.
The folder is already selected in step 2. Use the dropdown, if you want to change the folder.
Target
Enable and then from the dropdown, select a target for the new secret being created.
In the dropdown, select + to create a new target. See Creating a target.

The Default Template from the target will automtaically be used as Template for the secret.
If the Default Template is updated later on, the Template for the secret will not be automatically updated. It must be updated by editing the secret. See To change the template after selecting one:.
Privilege Account Select Yes or No to indicate if the secret is for a privilege account.
This option is only available when a Target is selected.
Template
From the dropdown, select a template.
Select Create to create a new template. See Creating secret templates.
To change the template after selecting one:
- Select the pen icon.
- In the Convert Secret Template pane, select a template to transfer old field values to new fields where applicable.
- Click OK.
Server Information
Disable to inherit server information from the Template.
Enable to select general type of server to which the secret is intended to connect:
Unix-Like
Cisco
FortiOS
Other
Associated Secret
Enable and then from the dropdown, select an associated secret for the new secret being created.
When enabled, changing password or verifying password requires credentials from the associated secret.
Note: The option is disabled by default.
Description
Optionally, enter a description.
Fields
Enter a value in a field.
For the Password field, click the Generate button to automatically generate the password following the password policy set in Password policies.
The options in the fields depend on the selected template.
For fields where a host is required when using the FortiPAM browser extension, enter the URL instead.
Secret Setting
Some settings may not be configurable as they are protected by the policy that applies to the folder where the secret is added.
The owner of the secret must configure password verification and change settings before the secret utilizes the password changer and password verification. However, a user can manually trigger these actions if they have sufficient permissions.
Automatic Password Changing
Enable/disable automatic password changing.
When enabled, password changer for secrets is activated to periodically change the password.
Recursive
Displays the password changing schedule based on your selections for the related settings.
Start Time
The date and time when the recurring schedule begins.
Enter date (MM/DD/YYYY) and time or select the Calendar icon and then select a date and time.
Recurrence
From the dropdown, select from the following three frequencies of recurrence:
Daily
Weekly
Monthly
Repeat every
The number of days/weeks/months after which the password is changed (1- 400).
Occurs on
Select from the following days of the month when the password is automatically changed:
First
Second
Third
Last
Last Day
Day
When you select Day, select + to add days of the month when the password is automatically changed.
Select days of the week when the password is automatically changed.
Note: The option is only available when Recurrence is set as Weekly or Monthly.
Automatic Password Verification
Enable/disable automatic password verification.
When enabled, password changer for secrets is activated to periodically verify the password, and check if the target server is still available.
Interval (min)
The time interval at which the secret passwords are tested for accuracy, in minutes (default = 60, 5 - 44640).
Start Time
The date and time when the Interval(min) begins.
Enter date (MM/DD/YYYY) and time or select the Calendar icon and then select a date and time.
Session Recording
Enable/disable session recording.
When enabled, user action performed on the secret is recorded.
The video file is available in the log for users with appropriate permission.
Proxy Mode
Enable/disable the proxy mode.
When enabled, FortiPAM is responsible to proxy the connection from the user to the secret.
In the proxy mode:
Web launcher is available to users who have the permission to view the secret password.
Web launcher is disabled for users who do not have the permission to view the secret password.
When disabled, the non-proxy (direct) mode is used.
See Modes of operation. In the non-proxy mode:
Web launcher is available to users who have the permission to view the secret password.
Web launcher is disabled for users who do not have the permission to view the secret password.
When launchers are disabled, the Launch option is unavailable and a tooltip is displayed instead:

Web Proxy
Enable/disable the web proxy feature.
When accessing a target using the FortiPAM browser extension, the browser extension sends the browser requests through the FortiPAM web proxy. FortiPAM dynamically operates on the web browser tab's PAC rule (on Google Chrome and Microsoft Edge) to successfully proxy the traffic to FortiPAM based on the configured domain. On Mozilla Firefox, FortiPAM sends the request to the web proxy instead.
FortiPAM scans the incoming web traffic and can replace the password.
Using web proxy, you do not require FortiClient to launch the proxied web account secret.
To enable the web proxy feature, you must first enable the feature globally for the interface that handles incoming and outgoing traffic using the following CLI commands:
config system interface
 edit "port1"
  set explicit-web-proxy enable #must be enabled
 next
end
Alternatively, you can enable the feature by enabling Explicit web proxy for the interface that handles incoming and outgoing traffic. See Creating an interface.
Notes:
The option is only available when Proxy Mode is enabled.
The Web Proxy option is inherited from the secret target. See Creating a target.
When you edit the Web Proxy option, you are editing the Web Proxy option available from within the associated secret target.
Tunnel Encryption
Enable/disable tunnel encryption.
When launching a native launcher, FortiClient creates a tunnel between the endpoint and FortiPAM. The protocol stack is HTTP/TLS/TCP.
The HTTP request gives information on the target server then FortiPAM connects to the target server. After that, two protocol options exist for the tunnel between FortiClient and FortiPAM. One is to clear the TLS layer for better throughput and performance. The other is to keep the TLS layer. The launcher's protocol traffic is inside the TLS secure tunnel.
If the launcher's protocol is not secure, like VNC, it is strongly recommended to enable this option so that the traffic is in a secure tunnel.
When there is an HTTPS Man In The Middle device, e.g., FortiGate or FortiWeb between FortiClient and FortiPAM, you must enable the Tunnel Encryption option. Otherwise, the connection will be disconnected, and the launching will fail.
DLP Status
Enable/disable DLP. See Data loss prevention (DLP) protection for secrets.
DLP Profile
From the dropdown, select a DLP profile.
Antivirus Scan
Enable/disable antivirus scan.
When enabled, it enforces an antivirus profile on the secret. See AntiVirus.
Antivirus Profile
From the dropdown, select an antivirus profile.
Requires Checkout
Enable/disable requiring checkout.
When enabled, a user has exclusive access to a secret for a limited time.
At a given time, only one user can check out a secret. Other approved users must wait for the secret to be checked in or wait for the checkout duration to lapse before accessing the secret.
Checkout Duration
The checkout duration, in minutes (default = 30, 3 - 120).
Checkin Password Change
Enable/disable automatically changing the password when the user checks in.
Renew Checkout
Enable/disable renewing checkouts.
Max Renew Count
When Renew Checkout is enabled, enter the maximum number of renewals allowed for the user with exclusive access to the secret (default = 1, 1 - 5).
Requires Approval to Launch Secret
Enable/disable requiring approval to launch a secret.
When enabled, users must request permission from the approvers defined in the approval profile before gaining access. From the dropdown, select an approval profile.
Use the search bar to look up an approval profile.
Use the pen icon next to the approval profile to edit it.
See Make a request and Approval flow.
Requires Approval to Launch Job
When enabled, users must request permission from the approvers defined in the approval profile before executing a job on a secret.
From the dropdown, select an approval profile.
Use the search bar to look up an approval profile.
Use the pen icon next to the approval profile to edit it.
See Make a request and Approval flow.
Bypass Approval
Enable/disable secret owners to bypass the secret request/approval process, i.e., secret owners do not require approval to launch secrets they own, given that Bypass Approval is enabled.
Note: The option is disabled by default and only available when Requires Approval to Launch Job is enabled.
TOTP Setting
Enable/disable TOTP (Time-based one-time password) for the secret.
TOTP is used when the target server requires TOTP as the 2FA.
To configure TOTP settings via the CLI, see Configuring TOTP settings via the secret CLI commands Example.
See Limitations of TOTP on FortiPAM.
Note: The option is disabled by default.
Verification Code with
The verification code issued by:
3rd Party (default)
FortiToken
Note: The option is only available when TOTP status is enabled.
Shared Key
The TOTP key from the target server or any other 3rd party authenticator.
The TOTP key is usually a binary string and delivered in
base64/base32encoding format.Use the eye icon to hide/unhide the shared key.
Note: The option is only available when the Verification Code with is set as 3rd Party.
Activation Code
The FortiToken Mobile activation code.
When using FortiToken Mobile as the TOTP mobile application, an activation code from the FortiToken Mobile token issuer is required to activate the token. In that case, you must provide the activation token, and FortiPAM then acts as a surrogate for the FortiToken Mobile application.
FortiToken TOTP can only be configured via the GUI.
Note: The option is only available when Verification Code with is set as FortiToken.
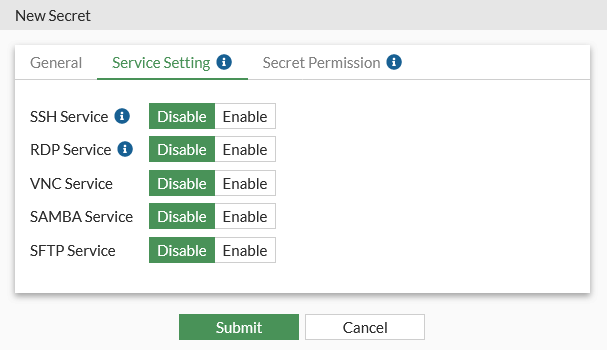
Service Setting
Turn on/off the service settings.
You can individually toggle on or off each service, controlling whether or not FortiPAM is allowed to use the specific service to connect to the secret.
The port used by each service specified in the template can also be overridden to use a custom port specific to the secret.
SSH Service
Enable/disable SSH service.
The SSH Service toggle controls Web SSH, Web SFTP, PuTTY, and the WinSCP launchers.
Note: SSH Filter, RSA Sign Algorithm, and Connect over SSH with, and SSH Auto-Password options are only available when Template is already selected.
Use Template Default Port
Use the template default port or disable and enter a port number.
SSH Filter
Enable/disable using an SSH filter profile. See SSH filter profiles.
SSH Filter Profile
From the dropdown, select an SSH filter profile.
Note: The option is only available when SSH Filter is enabled.
Use the search bar to look up an SSH filter profile.
Bypass for owner
Enable/disable allowing secret owners to bypass the SSH command filter (default = disable).
Once enabled, secret owners can send otherwise prohibited commands (listed in the SSH filter profile) to the targets.
Note: The option is only available when SSH Filter is enabled.
RSA Sign Algorithm
To improve compatibility with different SSH servers, select a sign in algorithm for RSA-based public key authentication:
RSA SHA-256 signing algorithm
RSA SHA-512 signing algorithm
RSA SHA-1 signing algorithm (default)
Connect over SSH with
If the setting is set to Self (default), the secret launches SSH with its own username and password.
If the setting is set to Associated Secret, the secret launches SSH with the associated secret's username and password.
SSH Auto-Password
Enable or disable automatically delivering passwords to the server when the user enters privileged commands (e.g.,
sudoin Unix system andenablein Cisco devices) in the SSH shell terminal.For secrets using Cisco server info template, an associated secret must be set to enable this feature.
Note: The option only works when Proxy Mode is enabled.
RDP Service
Enable/disable RDP service.
The RDP Service toggle controls Web RDP and the Remote Desktop-Windows launchers.
Note: Block RDP Clipboard, RDP Security Level, RDP Restricted Admin Mode, and Keyboard Layout options are available only when Template is already selected.
Use Template Default Port
Use the template default port or disable and enter a port number.
Block RDP Clipboard
Enable/disable allowing users to copy/paste from the secret launcher.
RDP Security Level
Select a security level when establishing a RDP connection to the secret:
Best Effort (default): If the server supports NLA, FortiPAM uses NLA to authenticate. Otherwise, FortiPAM conducts standard RDP authentication with the server through RDP over TLS.
NLA: Network Level Authentication (CredSSP).
When an RDP launcher is launched, FortiPAM is forced to use CredSSP (NLA) to authenticate with the target server.
RDP: FortiPAM uses the standard RDP encryption provided by the RDP protocol without using TLS (Web-RDP only).
TLS: RDP over TLS.
FortiPAM uses secured connection with encryption protocol TLS to connect with the target server.
RDP Restricted Admin Mode
Enable/disable RDP restricted admin mode.
Restricted admin mode prevents the transmission of reusable credentials to the remote system to which you connect using remote desktop. This prevents your credentials from being harvested during the initial connection process if the remote server has been compromised.
Note: The option is only available when RDP Security Level is set as Best Effort or NLA.
Keyboard Layout
From the dropdown, select a keyboard layout (default = English, United States)
RDP Event Filter
Enable/disable using an event filter profile. See Event filter profile.
RDP Event Filter Profile
From the dropdown, select an event filter profile.
Note: The option is only available when RDP Event Filter is enabled.
Use the search bar to look up an event filter profile.
VNC Service
Enable/disable VNC service.
The VNC Service toggle controls the Web VNC, VNC Viewer, and TightVNC launchers.
Use Template Default Port
Use the template default port or disable and enter a port number.
Note: The port number you enter is used to connect to the VNC launcher.
Display Number
Enter the display number to be added to the VNC port defined in the template (default = 0).
Notes:
The display number can only be set if the custom port on the template is the VNC default port, i.e., port
5900, and the secret uses the default template for VNC. Otherwise, the display number option is the custom port option.The display number cannot be set with a custom port.
The option is only available when Use Template Default Port is enabled.
SAMBA Service
Enable/disable SAMBA service.
The SAMBA Service toggle controls the Web SMB launcher.
Use Template Default Port
Use the template default port or disable and enter a port number.
SFTP Service
Enable/disable SFTP service.
The SFTP Service toggle controls the Web SFTP launcher.
Use Template Default Port
Use the template default port or disable and enter a port number.
Secret Permission
By default, secret permission is the same as the folder where they are located.
When customizing secret permission, ensure that you log in with an account with Owner or Edit permission to the secret or the folder where the secret is located.
Inherit ZTNA Control
Enable to inherit ZTNA control access permission from the parent folder.
By default, secrets in a folder follow the ZTNA control set up in the parent folder. However, when creating or editing a secret you can customize the ZTNA control in the Secret Permission tab.
ZTNA Control
Enable to limit the permission of launching by
ztna-ems-tag.You can choose whether to match all the tags or only one of them.
The option is only available when Inherit ZTNA Control is disabled.
Device Tags
Select + to add ZTNA tags or groups.
Use the search bar to look up a ZTNA tag or ZTNA tag group.
Only permitted devices with the selected tags are allowed to launch.
Device Match Logic
Define the match logic for the device tags:
OR: Devices with any of the selected tags are allowed to launch.
AND: Devices must acquire all the selected tags to launch.
Inherit Permission
Enable to inherit permissions that apply to the folder where the secret is located.
The option is enabled by default.
User Permission
The level of user access to the secret. See User Permission.
This option is only available when Inherit Permission is disabled.
For column settings, see Tables.
Group Permission
The level of user group access to the secrets. See Group Permission.
This option is only available when Inherit Permission is disabled.
For column settings, see Tables.
Target Filter
Enable/disable filtering addresses.
When enabled, Allow/Deny addresses, i.e., create a list of allowed or blocked addresses.
Creating allowlist/blocklist helps you improve security by allowing/blocking IP addresses.

The filter does not apply to the Domain-Controlled address.
Select +, from the Select Entries list, select addresses, and click Close.
Use the search bar to look up an address.
Click the delete icon to delete all the addresses and reset the list.
Note:
The option is disabled by default and only available when editing a secret that has one of its fields set as Domain.
-
Click Submit.
See Launching a secret and Example secret configurations example.
User Permission
-
In step 5 when Creating a secret, select Create in User Permission.
The New User Permission window opens.

- Enter the following information:
Users
Select + and from the list, select users in the Select Entries window.
To add a new user:
- From the Select Entries window, select Create and then select +User List.
The New User List wizard opens.
- Follow the steps in Creating a user, starting step 2 to create a new user.
Use the search bar to look up a user.
Use the pen icon next to a user to edit it.
Permission
From the dropdown, select an option:
None: No access.
List: Ability to list secrets. You cannot see detailed information on secrets.
View: Ability to view secret details and launch a secret.
Edit: Ability to create/edit secrets and launch the secrets.
Owner: The highest possible permission level with the ability to create, edit, delete, and launch secrets.
- From the Select Entries window, select Create and then select +User List.
- Click OK.
|
|
From the list, select a user permission entry and then select Edit to edit it. From the list, select user permission entries and then select Delete to delete them. |
Group Permission
-
In step 5 when Creating a secret, select Create in Group Permission.
The New Group Permission window opens.
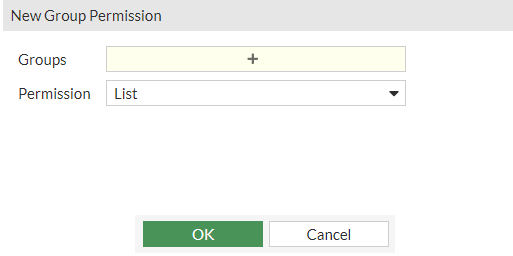
- Enter the following information:
Groups
Select + and from the list, select user groups in the Select Entries window.
To add a new user group:
- From the Select Entries window, select Create.
The Create New User Group window opens.
- Follow the steps in Creating user groups, starting step 3.
Use the search bar to look up a user group.
Use the pen icon next to a user group to edit it.
Permission
From the dropdown, select an option:
None: No access.
List: Ability to list secrets. You cannot see detailed information on secrets.
View: Ability to view secret details and launch a secret.
Edit: Ability to create/edit secrets and launch the secrets.
Owner: The highest possible permission level with the ability to create, edit, delete, and launch secrets.
- From the Select Entries window, select Create.
- Click OK.
|
|
From the list, select a user group permission entry and then select Edit to edit it. From the list, select user group permission entries and then select Delete to delete them. |
Installing CA certificates for web launching
When you attempt to access a website using the web proxy feature, you may receive a warning about untrusted hosts on the web browser. To resolve this issue, you must download and install a CA certificate signed by FortiPAM.
When creating a secret with Web Proxy enabled, Download CA Certificate button on the top-right allows you to download the CA certificate.
The browser may warn untrusted sites even if its certificate is valid. This is because the traffic is proxied by FortiPAM in the proxy mode. Download and install the CA certificate from FortiPAM to resolve the false positive untrusted site warning.
During installation, you may be asked to specify the certificate store (trusted root CA/intermediate CA). Most platforms can automatically select a certificate store based on the type of certificate. You can also specify a location for the certificate manually. For the latter case, check the Issued to and Issued by fields in the General tab of the Certificate dialog. If they are the same, choose Trusted Root Certification Authorities. If different, select Intermediate Certification Authorities.
|
|
|
Download the certificate file, double-click it, and follow the wizard to install it.

Also, when there are multiple certificates that you need to install, a Download All CA Certificates button is available instead.
When downloading multiple certificates, they are made available as a zip file named CA-Certificates.zip.
|
|
Download and double-click the certificate file to install it by following the installation wizard. |
|
|
If the CA certificate is root, it must be installed in the trusted root store. Not all CA certificates should be installed as root CA. If the CA certificate is intermediate, it must be installed in the intermediate store to work correctly.
|

You can tell the CA type by inspecting the property of the CA, e.g., in Windows, right-click the certificate file and click Property. If the Issued to and Issued by fields are the same, it should be installed as a root CA. Otherwise, it is an intermediate certificate and must be installed in the intermediate store.
Also, Windows can automatically determine the correct CA certificate when you select Automatically select the certificate store based on the type of certificate. This is the preferred way of certificate installation.
Configuring TOTP settings via the secret CLI commands Example
To configure TOTP settings via the CLI:
- In the CLI console, enter the following commands to use the secret template TOTP settings for the secret:
config secret database
edit 1
config totp-setting
set status enable
set use-template-setting enable
set shared-key xxxxxxxxxxxx
end
end
To configure TOTP settings via the CLI:
- In the CLI console, enter the following commands to disable the secret template TOTP settings and instead configure a custom TOTP setting for the secret:
config secret database
edit 1
config totp-setting
set status enable
set use-template-setting disable
set totp-length 6
set totp-duration 30
set hash-type hmac-sha1
set shared-key xxxxxxxxxxxx
end
end
Configuring a secret where the secret owner can bypass the SSH command filter Example
To configure the secret:
-
In
the CLI console, enter the following commands:
 config secret database
  edit 16
   set name "test_SSH_filter"
   set uuid be0204d2-6ea0-51ee-beb9-e0bd958f624c
   set folder 2
   set template "Unix Account (SSH Password)"
   set proxy enable
   set ssh-filter enable #enable SSH filter
   set ssh-filter-profile "test_SSH_filter" #assign an SSH filter
   set bypass-ssh-filter-for-owner enable #enable allowing secret owners to bypass the SSH command filter
   set ssh-service-status up
   set rdp-serice-status up
   set sftp-service-status up
   config credentials-history
  end
  config field
   edit 1
	set name "Host"
	set value "en.wikipedia.org"
   next
   edit 2
	set name "Username"
	set value "admin"
   next
   edit 3
       set name "Password"
       set value "ENC jdiQCaM/yseJywRX+yz0J+xfA2A="
   next
  end
 next
end