


Managing workflow jobs
This feature allows you to group multiple jobs according to certain logic to perform a series of logical and complex tasks.
Use the Workflow Jobs pane to create, edit, clone, delete, and view related workflow jobs.
The Workflow Jobs pane includes the following tabs:
| Create Workflow Job | Create new workflow jobs per specific jobs. |
| Edit | Edit the selected workflow job. |
| Clone | Clone the selected workflow job. |
| Delete | Delete the selected workflow job(s). |
| Column Settings | Click to select the columns to display or click Reset to Default to display the default columns: Name, Related Jobs, Description, Activity, and Action. |
The pane includes the following job information:
| Name | The name of the workflow job. |
| Related Jobs | The jobs included in the workflow. |
| Description | The description of the workflow job. |
| Activity | The operation activities of latest five times. At most five icons are displayed here with three status, Successful  . . |
| Action | Launch Create Schedule for this job |
Creating workflow jobs
Follow steps below to create a workflow job:
- Click Add.
- Configure the following settings:
Name Enter a workflow job name.
Description Enter a description for the job, optional. Notification Enable this option and click the button to choose a notification method. Currently, only the method email is supported. - Click START.
- Select a job from the right list, and click Select.
- Hover over the selected job, and click the
 icon.
icon.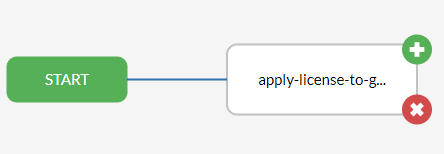
You can also delete the selected job and re-select one. - Select a second job from the right list.
- Select a condition for the job, and click Select.
- Click OK once the setting is finished.
- Click
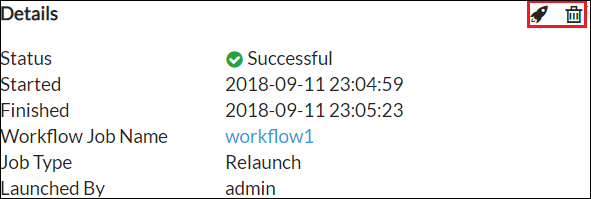
 to manually launch the workflow job as below.
You can relaunch, cancel, or delete the workflow event with the buttons on the top right.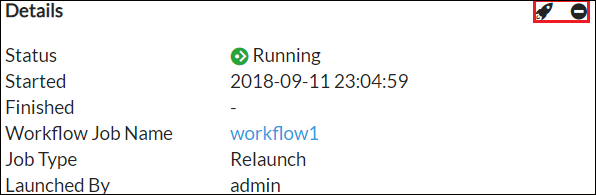
- Or click
 to create a schedule for the workflow job.
Once you launch or schedule the workflow, it goes to Workflow Events pane automatically.
|
|
The next job to be executed depends on the execution results (Success, Failure, Always) of last job. You can define the jobs to be selected according to actual needs. |
|
|
The icon is only available when the job status is Pending, Waiting , and Running. |
|
|
The |
Viewing workflow events
After you launch a workflow job or create schedule for a workflow job, you can view the execution results from Workflow Events.
The tab includes the following information:
| Name | The name of the workflow. |
| Type | The type that the workflow job is executed, Scheduled, Manual, Relaunch. |
| Finished | The time when the workflow finishes executing. |
| Action | Click Click Click |