


Request forensic analysis
You can submit forensic analysis requests from within an alert in the SOCaaS portal. In order to submit a request, the alert must include endpoints with FortiClient managed by the onboarded FortiClient EMS with a FortiClient Forensic Service license. See Forensic analysis.
Within the alert, under the CORRELATIONS > Endpoints tab at the bottom of the alert, you will find the endpoints that are associated with an alert.
When viewing an alert that does not meet these requirements, the Request Forensic Analysis button will be grayed out and you cannot submit a forensic analysis request.
To submit a forensic analysis request for qualified endpoints on an alert:
-
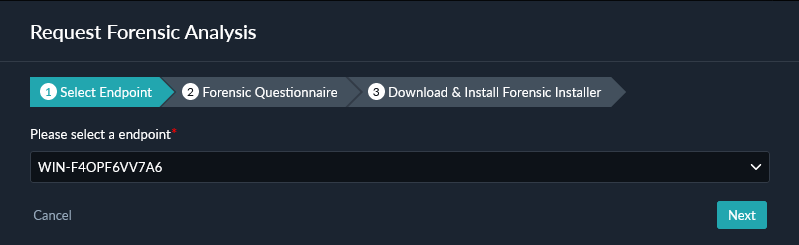
In an SOCaaS alert, click Request Forensic Analysis at the top of the alert page.

The Request Forensic Analysis wizard opens. -
Enter the following information required by the wizard:
-
Select an endpoint: Select an endpoint from the dropdown list. Only endpoints associated with this alert that have FortiClient managed by an onboarded FortiClient EMS are displayed. Only one endpoint can be selected for each forensic analysis request.
-
Complete the forensic analysis questionnaire by providing the following information:
Summary of the Issue Enter a summary of the issue. By default, this uses the same title as the alert. Reason of Escalation Select one or more reasons for the escalation or enter your own reason for escalation in the text box. First Identified Activity The first identified activity field is automatically populated with the Detection Time from the alert. You can change the time listed by clicking the calendar icon and choosing a date and time. Actions Taken to Date Select any applicable actions taken to date on the endpoint or enter your own actions taken in the text box. Supplementary Logs
Optionally, provide the link to the log page, for example on Google Docs.
Additional Notes
Optionally, provide additional notes for the forensic analysis team.
-
Download and install the Forensic Installer:
-
Select the Click to Download link to download the Forensic Installer.
-
Install the Forensic Installer on the affected endpoint, and keep it running for the next 3 days.
-
Once the forensic analysis is complete, you can uninstall the Forensic Installer from the endpoint.

-
-
Click Finish to submit the forensic analysis request. When the forensic analysis request has been submitted, the request details can be viewed from the Forensic Analysis tab on the alert or by going to Forensic Analysis in the SOCaaS portal.

-
After submitting a forensic analysis request
Click on the request to view the details under Forensic Analysis in the SOCaaS portal.
The request ID provides:
- A description of the request.
- Endpoints included for analysis.
- Status of the request.
- Detection time.
- Requested by (who submitted the request).
- A link to the request on the Forensic Service Portal.
The Forensic Service Portal link connects the customer to the Forensic Analysis portal where they can interact with the Forensics team regarding the analysis of the forensics request.
|
|
The Forensics team is a different service from SOCaaS. SOCaaS only provides the link to help connect the customer to the Forensic Analysis portal, and the request is passed to the Forensics team. |
Under the Forensic Analysis tab on the SOCaaS alert, when the analysis is complete, the status of the forensic analysis will be updated to Complete.
References and attachments added by the Forensic Analysis team can be found under the Forensic Analysis request attachments.
The Forensic Analysis view in SOCaaS shows all forensic analysis requests as a quick way for customers to find all their Forensic Requests. This view can also be used to connect customers to the Forensic Analysis Portal. See View forensic analysis request details.