Add AWS Account Manually
Prerequisites
Make sure the AWS account user you use to perform the tasks below is an Administrator User. For instruction on creating an Administrator User for your AWS account please refer to https://docs.aws.amazon.com/mediapackage/latest/ug/setting-up-create-iam-user.html.
Use the Administrator User to create new AWS Policy, Role, and configure the CloudTrail setting:
- Policy Types
- Step 1 - Policy Creation
- Step 2 - Role Creation
- Step 3 - Increase AWS Role Session Duration
- Step 4 - Activate Security Token Service (STS)
- Step 5 - Configure CloudTrail Setting
- Step 6 - Fill Account Info on FortiCNP
Policy Types
Before getting started to add AWS account, there are 3 types of permissions to be granted to FortiCNP to add the AWS account, consider adding the optional permissions or only the required one that best fits the need of your organization.
Basic Permissions (required) - This permission list is mandatory for adding AWS accounts to FortriCWP. This includes the permissions related to S3, CloudTrail, CloudFormation, IAM User Permissions and EC2.
AutoFix Permissions (optional) - This permission list includes the minimum write permissions of the AWS resources such as EC2, S3, IAM etc
Notification Permissions (optional) - This permission is required for FortiCNP to send notifications. This consists of SQS (Simple Queue Service) and SNS (Simple Notification Service).
Copy the permission JSON file below to create AWS policies.
Basic Permissions (Required)
{
"Version": "2012-10-17",
"Statement": [
{
"Action": [
"acm:Describe*",
"acm:List*",
"appstream:Describe*",
"autoscaling:Describe*",
"cloudformation:DescribeStack*",
"cloudformation:GetTemplate",
"cloudformation:ListStack*",
"cloudfront:Get*",
"cloudfront:List*",
"cloudsearch:Describe*",
"cloudtrail:DescribeTrails",
"cloudtrail:GetEventSelectors",
"cloudtrail:GetTrailStatus",
"cloudtrail:ListTags",
"cloudtrail:LookupEvents",
"cloudwatch:Describe*",
"codedeploy:Batch*",
"codedeploy:Get*",
"codedeploy:List*",
"config:Deliver*",
"config:Describe*",
"config:Get*",
"datapipeline:DescribeObjects",
"datapipeline:DescribePipelines",
"datapipeline:EvaluateExpression",
"datapipeline:GetPipelineDefinition",
"datapipeline:ListPipelines",
"datapipeline:QueryObjects",
"datapipeline:ValidatePipelineDefinition",
"dax:BatchGetItem",
"dax:ConditionCheckItem",
"dax:DescribeClusters",
"dax:DescribeDefaultParameters",
"dax:DescribeEvents",
"dax:DescribeParameterGroups",
"dax:DescribeParameters",
"dax:DescribeSubnetGroups",
"dax:GetItem",
"dax:ListTags",
"dax:Query",
"dax:Scan",
"directconnect:Describe*",
"ds:Describe*",
"dynamodb:DescribeTable",
"dynamodb:ListTables",
"ec2:Describe*",
"ec2:GetTransitGatewayAttachmentPropagations",
"ec2:GetTransitGatewayRouteTableAssociations",
"ec2:GetTransitGatewayRouteTablePropagations",
"ec2:SearchTransitGatewayRoutes",
"ecs:Describe*",
"ecs:List*",
"eks:DescribeCluster",
"eks:DescribeUpdate",
"eks:ListClusters",
"eks:ListUpdates",
"elasticache:Describe*",
"elasticache:List*",
"elasticbeanstalk:Describe*",
"elasticfilesystem:Describe*",
"elasticloadbalancing:Describe*",
"elasticmapreduce:DescribeCluster",
"elasticmapreduce:DescribeEditor",
"elasticmapreduce:DescribeSecurityConfiguration",
"elasticmapreduce:DescribeStep",
"elasticmapreduce:List*",
"es:Describe*",
"es:List*",
"glacier:GetVaultAccessPolicy",
"glacier:ListVaults",
"guardduty:ListDetectors",
"iam:GenerateCredentialReport",
"iam:Get*",
"iam:List*",
"iam:SimulateCustomPolicy",
"iam:SimulatePrincipalPolicy",
"inspector2:BatchGetAccountStatus",
"kms:Describe*",
"kms:Get*",
"kms:List*",
"lambda:GetPolicy",
"lambda:List*",
"logs:Describe*",
"logs:FilterLogEvents",
"logs:Get*",
"rds:Describe*",
"rds:DownloadDBLogFilePortion",
"rds:ListTagsForResource",
"redshift:Describe*",
"route53:GetAccountLimit",
"route53:GetChange",
"route53:GetCheckerIpRanges",
"route53:GetGeoLocation",
"route53:GetHealthCheck",
"route53:GetHealthCheckCount",
"route53:GetHealthCheckLastFailureReason",
"route53:GetHealthCheckStatus",
"route53:GetHostedZone",
"route53:GetHostedZoneCount",
"route53:GetHostedZoneLimit",
"route53:GetQueryLoggingConfig",
"route53:GetReusableDelegationSet",
"route53:GetReusableDelegationSetLimit",
"route53:GetTrafficPolicy",
"route53:GetTrafficPolicyInstance",
"route53:GetTrafficPolicyInstanceCount",
"route53:ListGeoLocations",
"route53:ListHealthChecks",
"route53:ListHostedZones",
"route53:ListHostedZonesByName",
"route53:ListQueryLoggingConfigs",
"route53:ListResourceRecordSets",
"route53:ListReusableDelegationSets",
"route53:ListTagsForResource",
"route53:ListTagsForResources",
"route53:ListTrafficPolicies",
"route53:ListTrafficPolicyInstances",
"route53:ListTrafficPolicyInstancesByHostedZone",
"route53:ListTrafficPolicyInstancesByPolicy",
"route53:ListTrafficPolicyVersions",
"route53:ListVPCAssociationAuthorizations",
"route53domains:CheckDomainAvailability",
"route53domains:GetContactReachabilityStatus",
"route53domains:GetDomainDetail",
"route53domains:GetDomainSuggestions",
"route53domains:GetOperationDetail",
"route53domains:ListDomains",
"route53domains:ListOperations",
"route53domains:ListTagsForDomain",
"s3:GetAccelerateConfiguration",
"s3:GetAccountPublicAccessBlock",
"s3:GetAnalyticsConfiguration",
"s3:GetBucket*",
"s3:GetEncryptionConfiguration",
"s3:GetInventoryConfiguration",
"s3:GetLifecycleConfiguration",
"s3:GetMetricsConfiguration",
"s3:GetObject",
"s3:GetObjectAcl",
"s3:GetObjectTagging",
"s3:GetObjectTorrent",
"s3:GetObjectVersion",
"s3:GetObjectVersionAcl",
"s3:GetObjectVersionForReplication",
"s3:GetObjectVersionTagging",
"s3:GetObjectVersionTorrent",
"s3:GetReplicationConfiguration",
"s3:ListAllMyBuckets",
"s3:ListBucket",
"s3:ListBucketMultipartUploads",
"s3:ListBucketVersions",
"s3:ListMultipartUploadParts",
"sdb:DomainMetadata",
"sdb:ListDomains",
"securityhub:GetFindings",
"securityhub:ListMembers",
"ses:Get*",
"ses:List*",
"tag:GetResources",
"tag:GetTagKeys",
"waf:Get*",
"waf:List*",
"workspaces:Describe*"
],
"Resource": "*",
"Effect": "Allow"
}
]
}
AutoFix Permissions (Optional)
{
"Version": "2012-10-17",
"Statement": [
{
"Action": [
"cloudfront:UpdateDistribution",
"cloudtrail:StartLogging",
"cloudtrail:UpdateTrail",
"ec2:ModifySnapshotAttribute",
"ec2:RevokeSecurityGroupEgress",
"ec2:RevokeSecurityGroupIngress",
"elasticloadbalancing:ModifyLoadBalancerAttributes",
"iam:UpdateAccountPasswordPolicy",
"kms:CancelKeyDeletion",
"kms:EnableKeyRotation",
"rds:ModifyDBInstance",
"redshift:ModifyCluster",
"redshift:ModifyClusterParameterGroup",
"s3:PutBucketAcl",
"s3:PutBucketPolicy",
"s3:PutBucketVersioning",
"s3:PutObjectAcl",
"s3:PutObjectVersionAcl"
],
"Resource": "*",
"Effect": "Allow"
}
]
}
Notification Permission (Optional)
{
"Version": "2012-10-17",
"Statement": [
{
"Action": [
"sns:CheckIfPhoneNumberIsOptedOut",
"sns:GetEndpointAttributes",
"sns:GetPlatformApplicationAttributes",
"sns:GetSMSAttributes",
"sns:GetSMSSandboxAccountStatus",
"sns:GetSubscriptionAttributes",
"sns:GetTopicAttributes",
"sns:ListEndpointsByPlatformApplication",
"sns:ListOriginationNumbers",
"sns:ListPhoneNumbersOptedOut",
"sns:ListPlatformApplications",
"sns:ListSMSSandboxPhoneNumbers",
"sns:ListSubscriptions",
"sns:ListSubscriptionsByTopic",
"sns:ListTagsForResource",
"sns:ListTopics",
"sns:publish",
"sqs:ChangeMessageVisibility",
"sqs:ChangeMessageVisibilityBatch",
"sqs:CreateQueue",
"sqs:DeleteMessage",
"sqs:DeleteMessageBatch",
"sqs:DeleteQueue",
"sqs:GetQueueAttributes",
"sqs:GetQueueUrl",
"sqs:ListDeadLetterSourceQueues",
"sqs:ListQueues",
"sqs:ListQueueTags",
"sqs:ReceiveMessage",
"sqs:SendMessage",
"sqs:SendMessageBatch",
"sqs:SetQueueAttributes"
],
"Resource": "*",
"Effect": "Allow"
}
]
}
Step 1 - Policy Creation
Policy creation is the first step in creating IAM role. Create AWS policies using the permission JSON files above.
The Basic Permissions are required to add the AWS account to FortiCNP, other permissions are optional.
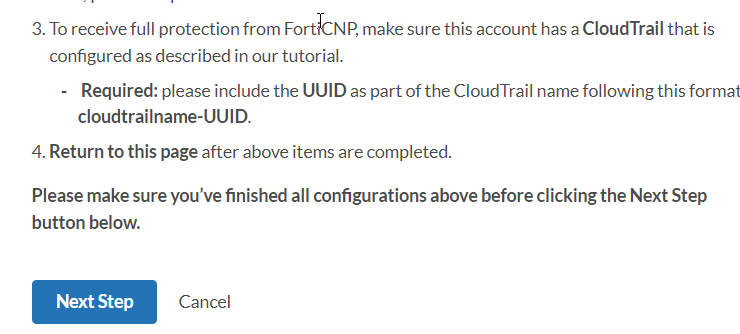
The policy name must include the UUID obtained from FortiCNP add account page.

Please use the following naming convention for each policy type. The purpose of using standard naming convention is when updating accounts later, only permissions with standard naming conventions can be removed automatically.
| Permission Types | Policy Name |
|---|---|
| Basic Permissions | forticnp_basic_permission_UUID |
| AutoFix Permissions | forticnp_autofix_permission_UUID |
| Notification Permissions | forticnp_notification_permission_UUID |
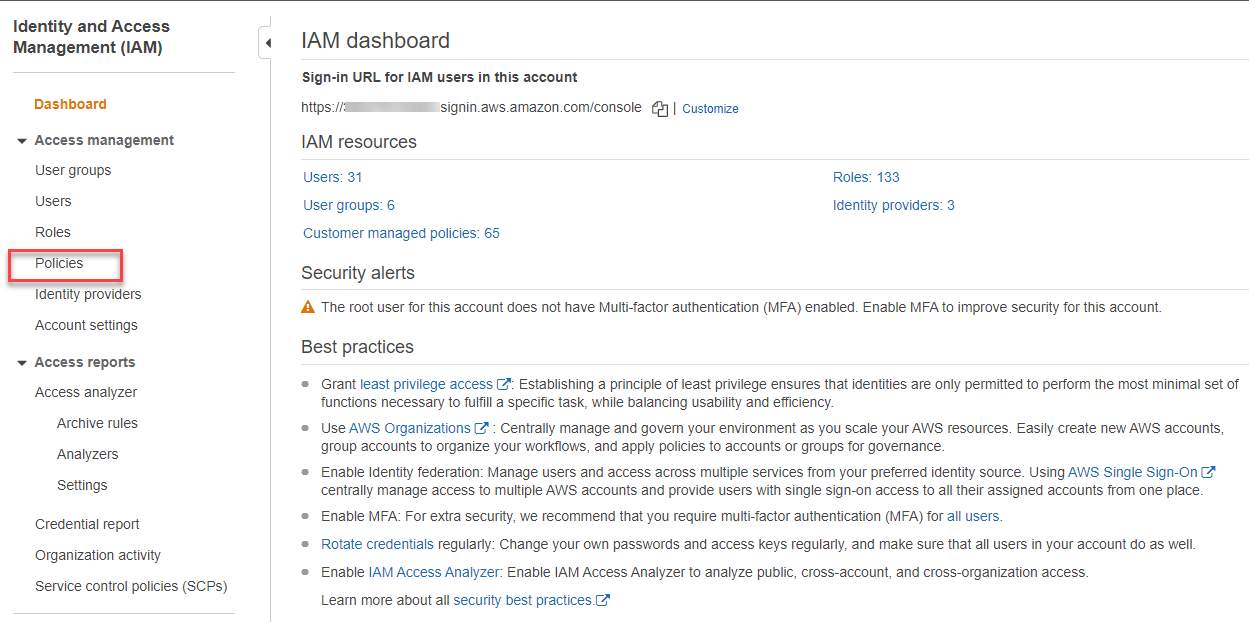
- Go to your AWS console dashboard, search and click IAM.
- Click Policies from the left navigation menu.
- Click Create policy, go to the JSON tab.
- Replace the existing JSON code with one of the permission JSON code above.
- Click Next: Tags, then click Next: Review.
- Name the policy as "forticnp_basic_permission_895146", scroll down and click Create policy.

Repeat the instruction above for each type of permission.
|
|
Please keep the policy names later for role creation. |
|
|
For the purpose behind the AWS services being used to create the custom policy, please refer to Appendix A - Cloud Protection Amazon Policy Usage |
Step 2 - Role Creation
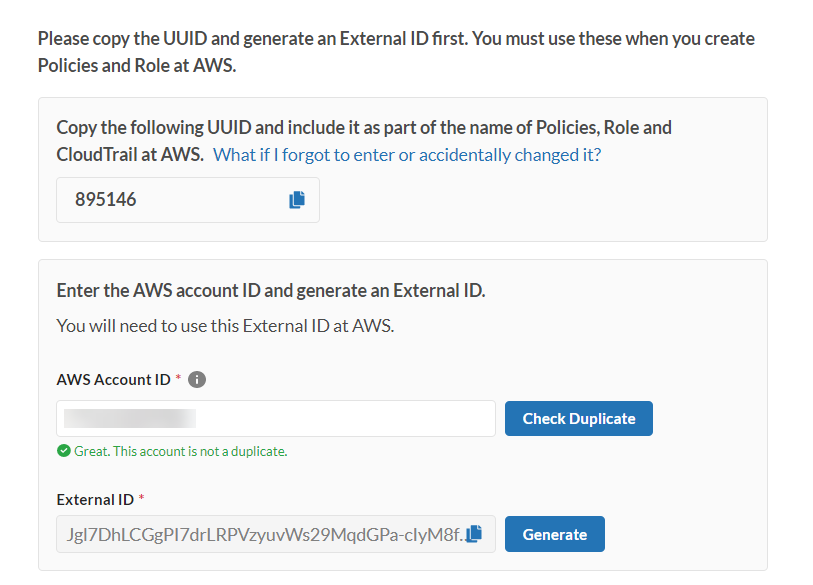
Before creating an AWS Role, you will need to create an External ID from FortiCNP. The External ID is an unique 32-bit token that meets AWS security requirement to protect the AWS Role. Go back to the Add Cloud Account page on FortiCNP to generate an External ID.
The UUID also needs to be included as part of the Role name, copy the UUID for use later.
Enter your AWS account ID and click Check Duplicate. If the AWS account ID is valid, it will prompt you to generate the External ID.
Click Generate to generate the External ID. Click copy to save it later for creating AWS Role.
|
|
If you already have an AWS Role associated with FortiCNP, and only need to update the External ID. Please refer to Update AWS Role External ID |
Steps to create AWS Role
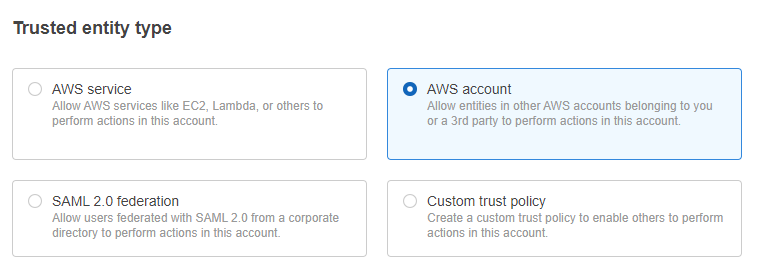
- Go to your AWS console dashboard. Click Roles from the menu on the left.
- Click Create role.
- In Trusted entity type, select AWS account.
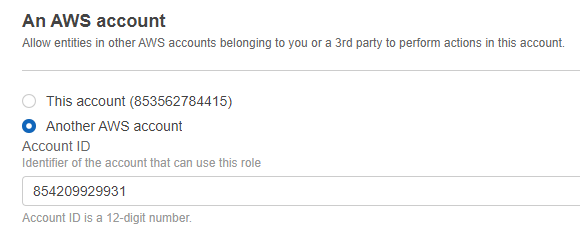
- In An AWS account, select Another AWS Account, and enter the following Account ID: 854209929931.
- Select the box Require external ID and enter in the External ID generated earlier.
- Make sure the box Require MFA is not selected, then click Next.
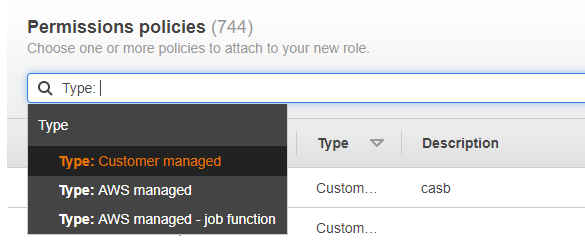
- In Add permissions, click search bar to select Type > Customer managed to filter.
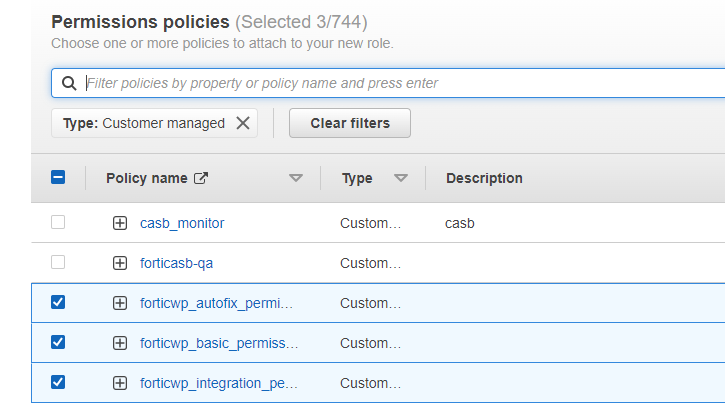
- Select all the permission policies you created earlier, and click Next.
- In Role details, enter a role name. Review the rest of the role details, and click Create role.
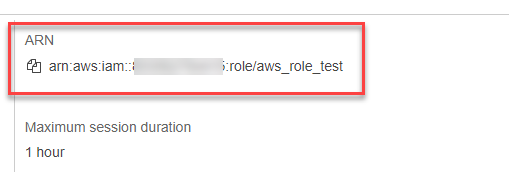
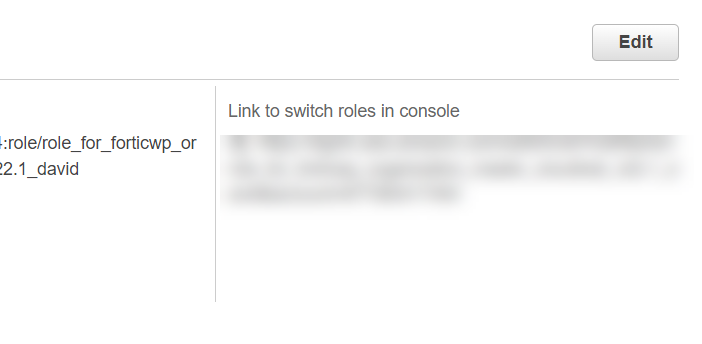
- Go back to list of Roles, click on the new role created to enter the role summary, and copy the AWS Role ARN.
Note: This is the Amazon AWS account that FortiCNP uses to monitor the new role that is being created.
|
|
The External ID must be the one generated earlier through FortiCNP using the same AWS account. If the External ID is not generated from FortiCNP, the AWS account cannot be added to FortiCNP. |
Example of AWS Role ARN: arn:aws:iam::123456123456:role/aws_role_test
|
|
Please keep the AWS Role ARN later for AWS authentication during installation. |
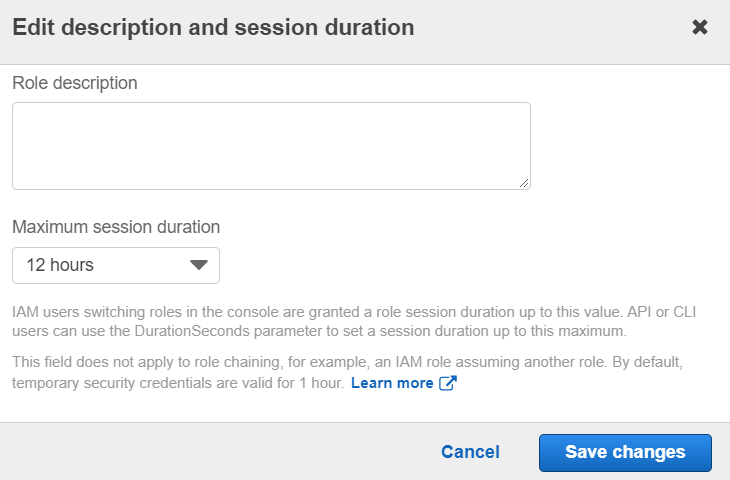
Step 3 - Increase AWS Role Session Duration
The AWS role session duration needs to be increased to avoid session timeout, thus allowing enough time for account onboarding process.
- In AWS Console, go to IAM.
- Select the AWS role that was created from Step 2 - Role Creation, click Edit.
- Click Maximum session duration drop down menu and select 12 hours.
- Click Save changes to apply.
Step 4 - Activate Security Token Service (STS)
FortiCNP uses regional Security Token Service (STS) to reduce latency and provide smoother user experience.
Follow these steps to turn on Security Token Service (STS) on AWS console.
- From your AWS console dashboard, go to Identity and Access Management (IAM).
- Click Account settings from the left navigation panel, and click to expand Security Token Service (STS).
- Based on your location, activate EU (Ireland) if you are located in European Union, otherwise, activate US West (Oregon).

Step 5 - Configure CloudTrail Setting
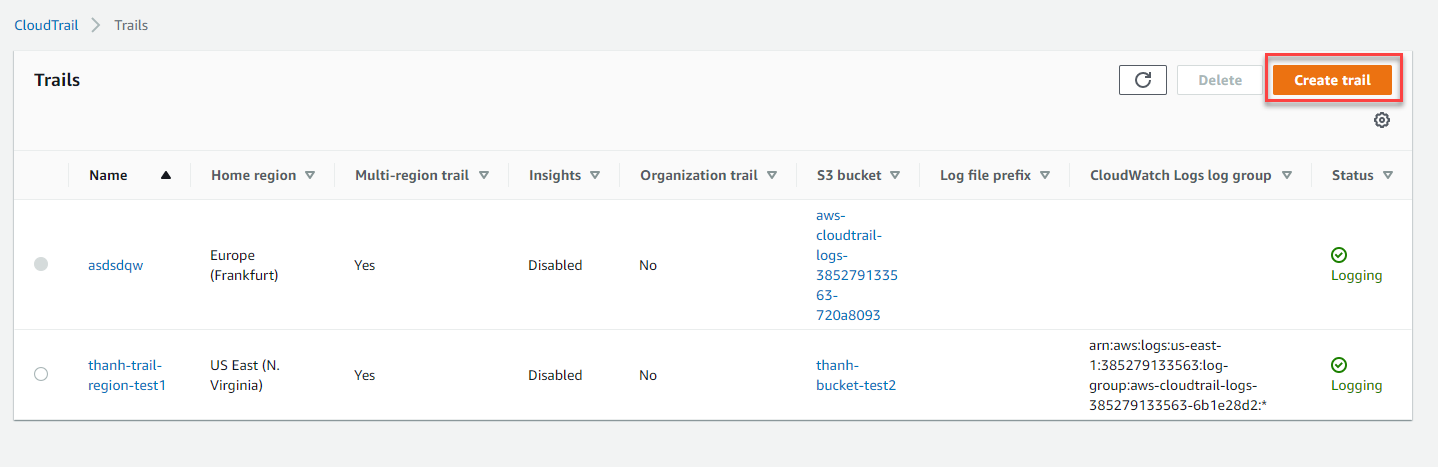
- From AWS console dashboard, search and go to "CloudTrail"
- Click on Trails in the left navigation pane, and click Create trail.
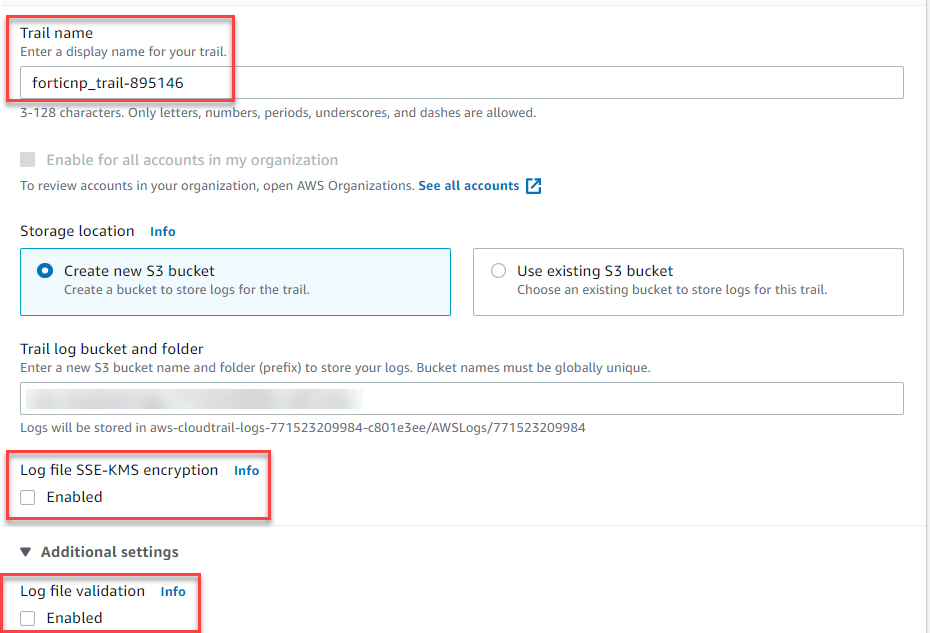
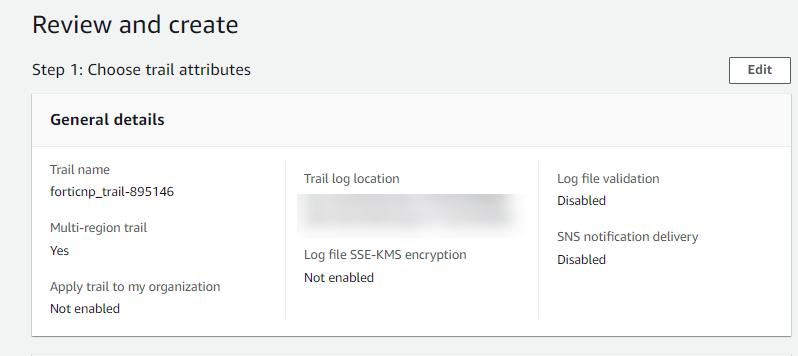
- In General details page, enter a Trail name that includes the UUID, for example, "forticnp_trail_895146". keep the default selection to Create a new S3 bucket.
- Uncheck the options to enable Log file SSE-LMS encryption and Log file validation.
- Scroll down and click Next to continue to Choose log events page.
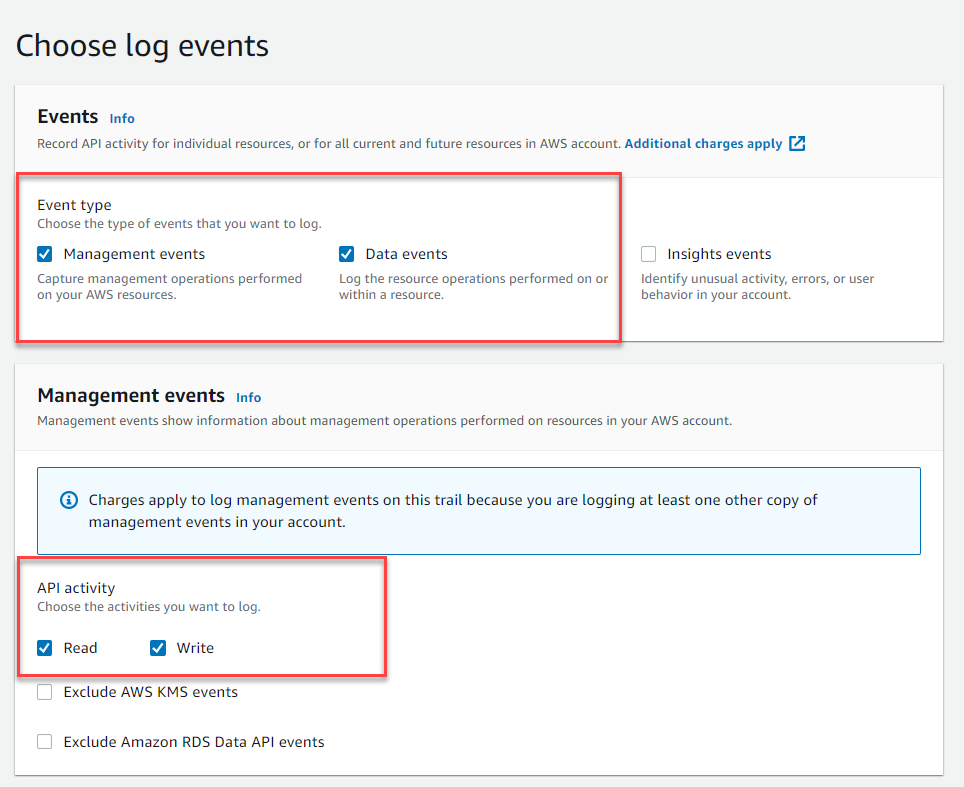
- In Events > Event type, select Mangement events and Data events types.
- In Manage events > API activity: keep Read and Write options selected, then click Next.
- Review the trail settings, make sure it is configured as multi-region trail, scroll down and click Create Trail.
- Go back to FortiCNP and click Next Step.
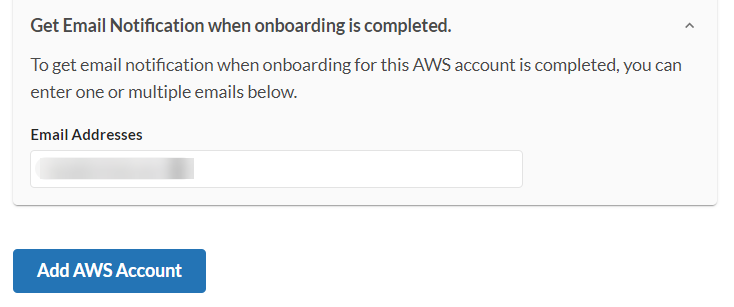
Step 6 - Fill Account Info on FortiCNP
Go back to FortiCNP and proceed with the rest of configurations.
- Enter the Role ARN that was saved from Step 2 - Role Creation.
- Enter an Account Name (optional)
- If you would like to receive notification when the add account process is completed (recommended), click Get Email Notification drop down menu, enter an e-mail address and press
Enter. Add additional email addresses as needed. - Click Add AWS Account to go to the next page.