


Appendix A: Shared line appearance
Configure the shared line appearance (SLA) feature to allow any group member to monitor and answer calls received on a shared line.
Supported accounts
The following table lists the phone models, account totals, and lines per account:
|
Phone model |
Account total |
Lines per account |
|---|---|---|
|
FON-280B |
2 |
10 |
|
FON-380 and FON-380B |
4 |
10 |
|
FON-480 and FON-480B |
8 |
10 |
|
FON-580 |
16 |
10 |
|
Note 1: The account total equals how many extensions a phone can monitor minus one account which is the phone's own extension. Note 2: The information in this table applies to FON-x80/x80B phones using version 3.0.19 or later. |
||
Example scenario with one manager and three assistants
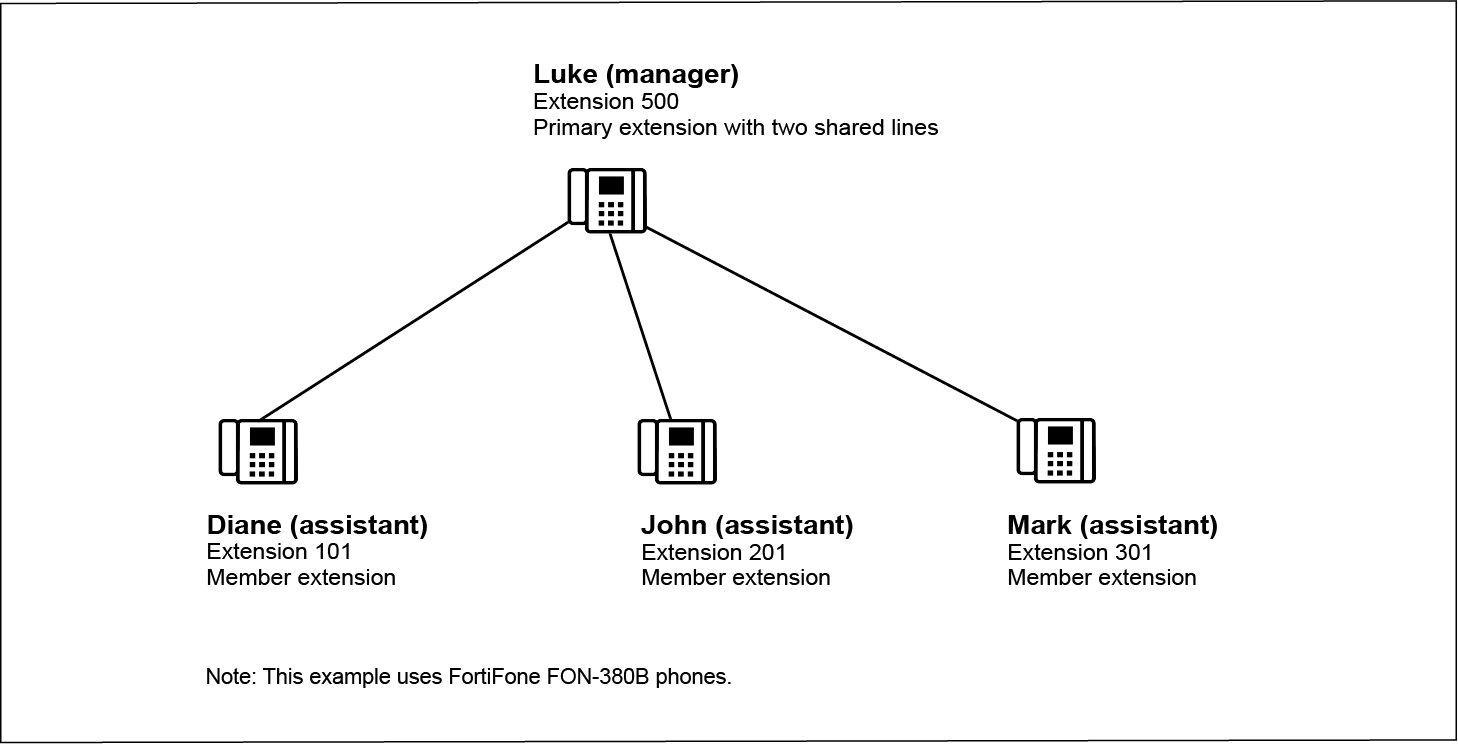
- Diane, John, and Mark are assistants and use extensions 101, 201, and 301 respectively. Luke is their manager and uses extension 500.
- All assistants can monitor their manager's lines. Those are the shared lines. In our example scenario, Luke has two shared lines.
- When there is an incoming call on one of the shared lines, all assistant phones will ring. Any assistant can answer the call. If no one answers the call after a specified time period, the manager's phone will ring.
The following diagram illustrates the example SLA scenario:
Prerequisites
- You have created and configured the assistant and manager extensions in Extension > Extension > IP Extension. For details, see Configuring IP extensions.
- You have added the FortiFone-380B phones to FortiVoice Cloud and assigned them to the extensions. For details, see Configuring desk phones.
To configure SLA, complete the following sections:
- Configuring an SLA group
- Configuring the programmable key profile for a primary extension
- Configuring the programmable key profile for a member extension
- Updating the phone configurations
- Viewing SLA configuration details for an extension
Configuring an SLA group
Configure an SLA group to organize the primary and member extensions.
- Go to Extension > Group > SLA Group.
- Click New.
- In Primary, select 500 (500) Luke.
- In Members, click + and select 101 (101) Diane, 201 (201) John, and 301 (301) Mark.
- In Member's Ring Pattern, select the ring tone that you want to use.
- In Ring Mode, select Members first then primary.
- In Ring Delay, select how many seconds you want the assistant phones to ring before an unanswered call starts to ring Luke's phone.
- Click Create.
Configuring the programmable key profile for a primary extension
Configure a programmable key profile for a primary extension and assign an SLA function to one or more programmable phone keys.
- Go to Phone System > Profile > Programmable Keys.
- Click New.
- In Name, enter a name for this programmable key profile. For example, 380-SLA-primary.
- Make sure that the Phone model shows the correct model. For our example, its FortiFone-380.
- Click Create.
- Select the profile that you just created and click Edit.
- In Number of Reserved Line keys, select the number of lines that you want to have with the SLA function. The maximum is 4. For our example, select 2.
- In Mode, select SLA Primary.

- Click OK.
FortiVoice Cloud has automatically configured the two programmable keys with the SLA feature.
- To assign the programmable key profile to a primary extension:
- Go to Extension > Extension > IP Extension.
- Double-click on the primary extension. For example, 500 (Luke).
- Go to Device Setting > Programmable keys and select the profile. For example, 380-SLA-primary.
- Click OK.
- To update the phone configuration, wait until you have configured the programmable key profile for the member extensions.
Configuring the programmable key profile for a member extension
Configure a programmable key profile for a member extension and assign an SLA function to one or more of the phone keys.
- Go to Phone System > Profile > Programmable Keys.
- Click New.
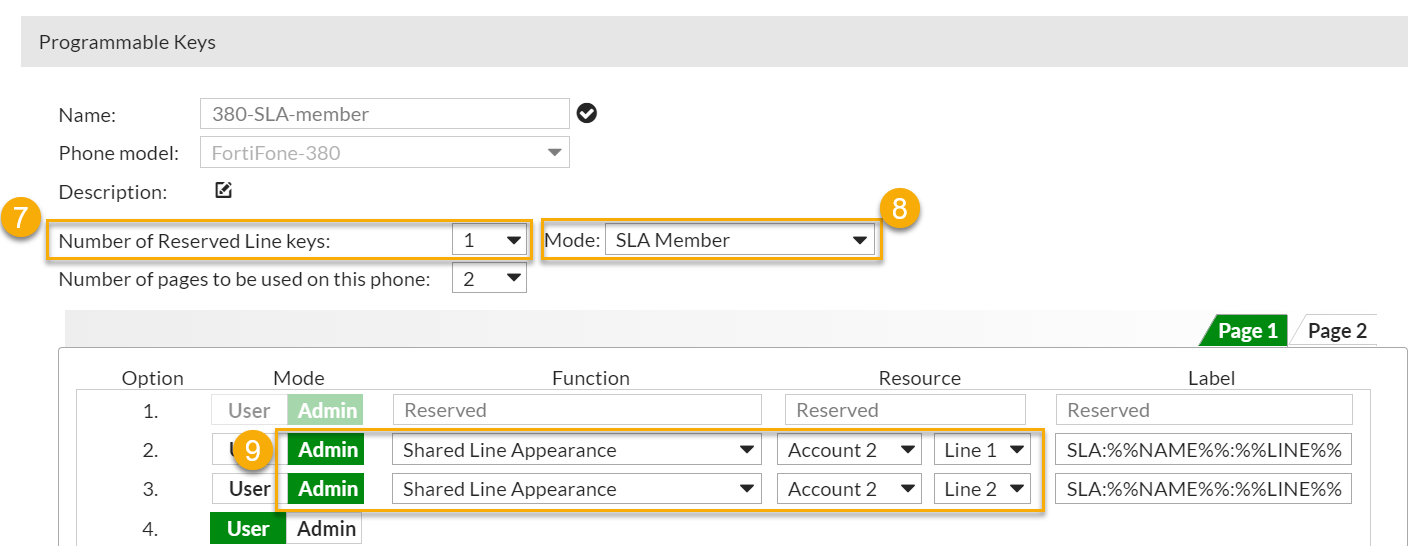
- In Name, enter a name for this programmable key profile. For example, 380-SLA-member.
- Make sure that the Phone model shows the correct model.
- Click Create.
- Select the profile that you just created and click Edit.
- In Number of Reserved Line keys, select 1. This is the member's line.
- In Mode, select SLA Member.
- In the table, add the following two Shared Line Appearance entries (Account 2, Lines 1 and 2):
- Click OK.
- To assign the programmable key profile to the member extensions:
- Go to Extension > Extension > IP Extension.
- Double-click on extension 101.
- Go to Device Setting > Programmable keys and select the profile. For our example, it's 380-SLA-member.
- Click OK.
- Repeat steps 11 b. to d. to assign the programmable key profile to the remaining member extensions (201 and 301).
Updating the phone configurations
Update the FortiFone-380B phones with the SLA changes.
- In the top banner, click the phone maintenance icon
 .
. - Keep Type as Configuration update.
- Keep All related devices enabled.
- To update the phones immediately, click Now.
- To update the phones later, click At and schedule a time.
- Click OK.
When the configuration is complete, the phone screen displays the following message: Configuration has been updated.
Viewing SLA configuration details for an extension
- Go to Extension > Extension > IP Extension.
- Double-click an extension that is included in an SLA group.
- In Device Setting, click the SLA tab.
- For a primary extension, you can view SLA group settings (Members, Members' Ring Pattern, and Ring Mode) related to this extension. For a member extension, you can view which SLA group this member is part of.
- To view programmable key details, click Phone Keys Preview.