


Fabric Connectors
Fabric connectors provide integration with Fortinet products to automate the process of managing dynamic security updates without manual intervention.
Creating a Security Fabric Group
To create a Security Fabric group in the GUI:
- Configure FortiAnalyzer logging:
- Go to Security Fabric > Fabric Connectors and double-click the FortiAnalyzer Logging card.
- Ensure the Status is Enabled, and configure the settings as needed.
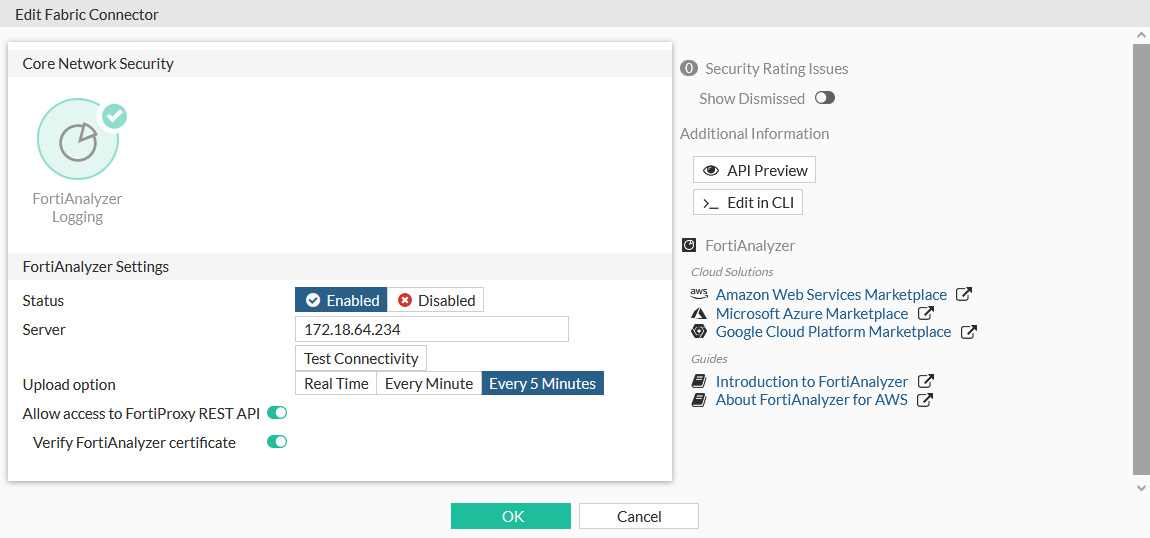
- Click OK.
- Configure the Security Fabric group root:
- Go to Security Fabric > Fabric Connectors and double-click the Security Fabric Setup card.

- Change Status to Enabled.
- In Security Fabric role, select Serve as Fabric Root to configure a Security Fabric root.
- In the Fabric name and Group password fields, specify the group name and password, which are required for other devices to join the group.
- Enable Allow other Security Fabric devices to join.
- Add members to the trusted list by clicking Edit next to Device authorization and clicking Create New in the Device Authorization panel. Fill in the license serial number of the member and specify a name. The license serial number can be retrieved by running the
get system statuscommand in the member device. - Configure other options as needed, such as License Sharing Between FortiProxy Devices which specifies whether to allow the root to share licenses with other devices within the group.
- Click OK.
- Go to Security Fabric > Fabric Connectors and double-click the Security Fabric Setup card.
- (Optional) Add additional members to the group by editing the root you just configured and repeat step f. Alternatively, you can add additional members by configuring a new Security Fabric Setup card:
- Go to Security Fabric > Fabric Connectors and double-click the Security Fabric Setup card.
- Change Status to Enabled.
- In Security Fabric role, select Join Existing Fabric to configure a Security Fabric member.
- Fill in the root device address in Upstream FortiProxy IP/FQDN.
- In the Group password field, enter the password you set in the root.
- Configure other options as needed, such as License Sharing Between FortiProxy Devices which specifies whether to allow the device to share licenses with other devices within the group.
- Verify the fabric group status using the fabric group topology in right-side menu on the Security Fabric >> Fabric Connectors page.

To create a Security Fabric group in the CLI:
- Configure FortiAnalyzer logging:
config log fortianalyzer setting
    set status enable
    set server "172.18.64.234"
    set serial "FL-8HFT000000000"
    set upload-option realtime
    set reliable enable
end
Refer to the config log fortianalyzer setting topic in the CLI guide for more details about each option and a full list of available options.
- Configure the security fabric group root:
config system csf
set status enable
set group-name <string>
set downstream-access enable
set license-sharing enable
config trusted-list
edit <MEMBER_DEVICE_NAME>
set serial <LICENSE_SERIAL_OF_MEMBER_DEVICE>
set guaranteed-seats <integer>
next
edit <MEMBER_DEVICE_2_NAME>
set serial <LICENSE_SERIAL_OF_MEMBER_DEVICE_2>
set guaranteed-seats <integer>
next ...
end
When adding devices to the trusted list, you can retrieve the license serial number by running the
get system statuscommand in the member device.Refer to the config system csf topic in the CLI guide for more details about each option and a full list of available options.
- (Optional) Apply the following configuration to each trusted member device you defined in step 2:
config system csf
set status enable
set upstream <IP_OF_FABRIC_ROOT>
set group-name <FABRIC_GROUP_NAME>
set group-password <FABRIC_GROUP_PASSWORD>
set configuration-sync local
set license-sharing enable
end
When license sharing is enabled, setting
configuration-synctolocaldisables configuration synchronization with a management device, which is recommended for license sharing.Refer to the config system csf topic in the CLI guide for more details about each option and a full list of available options.
- Verify the fabric group status:
To check connected member devices to the root, run
diag system csf downstream. All connected devices will be listed, regardless of the authorization status.To check the root device status, run
diag system csf upstream. The connection status should beAuthorized. If the connection status isAuthorization Rejected, check if the member device is added to the trusted list of the root device.To check the fabric group setting, run
get system csf. The following is an example of the results from a root device:status : enable
upstream :
upstream-port : 8013
group-name : my_fabric_grp
group-password : *
accept-auth-by-cert : enable
log-unification : enable
authorization-request-type: serial
fabric-workers : 2
downstream-access : enable
license-sharing : enable
downstream-accprofile: super_admin
configuration-sync : local
fabric-object-unification: local
trusted-list:
== [ 1 ]
name: 1 serial: FPX*************
ha-members:
fabric-connector:
forticloud-account-enforcement: enable
Simplify EMS pairing with Security Fabric so one approval is needed for all devices
FortiClient EMS with Fabric authorization and silent approval capabilities is able to approve the root FortiProxy unit in a Security Fabric once and then silently approve remaining downstream FortiProxy units in the Fabric. Similarly in an HA scenario, an approval only needs to be made once to the HA primary unit. The remaining cluster members are approved silently.
To use EMS silent approval:
- Configure the EMS entry on the root FortiProxy unit or HA primary:
config endpoint-control fctems
    edit "ems139"
        set fortinetone-cloud-authentication disable
        set server "172.16.200.139"
        set https-port 443
        set source-ip 0.0.0.0
        set pull-sysinfo enable
        set pull-vulnerabilities enable
        set pull-avatars enable
        set pull-tags enable
        set pull-malware-hash enable
        unset capabilities
        set call-timeout 30
        set websocket-override disable
    next
end
When the entry is created, the capabilities are unset by default.
- Authenticate the FortiProxy unit with EMS:
# execute fctems verify ems_139
...
The FortiProxy unit enables the Fabric authorization and silent approval based on the EMS supported capabilities.
config endpoint-control fctems edit "ems139" set server "172.18.62.12" set capabilities fabric-auth silent-approval websocket next end - Configure a downstream device in the Security Fabric. The downstream device is silently approved.
- Configure a secondary device in an HA system. The secondary device is silently approved.