


Configuring a wireless network connection using a Windows XP client
To configure the WPA-Enterprise network connection
- In the Windows Start menu, go to Control Panel > Network Connections > Wireless Network Connection or select the wireless network icon in the Notification area of the Taskbar. A list of available networks is displayed.

If you are already connected to another wireless network, the Connection Status window displays. Select View Wireless Networks on the General tab to view the list.
If the network broadcasts its SSID, it is listed. But do not try to connect until you have completed the configuration step below. Because the network doesn’t use the Windows XP default security configuration, configure the client’s network settings manually before trying to connect.
- You can configure the WPA-Enterprise network to be accessible from the View Wireless Networks window even if it does not broadcast its SSID.
- Select Change Advanced Settings and then select the Wireless Networks tab.

Any existing networks that you have already configured are listed in the Preferred Networks list.
- Select Add and enter the following information:
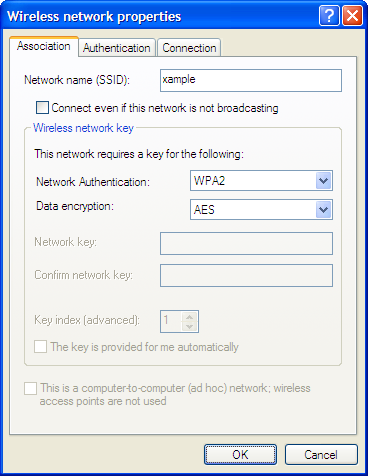
Network Name (SSID)
The SSID for your wireless network
Network Authentication
WPA2
Data Encryption
AES
- If this wireless network does not broadcast its SSID, select Connect even if this network is not broadcasting so that the network will appear in the View Wireless Networks list.
- Select the Authentication tab.
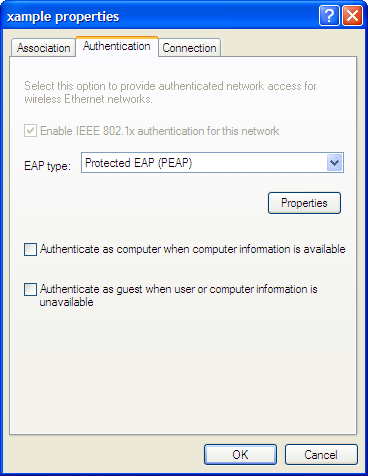
- In EAP Type, select Protected EAP (PEAP).
- Make sure that the other two authentication options are not selected.
- Select Properties.

- Make sure that Validate server certificate is selected.
- Select the server certificate Entrust Root Certification Authority.
- In Select Authentication Method, select Secured Password (EAP-MSCHAPv2).
- Ensure that the remaining options are not selected.
- Select Configure.
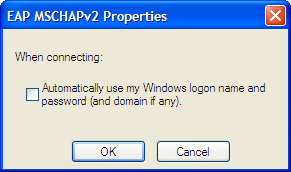
- If your wireless network credentials are the same as your Windows logon credentials, select Automatically use my Windows logon name and password. Otherwise, make sure that this option is not selected.
- Select OK. Repeat until you have closed all of the Wireless Network Connection Properties windows.
To connect to the WPA-Enterprise wireless network
- Select the wireless network icon in the Notification area of the Taskbar.
- In the View Wireless Networks list, select the network you just added and then select Connect.
You might need to log off of your current wireless network and refresh the list. - When the following popup displays, click on it.

- In the Enter Credentials window, enter your wireless network User name, Password, and Logon domain (if applicable). Then, select OK.

The next time you log on to this network, Windows automatically sends your credentials.