
IPsec VPN with FortiClient
In this example, you will allow remote users to access the corporate network using an IPsec VPN that they connect to using FortiClient for Mac OS X, Windows, or Android. Traffic to the Internet will also flow through the FortiGate, to apply security scanning.
In this example, FortiClient 5.4.0.493 for Mac OS X is used.

1. Creating a user group for remote users
Go to User & Device > User Definition. Create a local user account for an IPsec VPN user.


Go to User & Device > User Groups. Create a user group for IPsec VPN users and add the new user account.

2. Adding a firewall address for the local network
Go to Policy & Objects > Addresses and create an address for the local network.
Set Type to IP/Netmask, Subnet/IP Range to the local subnet, and Interface to an internal port.

3. Configuring the IPsec VPN using the IPsec VPN Wizard
Go to VPN > IPsec Wizard and create a new tunnel using a pre-existing template.
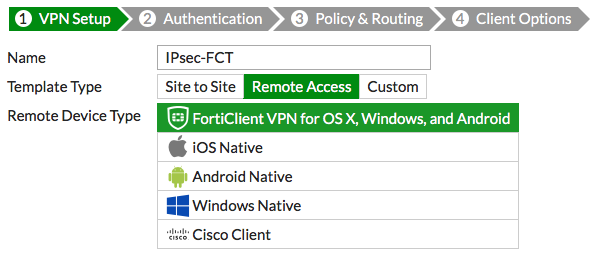
Name the VPN connection. The tunnel name may not have any spaces in it and should not exceed 13 characters. Set Template to Remote Access, and set Remote Device Type to FortiClient VPN for OS X, Windows, and Android.
Set the Incoming Interface to the internet-facing interface and Authentication Method to Pre-shared Key.
Enter a pre-shared key (the pre-shared key is a credential for the VPN and should differ from the user's password) and select the new user group, then click Next.

Set Local Interface to an internal interface (in the example, lan) and set Local Address to the local LAN address.
Enter an Client Address Range for VPN users. The IP range you enter here prompts FortiOS to create a new firewall object for the VPN tunnel using the name of your tunnel followed by the _range suffix (in the example, IPsec-FCT_range).
Make sure Enable IPv4 Split Tunnel is not selected, so that all Internet traffic will go through the FortiGate. If you do select Enable Split Tunneling, traffic not intended for the corporate network will not flow through the FortiGate or be subject to the corporate security profiles.

Select Client Options as desired.

After you create the tunnel, a summary page appears listing the objects which have been added to the FortiGate's configuration by the wizard.

4. Creating a security policy for access to the Internet
The IPsec wizard automatically created a security policy allowing IPsec VPN users to access the internal network. However, since split tunneling is disabled, another policy must be created to allow users to access the Internet through the FortiGate.
Go to Policy & Objects > IPv4 Policies and create a new policy. Set a policy name that will identify what this policy is used for (in the example, IPsec-VPN-Internet).
Set Incoming Interface to the tunnel interface and Outgoing Interface to wan1. Set Source to the IPsec client address range, Destination Address to all, Service to ALL, and enable NAT.
Configure any remaining firewall and security options as desired.

5. Configuring FortiClient
Open FortiClient, go to Remote Access and Add a new connection.

Set the Type to IPsec VPN and Remote Gateway to the FortiGate IP address.
Set Authentication Method to Pre-Shared Key and enter the key below.

6. Results
On FortiClient, select the VPN, enter the username and password, and select Connect.

Once the connection is established, the FortiGate assigns the user an IP address and FortiClient displays the status of the connection, including the IP address, connection duration, and bytes sent and received.

On the FortiGate unit, go to Monitor > IPsec Monitor and verify that the tunnel Status is Up.
Under Remote Gateway, the monitor shows the FortiClient user's assigned gateway IP address.

Browse the Internet, then go to FortiView > Policies and select the now view. You can see traffic flowing through the IPsec-VPN-Internet policy.

Right-click on the policy, then select Drill Down to Details. You can see more information about the traffic.
Under Source, you can also see the IP address assigned to the FortiClient user (10.10.100.1).

Go to FortiView > VPN to see which users have connected to the VPN.

