


Installing internal FortiGates and enabling Security Fabric
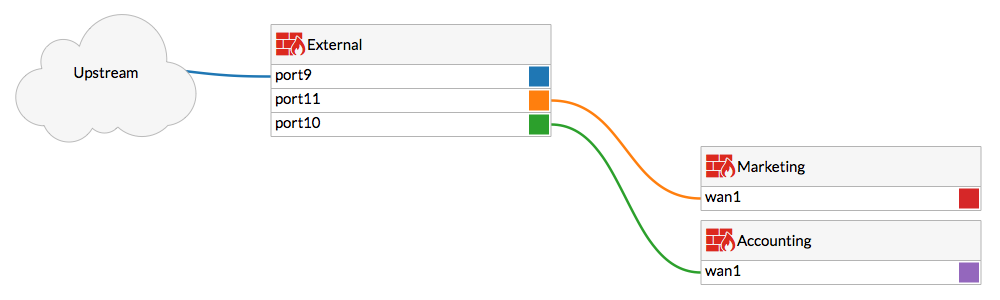
In this example, you will install two Internal Segmentation Firewalls (ISFWs) behind your External FortiGate. One of these FortiGates will be used to protect your Accounting team's network, while the other will be used for the Marketing team. You will also enable a Cooperative Security Fabric (CSF) and use OSPF routing between these FortiGates. The External FortiGate has already been installed in NAT/Route mode. For more information, see Installing a FortiGate in NAT/Route mode.
This recipe is part of the Cooperative Security Fabric collection. It can also be used as a standalone recipe.

1. Configuring External to connect to Accounting
In this example, the External FortiGate's port 10 will connect to the Accounting FortiGate's wan1.
On the External FortiGate, go to Network > Interfaces and edit port 10.
Set an IP/Network Mask for the interface (in the example, 192.168.10.2).
Configure Administrative Access to allow FortiTelemetry, required for communication between FortiGates in the CSF. Configure other services as required.

Go to Policy & Objects > IPv4 Policy and create a policy for traffic from the Accounting FortiGate to the Internet.
Enable NAT.

Connect the FortiGates.
2. Configuring the Accounting FortiGate
On the Accounting FortiGate, go to Network > Interfaces and edit wan1.
Set an IP/Network Mask for the interface that is on the same subnet as the External FortiGate's port 10 (in the example, 192.168.10.10).
Configure Administrative Access to allow FortiTelemetry.

Edit the laninterface.
Set Addressing Mode to Manual and set the IP/Netmask to a private IP address (in the example, 10.10.10.1). Configure Administrative Access to allow FortiTelemetry.
Under Networked Devices, enable Device Detection.
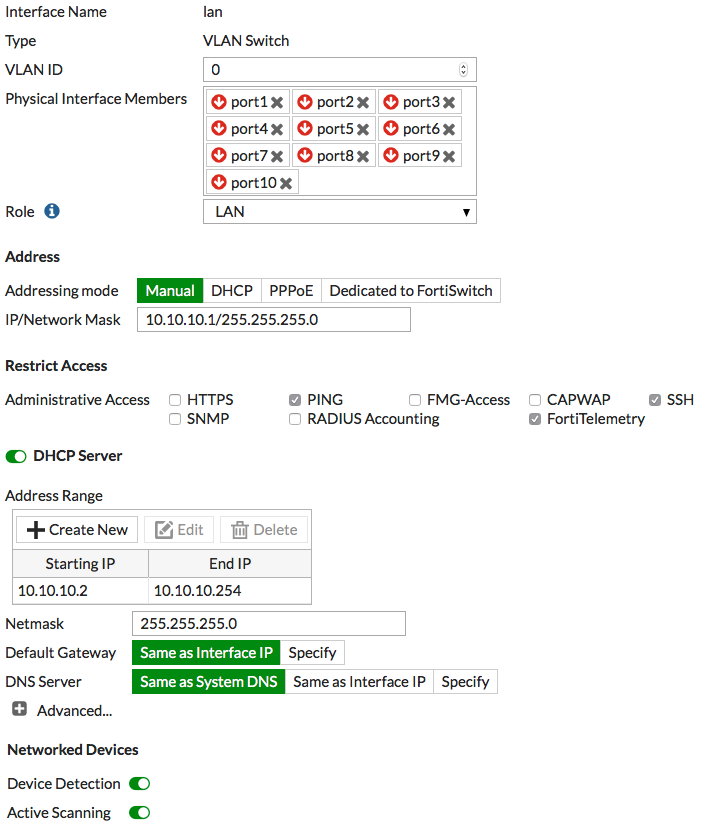
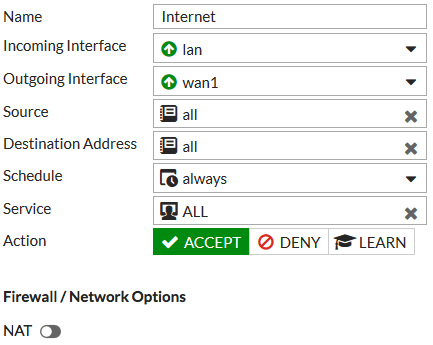
Go to Policy & Objects > IPv4 Policy and create a policy to allow users on the Accounting network to access the Internet.
Because OSPF routing will be used, make sure NAT is not enabled.
3. Installing and configuring the Marketing FortiGate
Connect and configure the Marketing FortiGate using the same method as the Accounting FortiGate. Make sure to include the following:
|
On External |
On Marketing |
|---|---|
|
|
4. Configuring OSPF routing between the FortiGates
On the External FortiGate, go to Network > OSPF. Set Router ID to 0.0.0.1 and select Apply.
Expand the Advanced Options and set Default Information to Always, to make sure the default route is broadcast from External to the ISFW FortiGates.

In Areas, select Create New. Set Area to 0.0.0.0, Type to Regular, and Authentication to None.

In Networks, select Create New. Set IP/Netmask to 192.168.10.0/255.255.255.0 (the subnet that includes Accounting's wan1) and Area to 0.0.0.0.
Create a second entry with the IP/Netmask set to 192.168.200.0/255.255.255.0 (the subnet that includes Marketing's wan1).

On the Accounting FortiGate, configure OSPF routing as shown. The Networks in this configuration are the subnet that includes Accounting's wan1 and the subnet for the Accounting Network.

In the example, the Marketing FortiGate is a 90D, a model that does not support OSPF configuration using the GUI. To add OSPF routing, use the following CLI command:
config router ospf
     set router-id 0.0.0.3
     config area
         edit 0.0.0.0
     next
 end
 config network
     edit 1
         set prefix 192.168.200.0/255.255.255.0
     next
     edit 2
         set prefix 10.10.200.0/255.255.255.0
     next
    end
end
5. Enabling the Cooperative Security Fabric
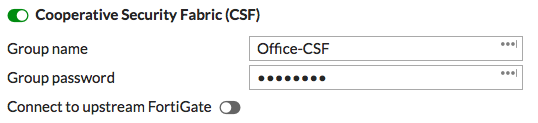
On the External FortiGate, go to System > Cooperative Security Fabric. Enable Cooperative Security Fabric(CSF) and set a Group name and Group password.
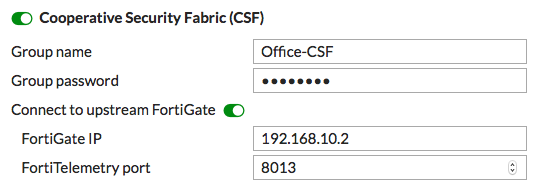
On the Accounting FortiGate, go to System > Cooperative Security Fabric. Enable Cooperative Security Fabric(CSF) and enter the name and password for the fabric.
Enable Connect to upstream FortiGate and enter the IP address of External port 10.
Configure CSF on the Marketing FortiGate, using the IP address of External port 11.
6. Results
On the External FortiGate, go to FortiView > Physical Topology.
This dashboard shows a visualization of all access layer devices in the Cooperative Security Fabric.

On the External FortiGate, go to FortiView > Logical Topology.
This dashboard displays information about the interface (logical or physical) that each device in the CSF is connected to.
Go to Monitor > Routing Monitor. You will see both ISFW FortiGates listed, using OSPF routing.

7. (Optional) Adding security profiles to the fabric
CSF configurations allow you to distribute security functions to different FortiGates in the security fabric. For example, you may want to implement virus scanning on the External FortiGate but add application control and web filtering to the ISFW FortiGates.
This results in distributed processing between the FortiGates in the CSF; reducing the load on each one. It also allows you to customize the web filtering and application control for the specific needs of the Accounting network as other internal networks may have different application control and web filtering requirements.
This configuration may result in threats getting through the External FortiGate which means you should very closely limit access to the network connections between the FortiGates in the CSF.
On the External FortiGate, go to Policy & Objects > IPv4 Policy and edit the policy allowing traffic from the Accounting FortiGate to the Internet.
Under Security Profiles, enable AntiVirus and select the default profile.
Do the same for the policy allowing traffic from the Marketing FortiGate to the Internet.

On the Accounting FortiGates, go to Policy & Objects > IPv4 Policy and edit the policy allowing traffic from the Accounting Network to the Internet.
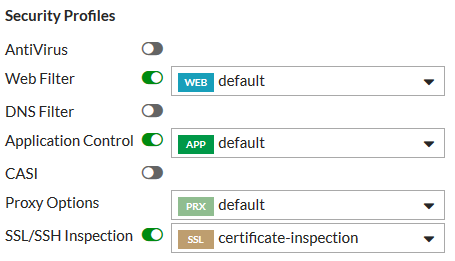
Under Security Profiles, enable Web Filter and Application Control. Select the default profiles for both.
Do the same on the Marketing FortiGate.
Another strategy you could choose is to have flow-based inspection on the External FortiGate and proxy-based inspection used by the ISFW FortiGates. For more information, see Inspecting traffic content using flow-based inspection.