
Whatʼs new
The following sections describe the new features and enhancements:
Zero Trust Network Access (ZTNA)
This section includes information about the following ZTNA new features:
Connect a ZTNA access proxy to an SSL-VPN web portal
SSL-VPN web portals can be defined in ZTNA access proxy settings. The ZTNA access proxy handles the access control processes (client certificate authentication, posture check, user authentication and authorization), and establishes the HTTPS connection between the end user and the access proxy. Then, it forwards the user to the web portal where they can use predefined bookmarks to access TCP based services like HTTPS, RDP, VNC, FTP, SFTP, SSH, Telnet, and SMB. Existing SSL-VPN portal configurations can be used.
|
|
The web portal service can only be configured in the CLI. |
To configure the SSL-VPN web portal:
- Go to VPN > SSL-VPN Portals and click Create New.
- Enter a name, for example,
test_ssl. - Disable Tunnel Mode.
- Enable Web Mode.
- Create the bookmarks:
- Under Predefined Bookmarks, click Create New.
- Enter the name of the service.
- Select the service Type.
- Enter the URL to access the service.
- Click OK.
- Repeat these steps to create other bookmarks.
- Click OK.
To configure the ZTNA access proxy:
- Configure a VIP for the ZTNA access proxy. The
ssl-certificatecan be replaced with a server certificate:config firewall vip edit "ztna_webportal" set type access-proxy set extip 172.18.62.68 set extintf "any" set server-type https set extport 4443 set ssl-certificate "*.test.com" next end
- Configure the virtual host to be used to connect to the ZTNA access proxy. The host should resolve to the VIP’s address:
config firewall access-proxy-virtual-host
	edit "webportal"
		set ssl-certificate "*.test.com"
		set host "web.test.com"
	next
end
- Configure the ZTNA access proxy to be in web portal mode:
config firewall access-proxy
	edit "ztna_webportal"
		set vip "ztna_webportal"
		set client-cert enable
		config api-gateway
			edit 1
				set url-map "/webportal"
				set service web-portal
				set virtual-host "webportal"
				set ssl-vpn-web-portal "test_ssl"
			next
		end
	next
end
- Apply the access proxy to a proxy policy (specify the ZTNA tags as needed):
config firewall policy
	edit 1
		set type access-proxy
		set name "ztna_rule"
		set proxy access-proxy
		set access-proxy "ztna_webportal"
		set srcintf "any"
		set srcaddr "all"
		set dstaddr "all"
		set ztna-ems-tag "FCTEMS8821000000_High"
		set action accept
		set schedule "always"
		set logtraffic all
		set srcaddr6 "all"
		set dstaddr6 "all"
		set utm-status enable
		set profile-type group
		set profile-group "profile group1"
		set logtraffic-start enable
	next
end
The SSL VPN bookmarks are learned by the WAD daemon and are ready to use.
- Verify the bookmarks:
# diagnose test app wad 351
[bookmark: (portal/group/name=test_ssl/gui-bookmarks/2nd HTTP)]:
	type  :1
	url   :http://httpbin.org
	host  :
	folder:
	domain:
	port  :0
[bookmark: (portal/group/name=test_ssl/gui-bookmarks/FTP)]:
	type  :4
	url   :
	host  :
	folder:172.16.200.215
	domain:
	port  :0
[bookmark: (portal/group/name=test_ssl/gui-bookmarks/HTTPS-fortinet)]:
	type  :1
	url   :https://www.fortinet.com
	host  :
	folder:
	domain:
	port  :0
[bookmark: (portal/group/name=test_ssl/gui-bookmarks/RDP)]:
	type  :9
	url   :
	host  :172.18.62.213
	folder:
	domain:
	port  :3389
			…
To test the connection:
- From the client browser, go to
https://web.test.com:4443/webportalto access the ZTNA access proxy web portal.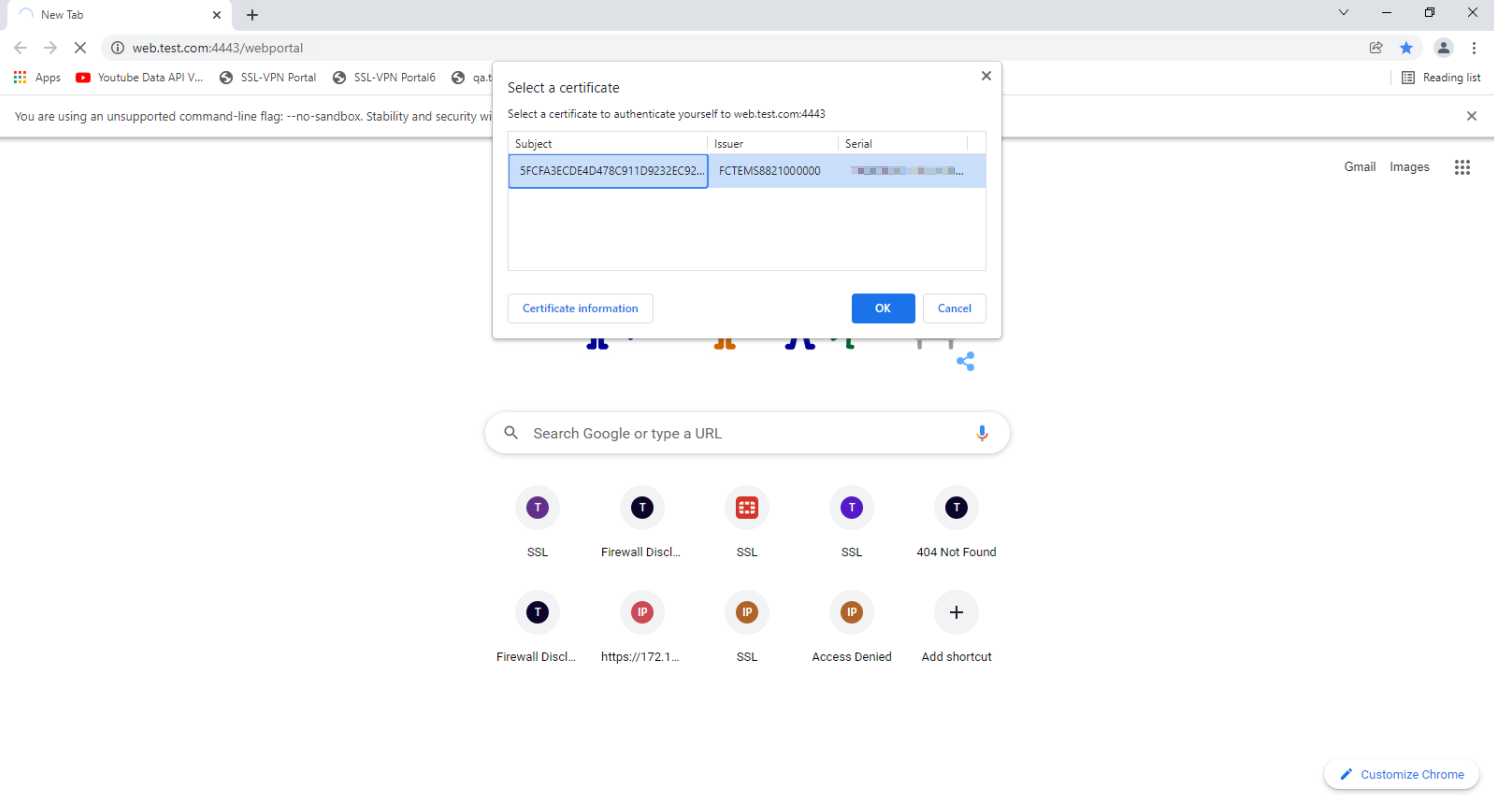
- Once the client passes the certificate check, posture check, and access is granted, the user is redirected to the web portal. The list of predefined bookmarks appears.
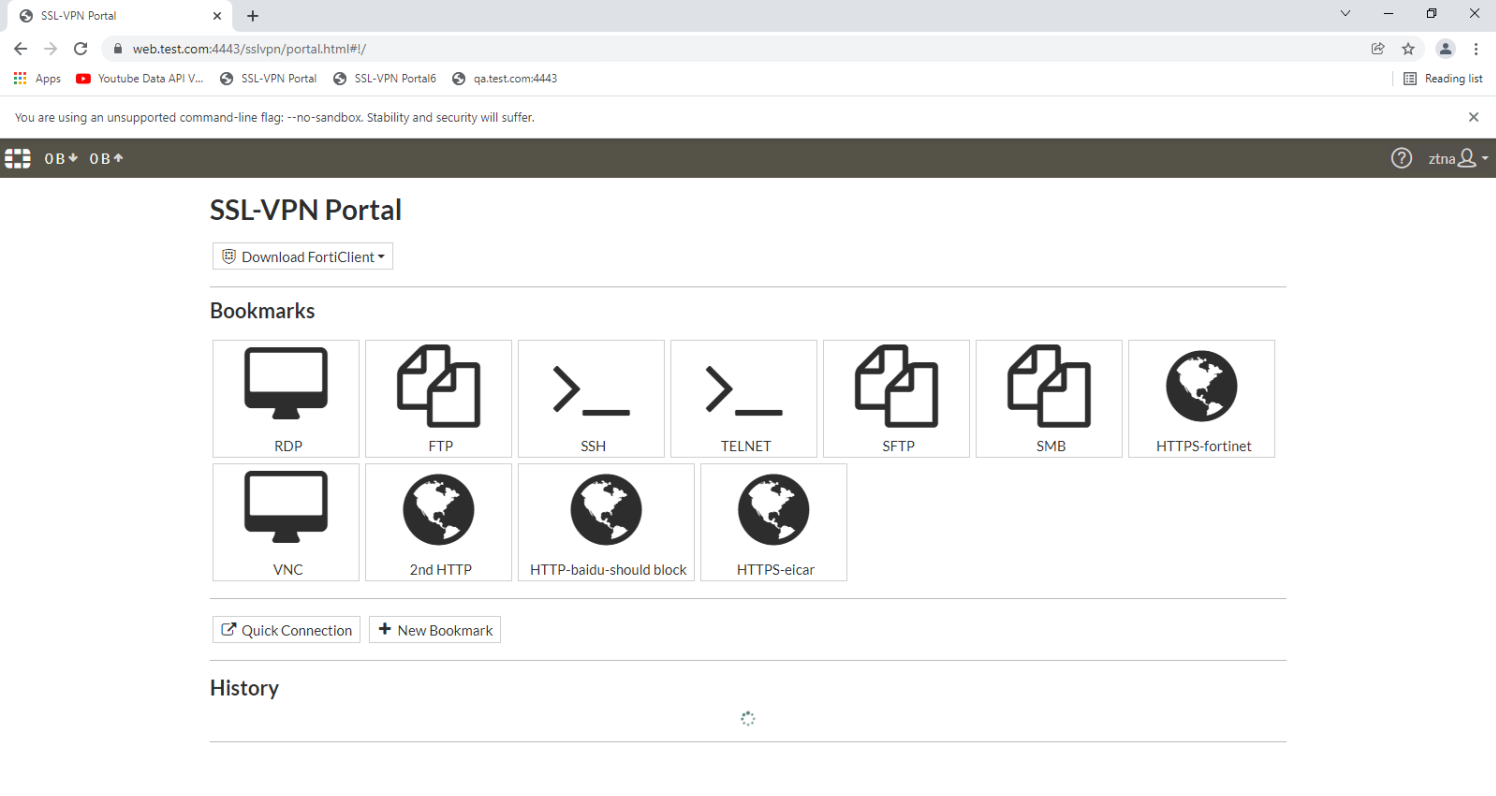
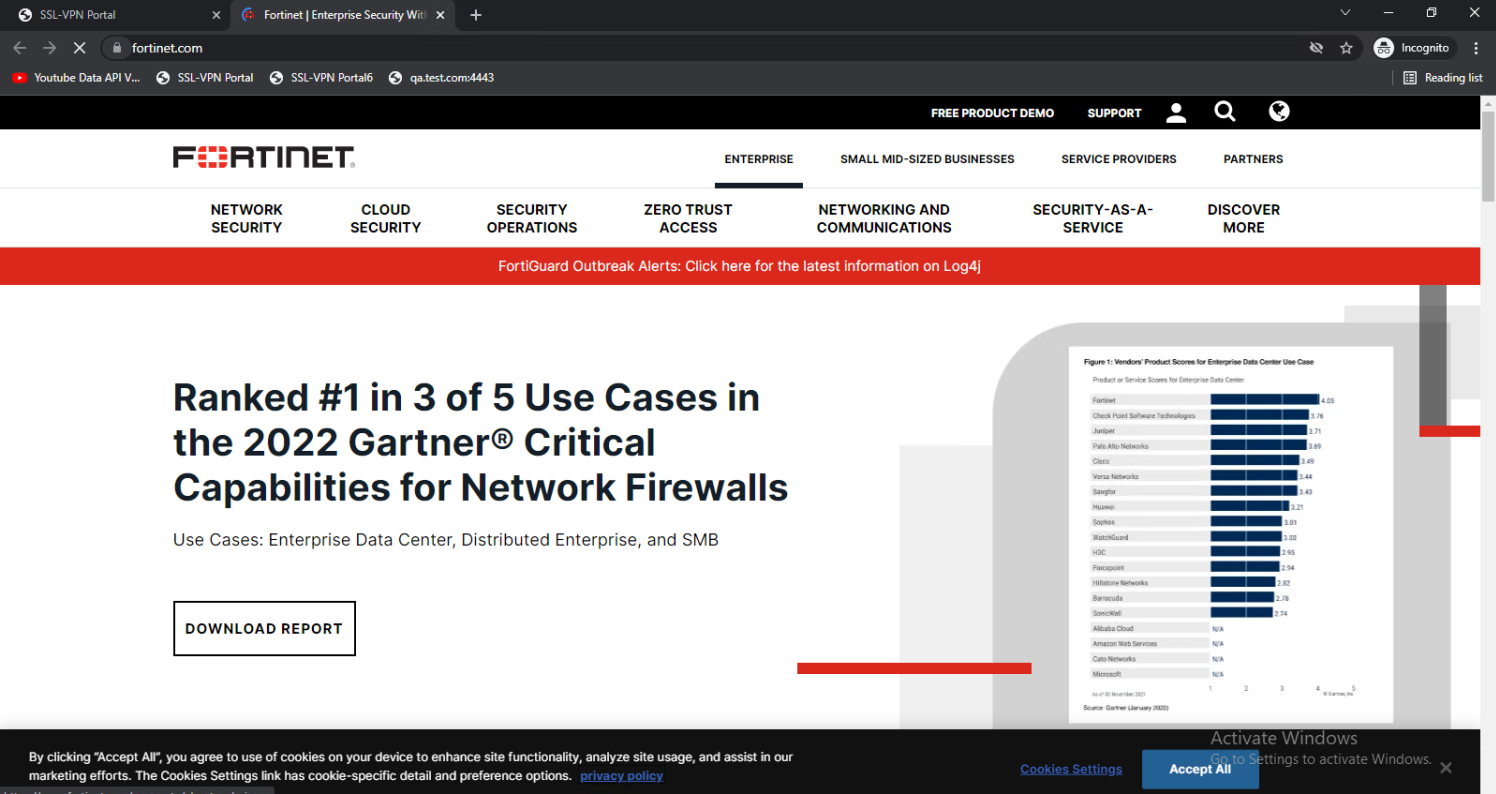
- Click a bookmark, such as HTTPS-fortinet. The website opens.
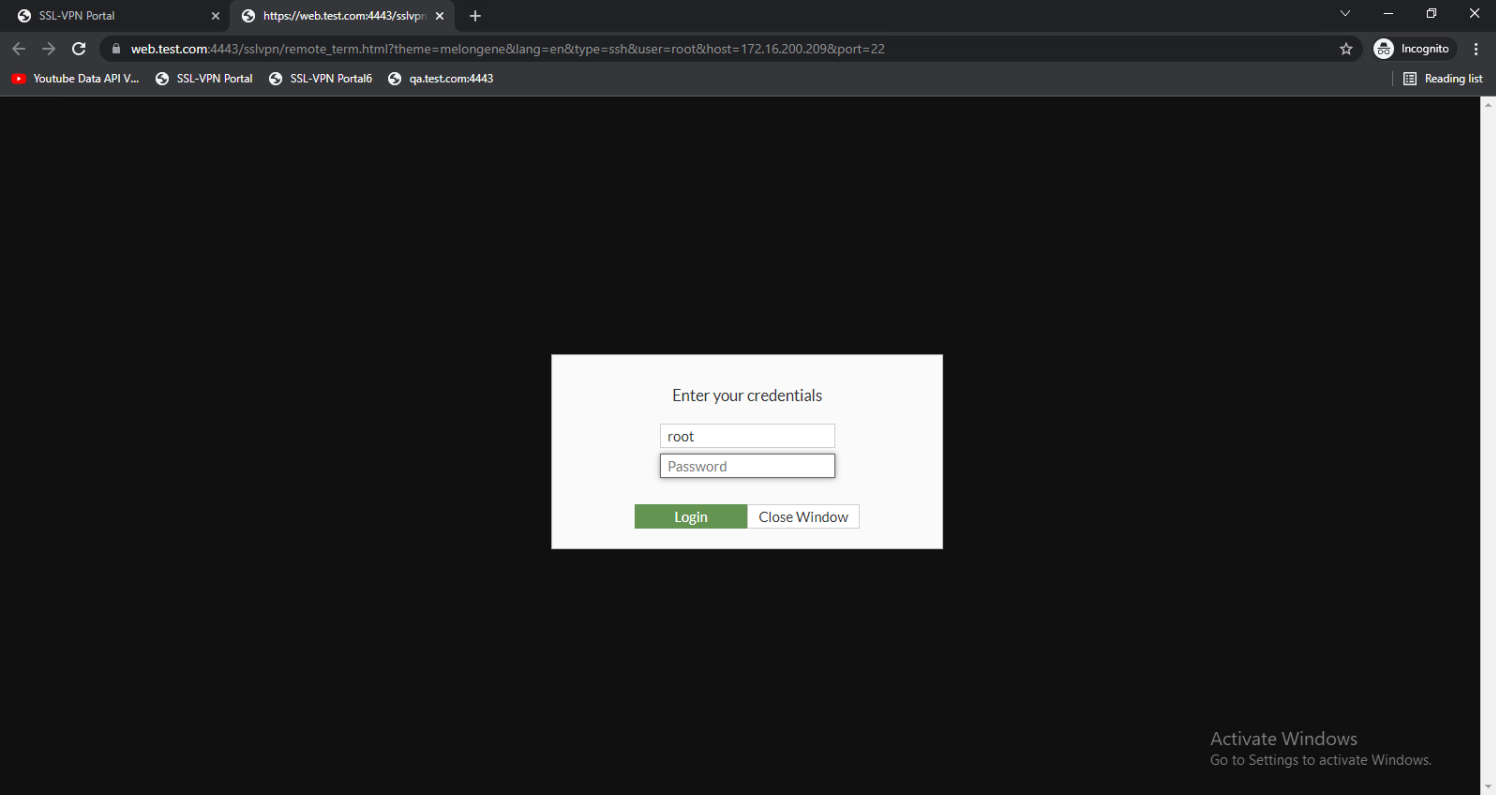
- From the web portal, click another bookmark, such as SSH. The page opens with the credential login screen to access the server.
UTM scanning on TCP forwarding access proxy traffic
UTM scanning and deep inspection is supported for multiple protocols in a ZTNA TCP forwarding access proxy. In addition to HTTP and HTTPS, the mail protocols (SMTP, IMAP, and POP3) and file sharing protocols (SMB and CIFS) are supported.
AV scanning for normal POP3, IMAP, and SMTP traffic
To configure AV scanning for normal POP3, IMAP, and SMTP traffic:
- In FortiClient, add ZTNA connection rules for the email server IP and POP3, IMAP, and SMTP ports.
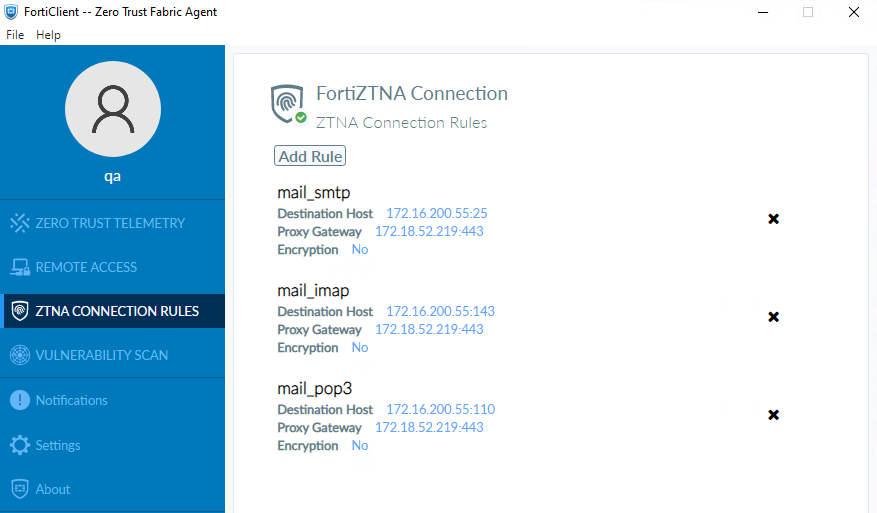
- In the FortiProxy unit, configure the ZTNA TCP forwarding server to add the email server address and enable AV profile scanning in the ZTNA rules.
- On the client PC, open Outlook app and send emails with attachments containing virus affected files.
- The ZTNA rule on the FortiProxy unit blocks the email send/receive traffic and generates AV logs.
AV deep scanning for SSL encrypted POP3S, IMAPS, and SMTPS traffic
To configure AV deep scanning for SSL encrypted POP3S, IMAPS, and SMTPS traffic:
- In FortiClient, add ZTNA connection rules for the email server IP and POP3S, IMAPS, and SMTPS ports.

- In the FortiProxy unit, configure the ZTNA TCP forwarding server to add the email server address and enable AV profile scanning in the ZTNA rules.
- On the client PC, open Outlook app and send emails with attachments containing virus affected files.
- The ZTNA rule on the FortiProxy unit blocks the email send/receive traffic and generates AV logs.
AV scanning for SMB service traffic
To configure AV scanning for SMB service traffic:
- In FortiClient, add ZTNA connection rules for the SMB file sharing server IP and ports.
- In the FortiProxy unit, configure the ZTNA TCP forwarding server to add the SMB server address and enable AV profile scanning in the ZTNA rules.
- On the client PC, upload and download virus affected files to and from the SMB server.
- The ZTNA rule on the FortiProxy unit blocks the email send/receive traffic and generates AV logs.
File filter scanning for CIFS service traffic
To configure file filter scanning for CIFS service traffic:
- In FortiClient, add ZTNA connection rules for the CIFS server IP and port.
- In the FortiProxy unit, configure the ZTNA TCP forwarding server to add the CIFA server address and enable file filter profile scanning in the ZTNA rules.
- On the client PC, upload and download predefined file types (such as .EXE) to and from the CIFS server.
- The ZTNA rule on the FortiProxy unit blocks the email send/receive traffic and generates AV logs.
Increase ZTNA and EMS tag limits
The following limits have increased for EMS server, IP addresses, and MAC addresses in EMS and ZTNA tags:
- The maximum number of EMS servers a FortiProxy unit can connect to increased from three to five.
- The maximum number of IP address an EMS tag can resolve increased from 1000 to over 100,000.
- The maximum number of MAC address an EMS tag can resolve increased from 1000 to 3000.
Use the following diagnose commands to verify address information:
# diagnose firewall fqdn <option>
|
Option |
Description |
|---|---|
|
list-ip |
List IP FQDN information. |
|
list-mac |
List MAC FQDN information. |
|
list-all |
List FQDN information. |
|
getinfo-ip |
Get information of IP FQDN address. |
|
getinfo-mac |
Get information of MAC FQDN address. |
|
get-ip |
Get and display one IP FQDN address. |
|
get-mac |
Get and display one MAC FQDN address. |
Use FQDN with ZTNA TCP forwarding access proxy
When defining ZTNA connection rules on FortiClient for TCP forwarding, it is sometimes desirable to configure the destination host address as an FQDN address instead of an IP address. Because the real servers are often servers in the corporate network, this layer of obfuscation prevents internal IP addresses from easily leaking to the public, and also makes the destination more easily recognizable by the end users.
One obstacle to overcome is getting remote hosts to resolve an internal FQDN that is typically only resolvable by an internal DNS in the corporate network. This can be solved with the following:
-
When an FQDN address is added as a destination host in a ZTNA connection rule, FortiClient creates a virtual IP address for this FQDN address and adds this to the computer’s host file (Windows). The same is true when a ZTNA connection rule entry is pushed from EMS.
-
The virtual IP address mapped to the FQDN address is not the real address of the server. It allows applications to resolve the FQDN address to this virtual IP address. FortiClient listens to any traffic destined for it and forwards the traffic using the TCP forwarding URL with FQDN to the ZTNA access proxy.
-
The FortiProxy access proxy will resolve the FQDN using the internal DNS on the corporate network, matching the traffic to the ZTNA real server configuration with the same domain and address.
-
If a valid ZTNA real server entry is found, traffic is forwarded to the real server.
This features requires a minimum FortiClient and FortiClient EMS version of 7.0.3.
To configure the TCP forwarding access proxy:
-
Go to Policy & Objects > ZTNA and select the ZTNA Servers tab.
-
Click Create New.
-
Enter a Name, such as
ZTNA_S1. -
Configure the network settings:
-
Set External interface to any.
-
Set External IP to 172.18.62.32.
-
Set External port to 443.
-
-
Select the Default certificate. Clients will be presented with this certificate when they connect to the access proxy VIP.
-
Add server mapping:
-
In the Service/server mapping table, click Create New.
-
For Service, select TCP Forwarding.
-
Add a server:
-
In the Servers table, click Create New.
-
Create a new FQDN address for the HTTPS server at
s27.qa.fortinet.comand then click OK. -
Apply the new address object as the address for the new server.
-
Click OK.
-
-
Add another server using the same steps for
s29.qa.fortinet.com.
-
-
Click OK. Now that the ZTNA server is complete, the domain settings must be configured in the CLI to map domains to the real servers.
To map domains to the real servers:
config firewall access-proxy
	edit "ZTNA_S1"
		set vip "ZTNA_S1"
		set client-cert enable
		config api-gateway
			edit 2
				set url-map "/tcp"
				set service tcp-forwarding
				config realservers
					edit 4
						set address "s27.qa.fortinet.com"
						set domain "qa.fortinet.com"
					next
					edit 5
						set address "s29.qa.fortinet.com"
						set domain "qa.fortinet.com"
					next
				end
			next
		end
	next
end
To configure the ZTNA rule:
-
Go to Policy & Objects > ZTNA and select the ZTNA Rules tab.
-
Click Create New.
-
Set Name to ZTNA_TCP.
-
Set Incoming Interface to port2.
-
Set Source to all.
-
Select the ZTNA server ZTNA_S1.
-
Configure the remaining options as needed.
-
Click OK.
To configure the DNS entries for each server:
-
Enable the DNS database visibility:
-
Go to System > Feature Visibility.
-
Enable DNS Database.
-
Click Apply.
-
-
Go to Network > DNS Service. Under DNS Database, click Create New.
-
Set DNS Zone to ZTNA.
-
Set Domain Name to qa.fortinet.com.
-
Add the DNS entries:
-
Under DNS Entries, click Create New.
-
Set Hostname to s27.
-
Set IP Address to the HTTPS server address.
-
Click OK.
-
Add another DNS entry using the same steps for the s29.qa.fortinet.com HTTP server.
-
-
Click OK.
Testing the connection to the access proxy
Before connecting, users must have a ZTNA connection rule in FortiClient.
|
|
ZTNA TCP forwarding rules can be provisioned from the EMS server. See Provisioning ZTNA TCP forwarding rules via EMS for more details. |
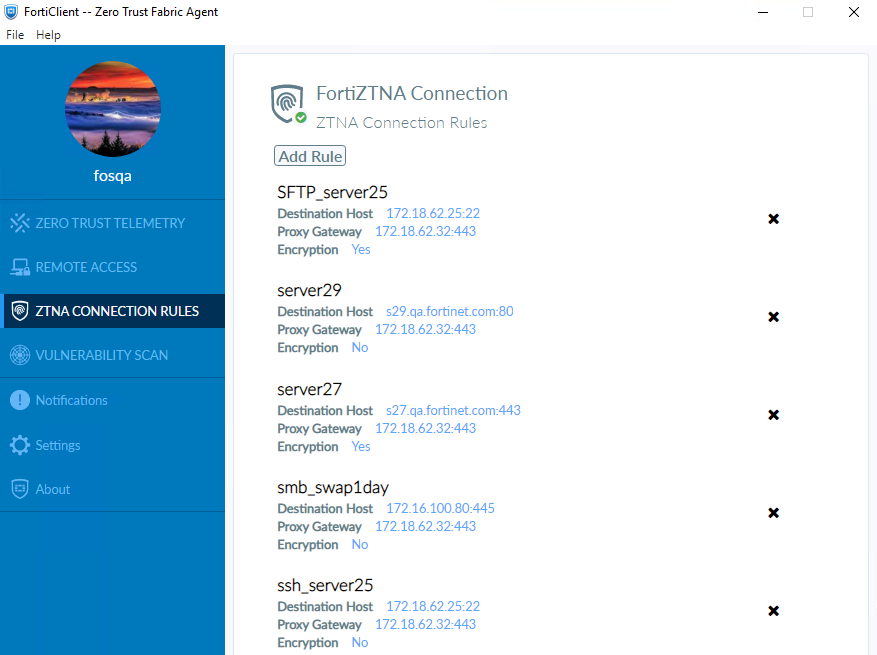
To create the ZTNA rules in FortiClient and connect:
-
From the ZTNA Connection Rules tab, click Add Rule.
-
Create a rule for the HTTPS server:
-
Set Rule Name to server27.
-
Set Destination Host to s27.qa.fortinet.com:443.
-
Set Proxy Gateway to 172.18.62.32:443.
-
Disable Encryption.
-
Click Create.
-
-
Create a rule for the HTTP server:
-
Set Rule Name to server29.
-
Set Destination Host to s29.qa.fortinet.com:80.
-
Set Proxy Gateway to 172.18.62.32:443.
-
Disable Encryption.
-
Click Create.
-
-
Upon creating the ZTNA rules, two new entries are added to the Windows PC’s host file in folder C:\Windows\System32\drivers\etc. View the file, and observe the new entries for the virtual IP and FQDN pairing for each ZTNA connection rule.
# ----- FORTICLIENT ZTNA VIP START -----
10.235.0.1 s27.qa.fortinet.com
10.235.0.2 s29.qa.fortinet.com
# ----- FORTICLIENT ZTNA VIP END -----
-
The Windows PC now resolves the FQDNs to the virtual IPs, and FortiClient will listen to the traffic to these IPs and forward them to the TCP access proxy.
-
Have the remote user connect to the HTTPS and HTTP servers on a browser. After device verification, the user is able to successfully connect to the remote servers.
Display EMS ZTNA and endpoint tags in user widgets and Asset Identity Center
EMS ZTNA and endpoint tags are displayed in the Device Inventory widget, FortiClient widget, and the Asset Identity Center page. In the backend, EMS ZTNA tags, endpoint tags, and EMS serial numbers have been added to the user device query API and response.
|
|
The ZTNA tag name can be used as a search criterion in the Asset view of the Asset Identity Center page. |
FQDNs supported for ZTNA TCP forwarding
Fully qualified domain names (FQDNs) can now be used for ZTNA TCP forwarding.
SSL VPN
This section includes information about the following SSL-VPN new features:
WebSocket SSL-VPN tunnel support
The WebSocket SSL-VPN tunnel is now supported for the Chromebook plugin. Only version 13 of the SEC WebSocket protocol is supported.
Azure Active Directory supported for the LDAP authentication source
You can now authenticate user credentials on the FortiProxy unit with Azure Active Directory (AD) services.
REST API
This section includes information about the following REST API new features:
Log REST API events
The REST API events log subtype logs POST, PUT, DELETE, and GET REST API requests. Logs can be viewed under Log & Report > Events > REST API Events after REST API events logging has been enabled in the CLI.
To enable REST API events logging in the CLI:
config log setting
	set rest-api-set {enable | disable}
	set rest-api-get {enable | disable}
end
|
rest-api-set {enable | disable} |
Enable/disable logging of POST, PUT, and DELETE REST API requests. |
|
rest-api-get {enable | disable} |
Enable/disable logging of GET REST API requests. |
Replace FSSO-based FortiNAC tag connector with REST API
A new REST API endpoint in both FortiNAC and FortiProxy is used by FortiNAC to send user logon and logoff information to the FortiProxy unit. The new FortiNAC tag dynamic firewall address type is used to store the device IP, FortiNAC firewall tags, and FortiNAC group information sent from FortiNAC by the REST API when user logon and logoff events are registered.
REST API filter standardization
The following API endpoints now use the same filtering as the /api/v2/cmdb/ endpoints:
-
/api/v2/monitor/fortiview/statistics -
/api/v2/monitor/user/device/query
Other new features and enhancements
This section includes information about the following new features and enhancements:
-
Implicit enforcement of deep inspection for user friendly policy matching
-
Migrating FortiToken Mobile users from the FortiProxy unit to FortiToken Cloud
Implicit enforcement of deep inspection for user friendly policy matching
When the HTTP CONNECT request or the Transport Layer Security (TLS) server name indication (SNI) partially matches a policy with deep inspection is enabled, deep inspection of the policy is enforced with the HTTPS traffic.
Monitoring the status of the PSUs
A log message is generated if a FortiProxy power supply unit (PSU) loses or regains power.
NOTE: This feature is available only for the FortiProxy 2000E and 4000E models.
Limiting the access of nondomain users
-
You can now limit the access of nondomain users while using proxy authentication. To do so:
- Use the negotiate authentication scheme.
- Disable NTLM negotiation.
For example:
config authentication scheme
edit "negotiateonly"
set method negotiate
set negotiate-ntlm disable
set kerberos-keytab "fpx45.dev.fgt.com"
next
end
config authentication rule
edit "negotiaterule"
set srcaddr "all"
set dstaddr "all"
set srcaddr6 "all"
set active-auth-method "negotiateonly"
next
end
Migrating FortiToken Mobile users from the FortiProxy unit to FortiToken Cloud
The execute fortitoken-cloud migrate-ftm <license> <vdom> command allows the migration of FortiToken Mobile users from the FortiProxy unit to FortiToken Cloud. The FortiToken Cloud account must be using a time-based subscription license. A request must be made to Fortinet Customer Service to initiate and pre-authorize the transfer. All current active FortiToken Mobile users will be migrated to the FortiToken Cloud license with no changes to the FortiToken Mobile serial number. The FortiProxy user or administrator's two-factor setting is automatically converted from fortitoken to fortitoken-cloud. After migration, end users will be able to authenticate as before without any changes to their FortiToken mobile app.
Use DNS over TLS for default FortiGuard DNS servers
When using FortiGuard servers for DNS, the FortiProxy unit defaults to using DNS over TLS (DoT) to secure the DNS traffic. New FortiGuard DNS servers are added as primary and secondary servers.
|
|
Because DNS servers probably do not support low encryption DES, low encryption devices do not have the option to select DoT or DoH. The devices default to cleartext (UDP/53) instead. |
The FortiGuard DNS server certificates are signed with the globalsdns.fortinet.net hostname by a public CA. The FortiProxy unit verifies the server hostname using the server-hostname setting.
|
|
When upgrading to 7.0.2, the FortiGuard servers are updated to the new defaults. |
To view the FortiGuard server DNS settings in the GUI:
- Go to Network > DNS Settings.
- For DNS servers, select Use FortiGuard Servers. The Primary DNS server is 96.45.45.45, and the Secondary DNS server is 96.45.46.46. DNS Protocols is set to TLS and cannot be modified.
To view the FortiGuard server DNS settings in the CLI:
# show system dns
config system dns
	set primary 96.45.45.45
	set secondary 96.45.46.46
	set protocol dot
	set server-hostname "globalsdns.fortinet.net"
end
|
|
The |
Add real-time FortiView monitors for proxy traffic
The following real-time FortiView monitors have been added for proxy traffic: FortiView Proxy Destinations, FortiView Proxy Sessions, and FortiView Proxy Sources. Proxy policy sessions are no longer shown in the FortiView Policies and FortiView Applications monitors.
Prerequisites:
- Configure an explicit proxy and proxy policy.
- Change the network settings on the client PC to use the FortiProxy unit as the proxy.
- Generate web traffic on the client PC.
To add the proxy traffic related widgets:
- Go to Dashboard > Status and click Add Widget.
- In the FortiView section, click the + beside one or all of the following:
- FortiView Proxy Destinations
- FortiView Proxy Sessions
- FortiView Proxy Sources
- Click Add Widget. The widgets are added to the dashboard.
- Double-click or right-click an entry in a monitor and select Drill Down to Details to view additional information about the selected traffic activity.
Process monitor
The Process Monitor displays running processes with their CPU and memory usage levels. Administrators can sort, filter, and terminate processes within the Process Monitor pane.
To access the process monitor:
- Go to Dashboard > Status:
- Left-click in the CPU or Memory widget and select Process Monitor.
Click the user name in the upper right-hand corner of the screen, then go to System > Process Monitor.
The Process Monitor appears, which includes a line graph, donut chart, and process list.
- Click the + beside the search bar to view which columns can be filtered.
To kill a process within the process monitor:
- Select a process.
- Click the Kill Process dropdown.
- Select one of the following options:
-
Kill: the standard kill option that produces one line in the crash log (
diagnose debug crashlog read). -
Force Kill: the equivalent to
diagnose sys kill 9 <pid>. This can be viewed in the crash log. -
Kill & Trace: the equivalent to
diagnose sys kill 11 <pid>. This generates a longer crash log and backtrace. A crash log is displayed afterward.
-
Kill: the standard kill option that produces one line in the crash log (
Add WebSocket for Security Fabric events
With the WebSocket for Security Fabric events, subscribers to the WebSocket (such as the Fabric Management page) are updated upon new Fabric events and alert users to reload the page.