
What's new
The following sections describe new features and enhancements:
Browser isolation
Client-based native browser isolation (NBI) uses a Docker container to isolate the browser from the rest of the computer. As browsers are one of the biggest windows to external networks, they are one of the biggest attack vectors. Isolating, or sandboxing, the browser in a container helps decrease the attack surface.
The endpoint must use FortiProxy as the network gateway for the internet. The FortiNBI installer installs the Chrome browser extension, a Docker image with a preloaded Chrome browser, a local server to invoke the dockerized browser instance, and a GUI for monitoring the status of the components and changing the IP address of the FortiProxy that it is connecting to.
The browser extension monitors each browser tab, and reports every new tab invocation to FortiProxy over the communication channel that it maintains, with FortiProxy acting as a secure web gateway.
Browser isolation is currently supported on Microsoft Windows 10 in Google Chrome and requires the new Isolator license.
For more information, see Browser isolation.
To configure browser isolation:
-
Configure an HTTP portal for the client to download the isolator image.
-
Enable and configure Captive Portal in the Proxy authentication settings.
-
Enable captive portal on the interface.
-
Configure a firewall proxy address.
-
Configure an isolator profile that uses the proxy address.
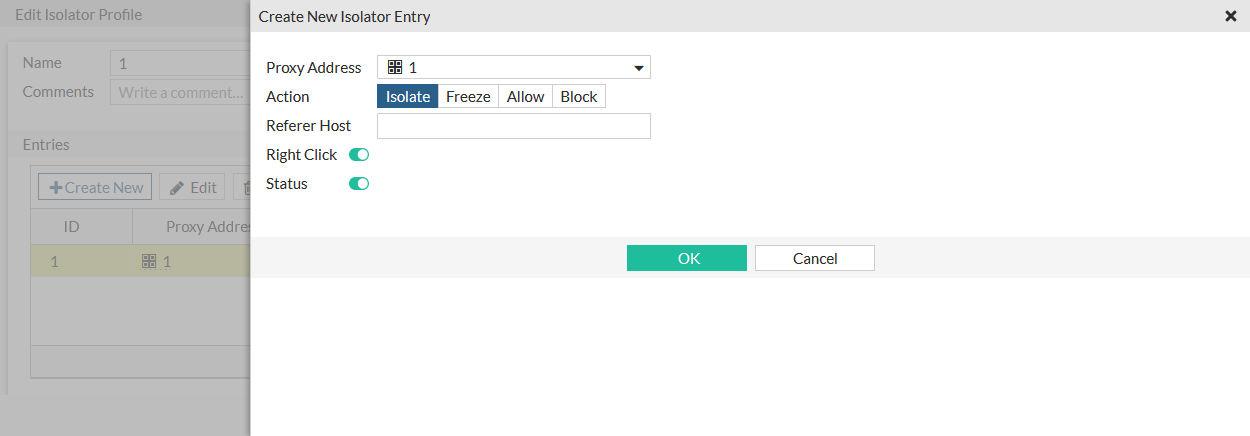
-
Configure an SSL/SSH profile.
-
Configure a firewall policy that uses the isolator and SSL/SSH profiles.
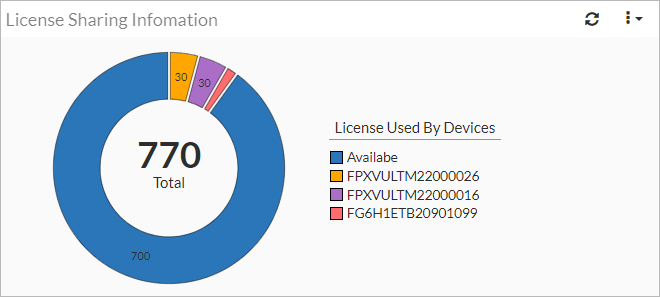
License sharing
Seat licenses can be shared across multiple units (hardware and VM), while the license limit is maintained for each unit. A cluster is created that licenses are shared in. The primary FortiProxy manages the licenses, and can then share them with multiple other units. When a member joins the cluster, its associated entitlements are added to the license pool.
For more information, see the FortiProxy 7.2 License Sharing Guide.
To enable license sharing:
config system csf
    set status enable
    set group-name <string>
    set downstream-access enable
    set license-sharing enable
    ...
end
The License Sharing Information widget shows the total number of available licenses, and the numbers used by the devices in the license pool.
HA license sharing behavior change
In HA active-passive mode, FortiProxy 7.2.0 shares all available seats (as opposed to 50% of available seats in previous versions) among the HA cluster (hardware and VM) by default. With this change, seat license variation across HA devices is no longer a concern in case of failure.
The primary FortiProxy unit automatically claims all license entitlements from all members in the HA cluster (hardware or VM). When a member joins the cluster, its associated entitlements are added to the primary unit. When a member leaves the cluster, its associated entitlements are removed from the primary unit. When the primary unit goes down, the secondary device with the highest priority becomes the primary and assumes all the license entitlements.
VDOM support
Virtual Domains (VDOMs) are used to divide a single FortiProxy into two or more virtual units that function independently. VDOMs can provide separate firewall policies and security profiles. In NAT mode, they provide separate routing configurations. When multi VDOM mode is enabled, the default VDOM is the root VDOM, and it cannot be deleted.
Multiple VDOMs allow users to combine NAT and transparent mode on a single FortiProxy; VDOMs can be independently configured to operate in NAT or transparent mode.
By default, FortiProxy hardware and VM devices support 5 VDOMs; a license key can be purchased to increase the maximum number.
For more information, see Virtual domains in the FortiProxy Administration guide, and the FortiProxy data sheet.
Correlation log support
Under Log & Report, you can now view correlation log which shows the correlation of forward traffic log(s) and HTTP transaction log(s) that have a common session ID.
VXLAN support
FortiProxy supports VXLAN.
To configure VXLAN:
config system vxlan
    edit <name>
        set interface <interface>
        set vni <vxlan_network_id>
        set ip-version {ipv4_unicast | ipv6_unicast}
        set remote-ip <ipv4_address>
        set remote-ip6 <ipv6_address>
        set dstport <port>
    next
end
|
interface <interface> |
Outgoing interface for VXLAN encapsulated traffic. |
|
vni <vxlan_network_id> |
VXLAN network ID (default = 0). |
|
ip-version {ipv4_unicast | ipv6_unicast} |
The IP address version to use for the VXLAN interface, and for communication over the VXLAN (default = ipv4_unicast). |
|
remote-ip <ip_address> remote-ip6 <ipv6_address> |
The IPv4 or IPv6 address of the VXLAN interface on the device at the remote end of the VXLAN. |
|
dstport <port> |
The VXLAN destination port (1 - 65535, default = 4789). |
To view the VXLAN forwarding database list for an interface:
diagnose sys vxlan fdb list <interface>
Certificate validation for external resources
Certification is verified before fetching data from the external connectors that have SSL enabled.
To configure certificate verification:
config system external-resource
    edit "test"
        set server-identity-check {none | basic | full}
    next
end
|
none |
No certificate verification (default). |
|
basic |
Check server certificate only. |
|
full |
Check server certificate and domain match server certificate. |
Detect HTTPS in HTTP request
In an explicit web proxy, you can enable detecting SSL in the HTTP request line. When enabled, HTTP get/post requests sent to the FortiProxy will be passed instead of blocked.
To enable detecting SSL in the HTTP request line:
config web-proxy explicit-proxy
    edit "web-proxy"
        set status enable
        set interface "any"
        set http-incoming-port 8080
        set detect-https-in-http-request enable
    next
end
Auto-script password encryption
When configuring an automatic script, the new password attribute can be set. It will replace the password in the script when the script uses the %%PASSWD%% tag. When the configuration is downloaded or viewed in the CLI, the password is encrypted.
To configure then view an automatic script with a password:
-
Configure the automatic script:
config system auto-script edit "autobackup" set interval 60 set repeat 0 set start auto set script "execute backup config sftp 10.0.0.1 admin %%PASSWD%% /home/user/proxy.config" set password 1234567890 next end -
View the script:
# show system auto-script
config system auto-script
    edit "autobackup"
        set interval 60
        set repeat 0
        set start auto
        set script "execute backup config sftp 10.0.0.1 admin %%PASSWD%% /home/user/proxy.config"
        set password ENC Dz6s2235D+GkaND0zptzOUQH2ptR2M4v5VEP3v3/NvB2So/yBat/tUGEavP71pUdn38HKFXUPeZ802C8+exOjDatMSo5YVebkkDnL01J4EtGzcrJuQKl97+ekrHXMzkyxA/yxtkKURuVBlhKRqBFn03DleaR7vcbj4HnLLIY73WRI018NDfPgOS3non02OqfFv9Oew==
    next
end
The password is encrypted.
Automation stitches
Automation stitches automate the activities between the different components in the Security Fabric, which decreases the response times to security events. Events from any source in the Security Fabric can be monitored, and action responses can be set up to any destination. Automation stitches can only be created on the root device in a Security Fabric. Automation stitches can also be used on FortiProxy devices that are not part of a Security Fabric.
An automation stitch consists of two parts: the trigger and the actions. The trigger is the condition or event on the FortiProxy that activates the action, for example, a specific log, or a failed log in attempt. The action is what the FortiProxy does in response to the trigger.
Automation stitches that use cloud-based actions (AWS Lambda, Azure Function, Google Cloud Function, and AliCloud Function) have the option to delay an action after the previous action is completed.
Diagnose commands are available in the CLI to test, log, and display the stitch history and settings.
Go to Security Fabric > Automation to configure automation stitches, triggers, and actions. On the Security Fabric > Automation page, there are tabs for Stitch, Trigger, and Action. The Stitch tab is the default view that lists the trigger and actions used in each stitch. Individual triggers and actions can be created or edited in the corresponding tabs.
For details about configuring automation stitches, see Automation stitches in the FortiProxy Administration guide.
Remove quotes from external resource
When a URL is entered for an external resource, the leading and tailing quote strings are automatically removed from the URL. This includes the following characters: ", ', &39;, &34;, and &96;.
For example: "https://docs.fortinet.com"
will be changed to: https://docs.fortinet.com.