


Role
Roles or access profiles define what a user can do when logged into FortiPAM.
When a new user is created, it must have a specific role. See Creating a user.
|
|
When you create a standard user, a default normal user role is assigned to the new user automatically. |
|
|
When setting up an administrator, administrator roles can be selected from the Choose an Adminstrator Role dropdown. See Creating a user. The administrator role decides what the administrator can see. |
Go to Roles in User Management to see a list of configured roles.

There are five default roles:
|
|
Default roles cannot be edited. |
-
Default Administrator: Read/write access same as a super administrator, but no access to maintenance mode and glass breaking.
-
Guest User: For demonstration purposes only. Guest users can only view secrets and have restricted access to FortiPAM features.
-
Power User: For managing general secret settings, e.g., a power user can change who approves secrets, commands blocked on the target server, etc.
-
Standard User: Logs in, makes requests for resources, and connect to the privileged resources.

Users with Standard User role do not have the privilege to manage FortiPAM devices.
-
Super Administrator: Privilege to manage and monitor the FortiPAM device.
Users with Super Administrator role also include privilege of secret server.
-
The Roles tab contains the following options:
Create
Select to create a new role.
Edit
Select to edit the selected role.
Delete
Select to delete the selected roles.
Search
Enter a search term in the search field, then hit
Enterto search the roles list. To narrow down your search, see Column filter.
To create a role:
-
Go to User Management > Role, and select Create.
The Secret tab in the New User Role window opens.

Pages and features are organized and separated into different access controls.
There are two types of access controls:
- Radio: Provides None, Read, and Read/Write access.
Switch: Enable/disable a feature.
For each feature, select from the following access levels:
- None
-
Read: View access.
Note: When an administrator has only read access to a feature, the administrator can access the GUI page and can use the
getandshowCLI command for that feature, but cannot make changes to the configuration. -
Read/Write: View, change, and execute access.
Name | The name of the role. | ||
Comment | Optionally, enter comments about the role. | ||
Secret Select None, Read, or Read/Write to set access level globally for all the secret features. | |||
| Set the access level for Secret list page. It also controls whether pages: Secret Templates, Policies and Launchers can be viewed. | ||
| Set the access level for Folders. Note: You can restrict the corresponding folder and secret permissions under a specific secret. | ||
| Permission to create folders in Root. Note: The Secret Folder must be set to at least Read permission to enable accessing the root folder. | ||
| Set the access level for SSH Filter Profiles page. | ||
| Set the access level for Jobs List page. | ||
| Set the access level for My Request and Request Review page in Approval Request. | ||
| Set the access level for Approval Profile page in Approval Flow. | ||
| Set the access level for Password Changers page in Password Changing. | ||
| Set the access level for Character Sets page in Password Changing. | ||
| Set the access level for Password Policies page in Password Changing. | ||
| Enable/disable creating a personal folder right after the user is created. Note: The Secret Folder permission must be Read/Write. | ||
| Enable/disable editing the Secret Templates page. | ||
| Enable/disable editing the Policies page. | ||
| Enable/disable editing the Secret Launchers page. | ||
| Enable/disable viewing the secret password, passphrase, and ssh-key. Note: Secret List must be set to Read/Write permission to view the encrypted secret information. | ||
| Enable/disable permitting file transfer. | ||
The User Management tab opens.

User Management Select None, Read, or Read/Write to set access level globally for all the user management features. | |||||
| Set the access level for the User Definition page in User Management and the Backup page in System. | ||||
| Set the access level for User Groups page in User Management. Note: Ldap Servers, Saml Single Sign-On, and Radius Servers must be set to at least Read permission to access User Groups. | ||||
| Set the access level for Role page in User Management. | ||||
| Set the access level for Ldap Servers page in User Management. Note: Scheme & Rules must be set to at least Read permission to access LDAP servers. | ||||
| Set the access level for Saml Single Sign-On page in User Management. Note: Addresses and Scheme & Rules must be set to at least Read permission to access SAML servers. | ||||
| Set the access level for Radius Servers page in User Management. Note: Scheme & Rules must be set to at least Read permission to access RADIUS servers. | ||||
| Set the access level for Schedule page in User Management. | ||||
Authentication Select None, Read, or Read/Write to set access level globally for all the authentication features. | |||||
| Set the access level for Addresses page in Authentication. | ||||
| Set the access level for Scheme & Rules page in Authentication. Note: This requires the Write permission to User Groups, Ldap Servers, Saml Single Sign-On, and Radius Servers. | ||||
| Set the access level for ZTNA page in System. Note: This requires the same permission as Schedule and Addresses. Examples
| ||||
| Enable/disable CLI access. Note: The Administrator Users must be set to Write permission to have CLI access. | ||||
| Enable/disable access to diagnostic CLI commands. Note: System Configuration must be set to Write permission to manage system certificates.
| ||||
| Enable/disable permission to use firmware upgrades and configuration backup features. | ||||
The System & Network tab opens.

System Select None, Read, or Read/Write to set access level globally for all the system features. | |||
| Set the access level for:
| ||
| Set the access level for FortiGuard page from Dashboard. The System Configuration is set to Write to have access to the FortiGuard page. | ||
| Set the access level for Email Alert Settings and Log Settings in Log & Report. Note:
| ||
Network Select None, Read, or Read/Write to set access level globally for all the network features. | |||
| Set the access level for Interfaces page in Network. | ||
| Set the access level for Packet Capture page in Network. | ||
| Set the access level for Static Routes page in Network. | ||
| Set the access level for FortiAnalyzer Logging card on the Fabric Connectors page in Security Fabric. | ||
| Set the access level for FortiClient EMS card on the Fabric Connectors page in Security Fabric and ZTNA Tags in System > ZTNA. | ||
| Enable/disable accessing the Certificates page in System. Note: System Configuration must have the Write permission. | ||
The Admin Settings tab opens.
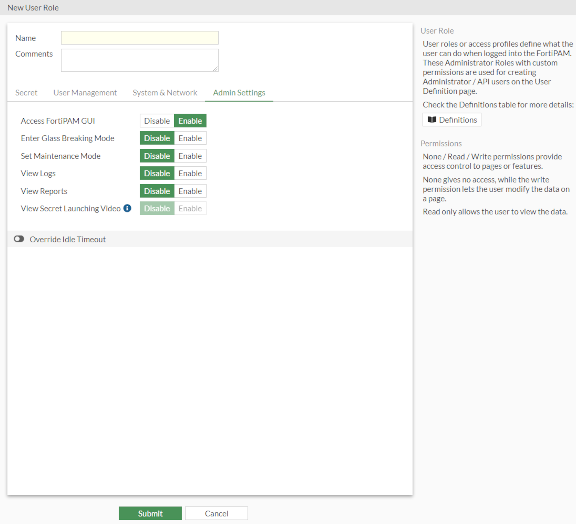
Access FortiPAM GUI | Enable/disable accessing FortiPAM GUI. | ||
| Enter Glass Breaking Mode | Enable/disable glass breaking mode. Note: The glass breaking mode gives you access to all secrets in the system. | ||
Set Maintenance Mode | Enable/disable maintenance mode. Note: Suspend all critical processes to allow maintenance related activities. | ||
View Logs | Enable/disable viewing Events, Secrets, ZTNA, and SSH logs in Log & Report. | ||
View Reports | Enable/disable viewing Reports in Log & Report. | ||
View Secret Launching Video | Enable/disable viewing playback videos in Secret Video. Note: View Logs must be enabled since the secret videos are available in Log & Report > Secret page. | ||
Override Idle Timeout Enable to override the idle timeout. | |||
| Enable to never timeout. Note: The option is disabled by default. | ||
| Set the time after which the user with the role goes offline, in minutes (1 - 480, default = 10). | ||
|
|
Alternatively, you can also use the CLI to create roles. |
CLI configuration to set up a user role example:
config system accprofile
edit "Default Administrator"
set secfabgrp read-write
set ftviewgrp read-write
set authgrp read-write
set sysgrp read-write
set netgrp read-write
set loggrp read-write
set fwgrp read-write
set vpngrp read-write
set utmgrp read-write
set wanoptgrp read-write
set secretgrp read-write
set cli enable
set system-diagnostics enable
next
edit "pam_standard_user"
set secfabgrp read
set ftviewgrp read
set authgrp read
set secretgrp custom
set system-diagnostics disable
config secretgrp-permission
set launcher read
set pwd-changer read
set template read-write
set secret-policy read
set request read-write
set folder-table read-write
set secret-table read-write
set create-personal-folder read-write
end
next