


System information widget
The system dashboard includes a System Information widget, which displays the current status of FortiPAM and enables you to configure basic system settings.
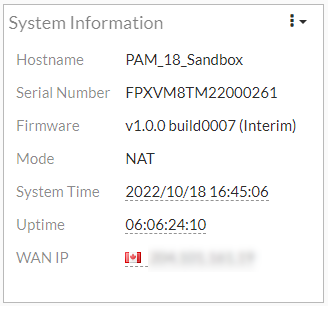
The following information is available on this widget:
|
Host Name |
The identifying name assigned to this FortiPAM unit. For more information, see Changing the host name. |
||
|
Serial Number |
The serial number of FortiPAM.
|
||
|
Firmware |
The version and build number of the firmware installed on FortiPAM. To update the firmware, you must download the latest version from FortiCloud. See Uploading a firmware. |
||
|
Mode |
The current operating mode of the FortiPAM unit.
|
||
|
System Time |
The current date and time according to the FortiPAM unit's internal clock. For more information, see Configuring the system date, time, and time zone. |
||
|
Uptime |
The duration of time FortiPAM has been running since it was last started or restarted. |
||
|
WAN IP |
The WAN IP address and location. Additionally, if the WAN IP is blocked in the FortiGuard server, there is a notification in the notification area, located in the upper right-hand corner of the Dashboard. Clicking on the notification opens a window with the relevant blocklist information. |
Changing the host name
The System Information widget displays the full host name.
To change the host name:
- Go to Dashboard > Status.
-
Select the System Information widget and then click Configure settings in System > Settings.
The System Settings window opens.
- In System Settings, update the host name in Host name.
- Click Apply.
Configuring the system date, time, and time zone
You can either manually set the FortiPAM system date and time, or configure the FortiPAM unit to automatically keep its system time correct by synchronizing with an NTP server.
To configure the date and time manually:
- Go to Dashboard > Status.
- Select the System Information widget and then click Configure settings in System > Settings.
- From the Time Zone dropdown, select a timezone.
If you want to change the date and time manually, select Manual Settings for Set Time:
- In Date, either enter the date or select the Calendar icon and then select a date.
- In Time, either enter the time or select the Clock icon and then select a time.
- Click Apply to save changes.
To automatically synchronize FortiPAM unit's clock with the NTP server:
- Go to Dashboard > Status.
- Select the System Information widget and then click Configure settings in System > Settings.
- From the Time Zone dropdown, select a timezone.
- In Set Time, select NTP.
- In Select Server, either select Fortiguard or Custom.
If you select Custom, enter the Custom Server IP Address.

Custom server details must be configured in the CLI.
- In Sync interval, enter how often, in minutes, that the device synchronizes time with the NTP server.
- Click Apply to save changes.